This is the multi-page printable view of this section. Click here to print.
General Support Topics
- 1: Activity Screen Walkthrough
- 2: Best Practices
- 3: Changing Interface Locale
- 4: Changing Presenter Language When Streaming
- 5: Cvent Widget
- 6: Restoring Original Sound in Zoom
- 7: Sharing Minutes Between Accounts
- 8: Transactions Screen Walkthrough
- 9: Webex Support and Wordly
1 - Activity Screen Walkthrough
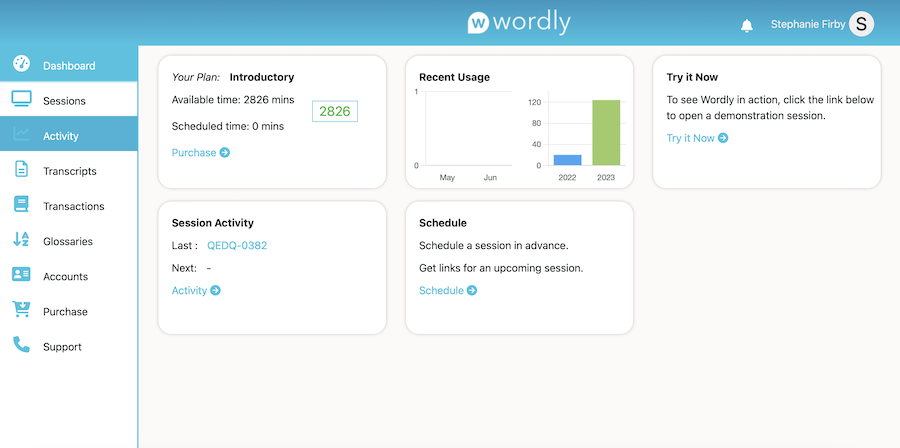
The Activity screen allows you to track the date, duration, minute use, and all other session activity. You can also:
- Track how many sessions you’ve attended.
- Track how much time you’ve used.
- Track which sessions are currently active.
- Download transcripts of sessions.
Navigating to the Activity screen
To access the Activity screen from anywhere within Wordly:
-
Move the mouse cursor to the left side of the screen.
-
Click on Activity (
) from the expanding menu, as seen here:
Overview
-
Sessions are listed on the left side of the screen by Session ID and Date only.
-
Click on a session to open up the Usage Summary for that session on the right side of the screen.
-
Click the Transcript icon (
 ) within the Session details page to be taken to the transcript of that session. See the Transcripts Page Overview Article for more information about transcripts.
 -
Click the Options dropdown in the top right corner of the screen to download an activity report:

Activity reports are Microsoft Excel spreadsheets (.CSV files) that detail everything that happened during a session.
Activity report notes
-
Activity is reported from the time a session starts to the time Wordly receives a command to “end” the session.
-
Occasionally, the length of a session reported on the Activity Screen won’t match the time reported on the Transaction screen (indicated as Used Minutes).
-
2 - Best Practices
Audio Tips
We suggest using high-fidelity audio equipment such as headsets, headphones, earbuds, or boom microphones, preferably with noise-canceling technology.
Advise your presenters to avoid using integrated laptop microphones, which capture too much background noise. If a laptop microphone is the only option available, we suggest turning the microphone gain levels up as high as possible in their laptop system’s audio settings.
Coach your speakers
-
If you have multiple presenters, make sure they know to speak one-at-a-time and avoid interrupting or speaking over each other.
-
Presenters should know to enunciate clearly.
-
Avoid using music with lyrics.
-
Presenters should speak at a moderate pace, pausing between sentences briefly.
-
Advise your presenters to pick a single language to speak in.
-
Make sure your presenters have sufficient bandwidth to support high-quality audio capture.
Create Glossaries
-
Glossaries are custom libraries which significantly increase the accuracy of Wordly’s transcription results. Without a glossary for reference, Worldly may be unable to properly transcribe unique phrases, words, and terminology that may be specific to your organization, employees, or departments. Check out this article to learn how to create glossaries.
-
Make sure to create glossaries for all the languages which presenters will be speaking.
Set Practical Expectations
Many variables can affect the accuracy of Wordly’s translation, including available internet bandwidth and possible issues with hardware, software, and operating systems. Make sure to let your presenters know that while they should expect a great experience with Wordly, errors are possible.
3 - Changing Interface Locale
How to change your locale in the Portal
-
Click on your profile icon at the top right of the page and select Profile.
-
You will see your profile information, go to the last item (Locale). Click on the Locale icon.
-
Select your desired language from the dropdown menu. We currently support Japanese, French, Spanish, and English.
-
Click Change Locale when finished.
How to change your locale in the Attend app
-
At the bottom of the Attend page, you will see “Learn About Wordly Interpretation”. Under that section in grey print, to the right of “Terms of Service”, click on the Locale icon
-
Select your desired language from the dropdown menu. We currently support Japanese, French, Spanish, and English.
-
Click Apply when finished.
4 - Changing Presenter Language When Streaming
Intro
The Presenter Language (also called “Streaming Language”) is initially set up when adding a session. However, it’s possible to change it during a stream if necessary.
The method of changing the Presenter Language is different depending on how audio is being sent to Wordly:
-
If audio is being sent to Wordly via Zoom or RTMPS, you must select and toggle the streaming language in your Wordly Portal. See Changing the Presenter Language in Wordly below.
-
If each speaker in your meeting is sending their audio to Wordly via https://join.wordly.ai, then see “Join Instructions” below.
-
If audio is being sent to Wordly via the mobile app, see “Mobile App Instructions” below.
Changing the Presenter Language in Wordly
-
With the session in progress, Go to Wordly’s Sessions page and use your meeting’s session ID to locate the session. Click on the black gear button to open the Live Session Controls box.
-
Click Change Streaming Language and select your desired language from the drop down menu:
-
Click Change when finished:
If successful, a green SUCCESS box will appear briefly in the top-right corner of the screen. See the below image:
Note
Clicking change must be done at least 2 seconds before your speaker begins talking in that language.
Switching languages
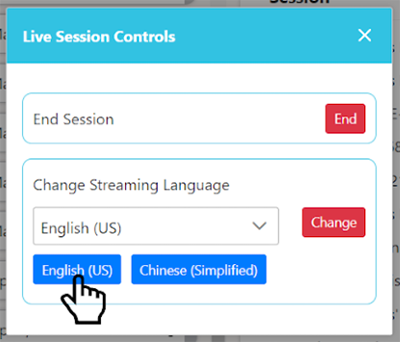
When you add a language to a session, a blue toggle button with the language you just added will appear within the Live Session Control box.
To switch between languages, simply click the blue toggle button of the language you want to use at least 2 seconds before a presenter begins speaking in that language. See the image below:
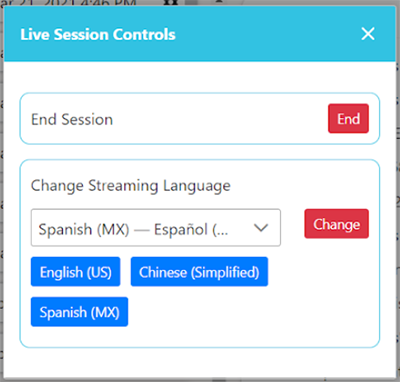
You can add as many languages as you like to a session, and Wordly will create a blue toggle button for each language.
To add new toggle buttons, you’ll need to select a language from the list and click on the red Change button:
Once you click on the red Change button, the new language will take effect 2 seconds later, and you’ll have created a new blue toggle button for that language. See the image below:
Changing the Presenter Language in Wordly Join
-
Once you join an active session through a Wordly Join link (https://join.wordly.ai), you’ll see a screen similar to the one below. In this example, Worldy is currently expecting the presenter to speak in English:
-
To change the language Wordly expects to hear, click on the triangle button to the immediate right of the current language, as seen below:
-
This will open the dropdown menu of available languages. Select the language you want to speak.
Note
You can also click on the “down” arrow button on the far right side of the screen. This will open a new row that includes the two languages most recently selected, which you can toggle between. -
Confirm that your preferred language is now visible at the top of the screen, as seen below:
Mobile App Instructions
-
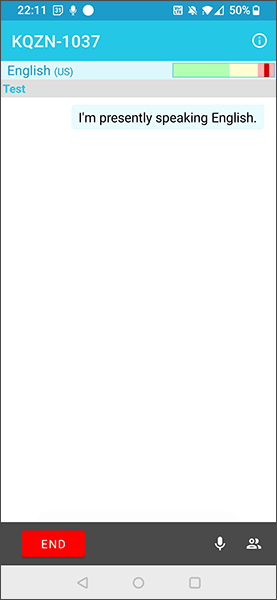
Open the Wordly mobile app and start a session or join an existing one. You’ll see a screen like this:
-
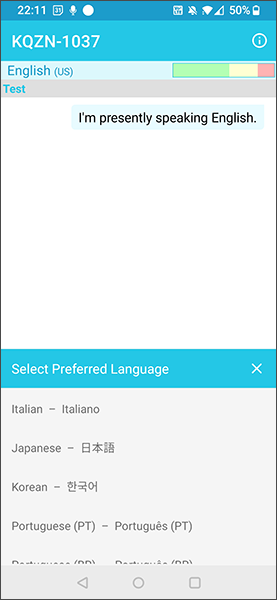
Tap the named language (“English (US)” in this example) near the top left corner of the screen. This will open the language menu at the bottom of the screen, as seen here:
-
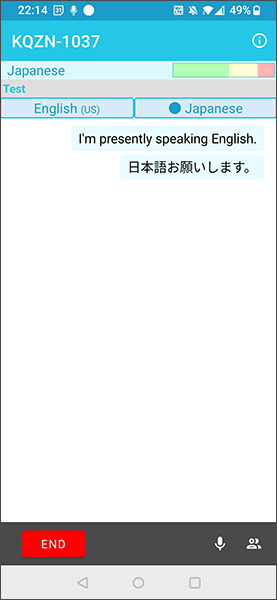
Tap on your preferred language. In the example below we’ve selected Japanese, which now appears in the top left corner as the active language. Wordly will now translate what speakers say into this chosen language:
-
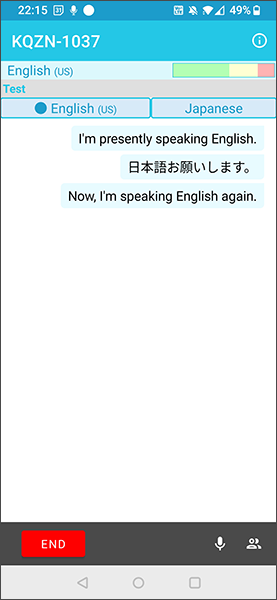
To switch back to your initial language, tap the blue button with that language near the top of the screen. As you switch languages, up to 3 buttons can be displayed. In this manner you can switch between your preferred languages rapidly. In the example below we’ve switched back to English (US).
Note
The currently active language is indicated with a blue circle.
5 - Cvent Widget
The Cvent Widget allows you to integrate the Wordly App into the Cvent Attendee Hub for your webinars and conferences, providing a cohesive translation experience.
Setting up the Cvent Widget
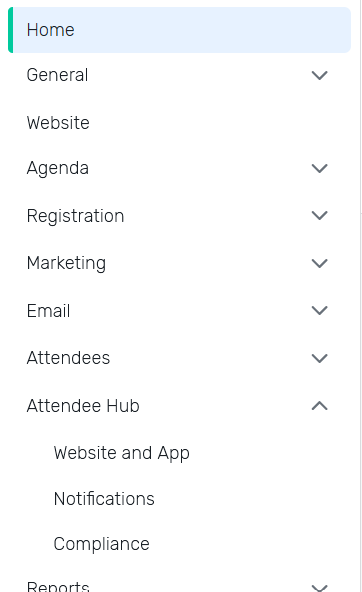
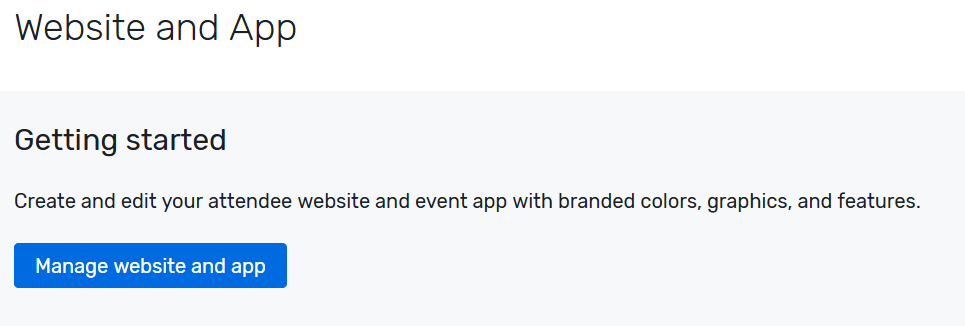
- In Cvent, begin by selecting your event. From the left-hand navigation, click Attendee Hub, then Website and App.
- Click on Manage website and app. This will take you to the Event App Builder.
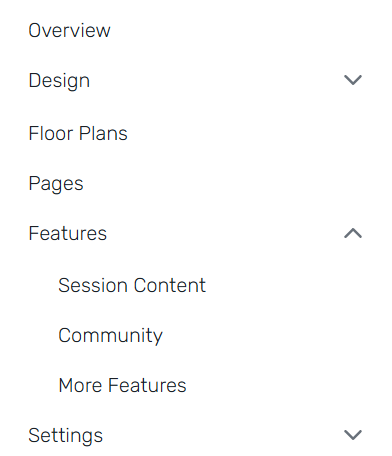
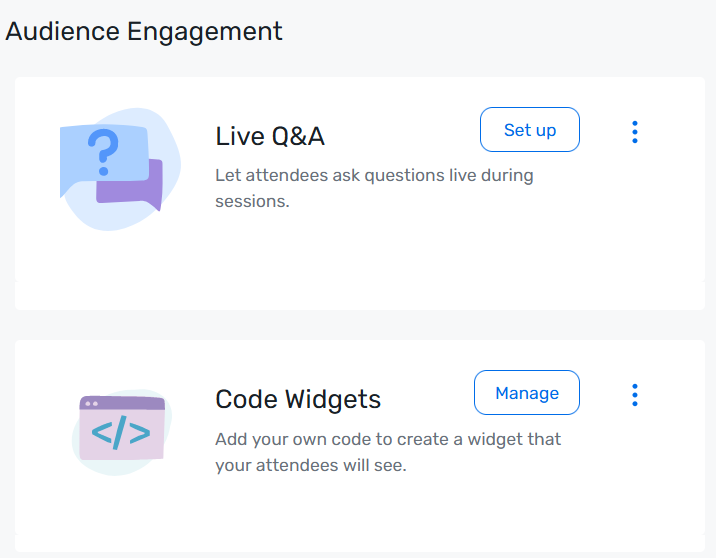
- In the left-hand menu, Click on Features, then Session Content. Scroll down to Code Widgets, then click on Set Up or Manage.
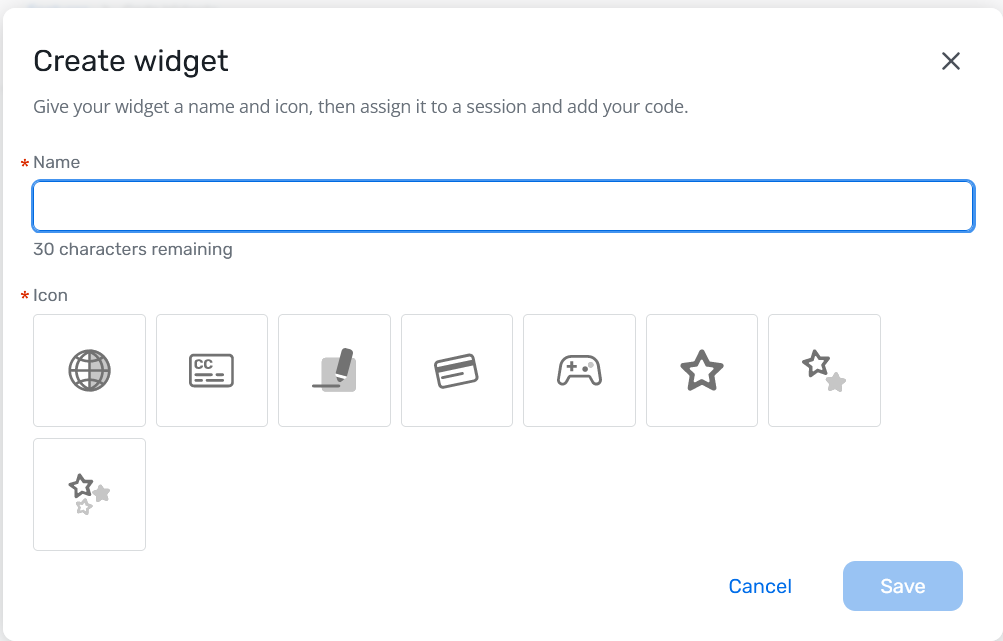
- Click Create code widget to the left of the canvas. Enter in a name and select an icon to represent your widget.

-
Click Select Session then select the session to which you’d like your widget assigned. Then click on Add code to the right of the session name.
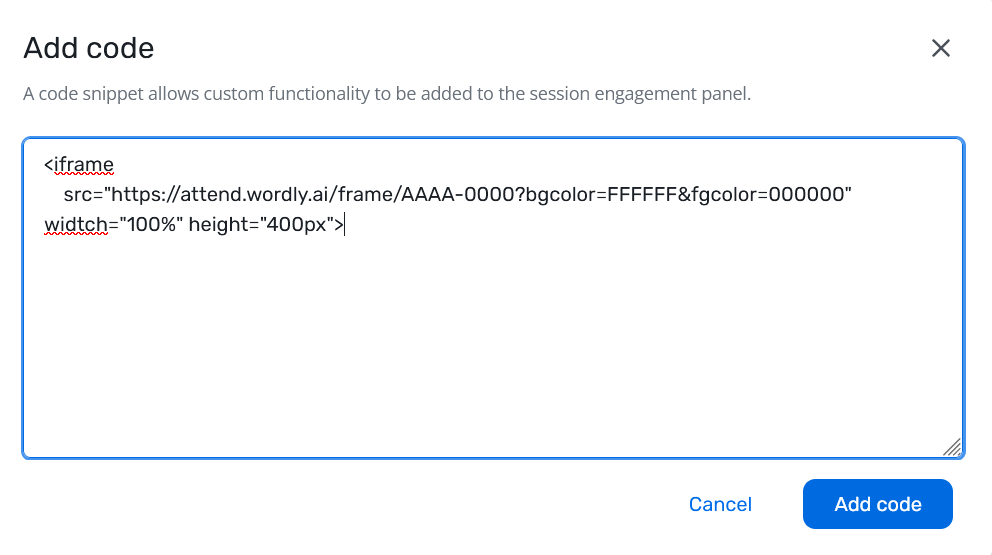
a. In the text box, enter the iframe code for your Wordly session in the following format:
<iframe src="https://attend.wordly.ai/frame/AAAA-0000?bgcolor=FFFFFF&fgcolor=000000" width="100%" height="400px">b. Do not include a terminating tag.
Note
Be sure to replace “AAAA-0000” in your iframe code with the Session ID for your Wordly session.

Verifying Wordly Widget Was Successfully Added
-
Click on Overview, then click on Visit Website at the right of the page.
-
Navigate to your session, and click on the Session Title. This will take you into the session where you will be able to see the Wordly Widget at the right side of the screen.
-
Click on the widget to see if the iframe you have installed.
a.
<iframe src="https://attend.wordly.ai/frame/AAAA-0000?bgcolor=FFFFFF&fgcolor=000000" width="100%" height="400px">
6 - Restoring Original Sound in Zoom
Standard Zoom audio changes the way speakers sound in an attempt to improve audio quality. Unfortunately, this introduces distortions in the speech pattern of spoken audio, which can degrade the quality of Wordly’s translation.
It’s possible to restore the original quality of Zoom’s audio by following the steps below. Wordly translations will be significantly better in all languages when “Original Sound” is used:
-
Run Zoom.
-
Start a Zoom meeting or join an existing one.
-
Once you’re in the meeting, click the up arrow next to the Mute button in the bottom-left corner:

-
Click Audio Settings…

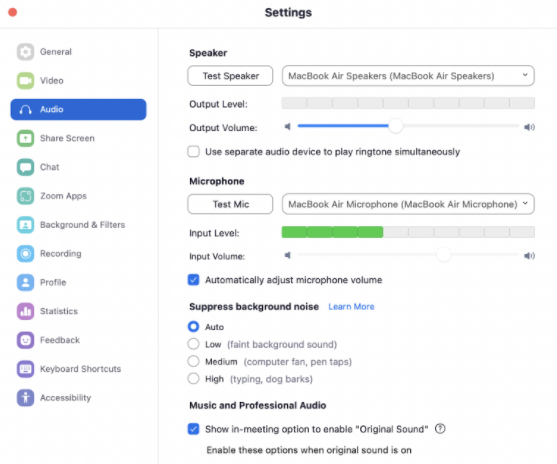
This will open the Zoom Audio Settings window:
-
Under Music and Professional Audio, check the following boxes:
- Show in-meeting option to enable “Original Sound”
- Echo cancellation
-
Uncheck all other options within Music and Professional Audio, as seen below:
-
Close the Settings window, and Leave the current Zoom meeting.
-
Rejoin the meeting you were in, or start a new one. In the top-left corner of the meeting window you’ll see the following:

-
Click on Original Sound: Off (and not the arrow). It will change to the following:

You are now using Zoom’s Original Sound setting. To deactivate original sound or change your audio options, return to Zoom’s Audio Settings screen.
7 - Sharing Minutes Between Accounts
Follow the steps below if you want to share billable minutes between multiple accounts.
There are two prerequisites for sharing minutes:
-
The Wordly accounts you want to share minutes with must already exist.
-
If you intend on manually sharing minutes between multiple accounts, you’ll need more than one web browser (Chrome, Safari, Firefox, Edge, etc) installed on your computer so that you can log in to both accounts simultaneously.
- If you attempt to use the same browser to log into another account, Wordly will automatically sign you out of the current active account.
- If you attempt to use the same browser to log into another account, Wordly will automatically sign you out of the current active account.
Sharing minutes
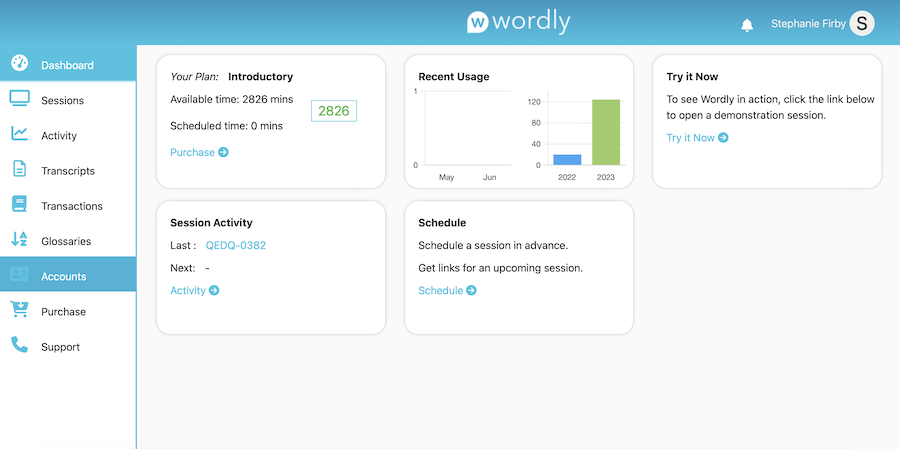
When you first login to Wordly, you’ll automatically start on the Dashboard:
-
Move the mouse cursor to the left side of the screen
-
Click on Accounts (
 ) from the expanding menu to open the accounts page, as seen here:
-
From the Accounts page, click on + Add Account (
 ) in the top right corner:
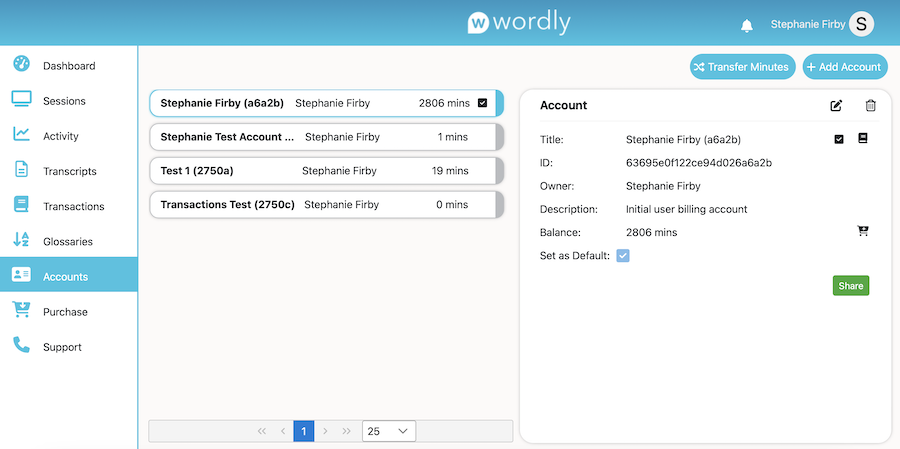
This will open up the Add Account window: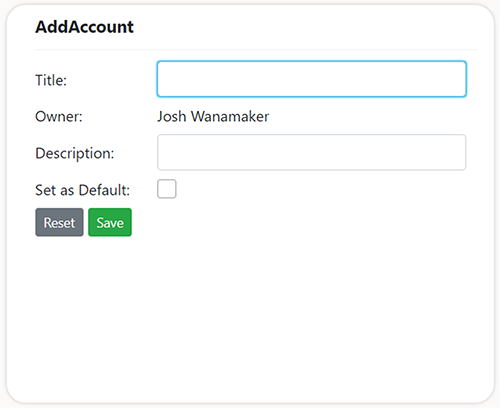
-
Enter a Title and Description for the pre-existing account you want to share minutes with.
Caution
Avoid checking the Set as Default box, as this will change your default account to the one you’re adding. -
Click Save (
 ) when ready.
-
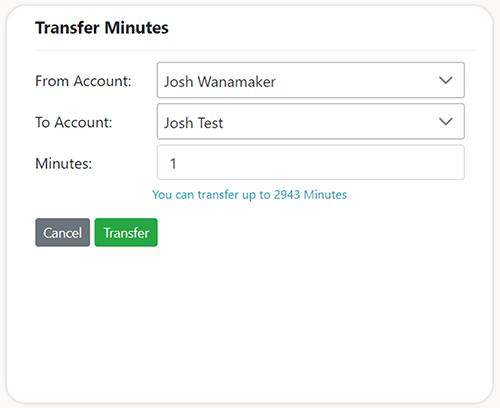
With the account added, click Transfer Minutes (
 ) in the top right corner. This will open up the Transfer Minutes window:
-
In the From Account dropdown, choose your current account if it’s not already selected.
-
In the To Account dropdown, choose the pre-existing account you just added in step 5.
-
In the Minutes Dropdown, enter the number of minutes that you want to share and click Transfer (
 ).
).
-
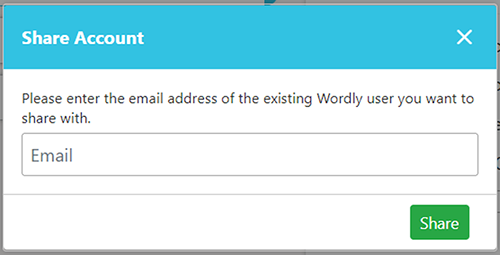
Click Share (
 ) to open the Share Account window:
-
In the Share Account window, enter the email address associated with the pre-existing account you want to share minutes with, and click Share (
 ).
).
Note
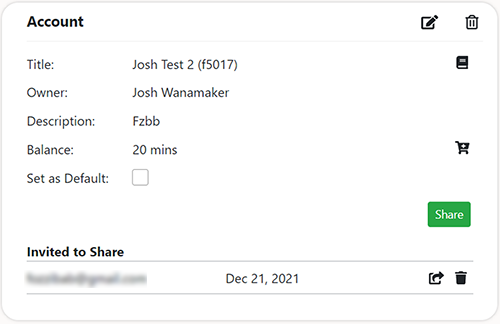
No actual email is sent during this step. This is a verification process to ensure the minutes are going to the correct account.If successful, you’ll see that the account has been sent an invitation to share minutes:
-
Click the edit button (
 ) to edit the account information.
 -
Click the white trashcan button (
 ) to delete the account.
 -
Click the book button (
 ) to go to the Transactions page.
 -
Click the shopping cart button (
 ) to go to the Purchase page and buy more minutes.
 -
Click the send icon button (
 ) to send another invitation to the account.
 -
Click the black trashcan button (
 ) to cancel the invitation.
-
-
Open up your alternative web browser (Chrome, Safari, Firefox, Edge, etc) and log in to the account you shared minutes with. You’ll automatically start on the Wordly Dashboard:
-
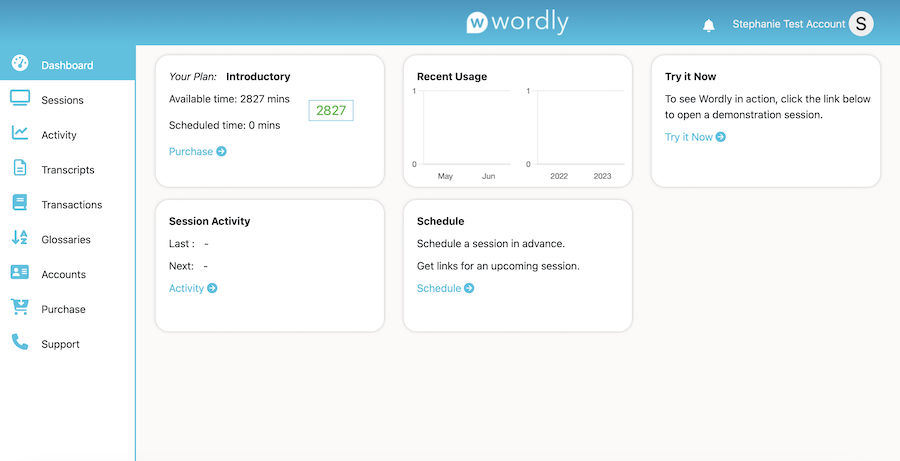
Note that this account will have the 20 free minutes provided to every new Wordly account, indicated on the left side of the page.
-
Also Note the bell icon the top right corner of the screen, indicating you have a new alert.
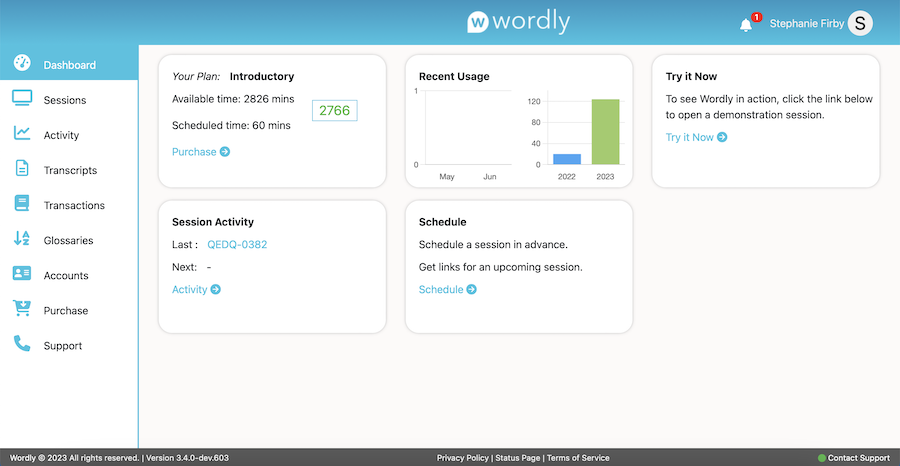
-
-
Click the bell icon to open the Alerts page and see the invitation:
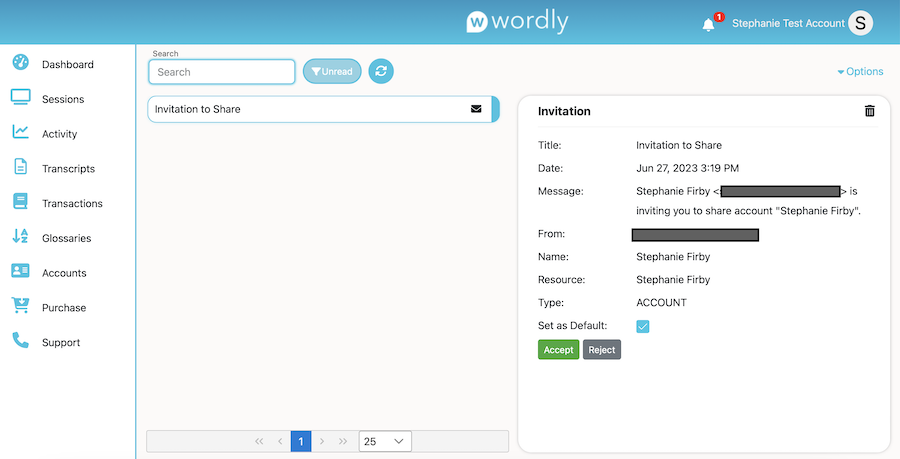
Note
If you want your alternative account to use the shared minutes, make sure to check the Set as Default box at this point. If you create multiple accounts, you’ll need to switch whichever account will be using the shared minutes to be the default for the duration of the session. -
Click Accept (
 ), and then Yes on the following confirmation dialogue box:
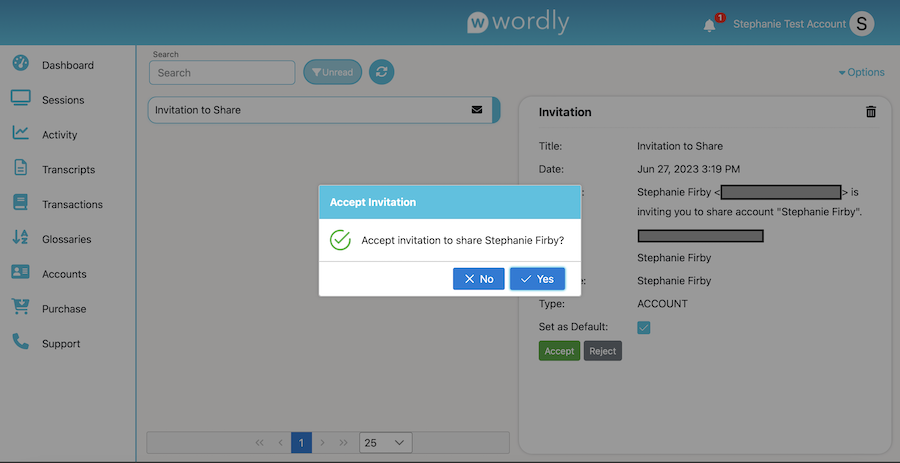
-
In the following window, click the Resolved check box to close the issue and remove the alert from the account:
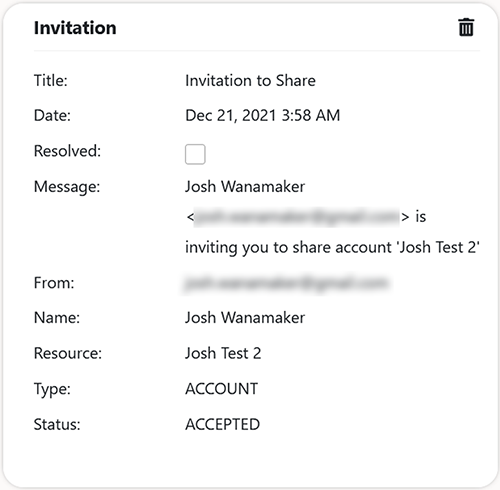
-
You’ve now successfully shared minutes between accounts. Return to the Dashboard to see your updated minutes on the left side of the screen. In the example below, there are now 40 minutes available.
8 - Transactions Screen Walkthrough
The Transactions screen lists every addition and subtraction of billable minutes from any of your accounts, as they occur.
Note
If you need to know how much time was billed to your account for a session, use the value on the Transactions screen only. Do not use the value on the Activity Screen.Navigating to the Transactions screen
To access the Transactions screen from anywhere within Wordly:
-
Move the mouse cursor to the left side of the screen.
-
Click on Transactions (
) from the expanding menu, as seen here:
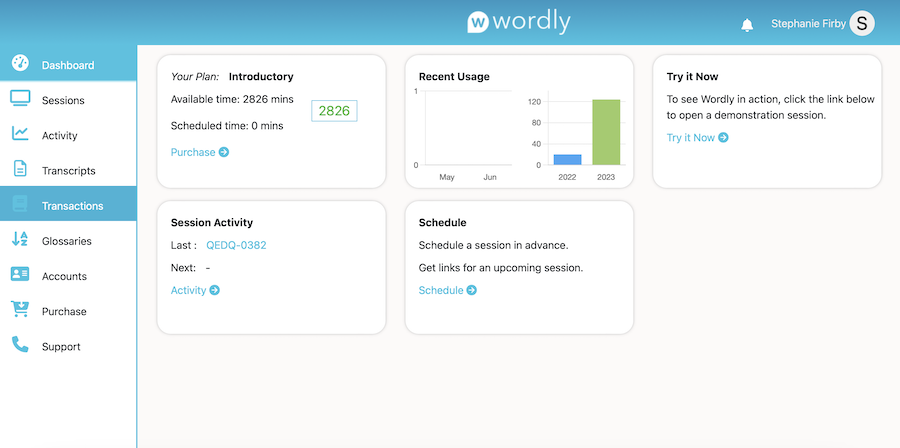
This will take you to the Transactions screen.
Overview
Below is a screenshot of the Transactions screen. See the following information for details on the layout:
-
Transactions are listed on the left side of the screen by date and the number of minutes added or subtracted.
-
Click on a transaction to open up the Transaction details for it on the right side of the screen.
-
If you have access to more than one account, you can select it from the Account dropdown near the top of the left side of the screen, as seen here:
-
To the immediate right of the Account dropdown is the total number of minutes available for the selected account.
-
Click the Options dropdown in the top right corner of the screen to download a Transaction report:
Transaction reports are Microsoft Excel spreadsheets (.CSV files) that detail every transaction attributed to an account.
9 - Webex Support and Wordly
Wordly can be seamlessly integrated into Webex to enable meeting and Webinar attendees to participate in the language of their choice. Follow the instructions below to integrate Wordly into your Webex platform.
This guide covers:
- Configurations of your settings on Webex
- Initiating Wordly from a meeting or Webinar
- Displaying real-time translation or transcription
- Hearing audio in translated language
To use Wordly with Webex, you’ll need the following:
-
A Wordly account with available minutes.
-
A valid Webex account with administrator credentials. These are necessary to enable features on the Webex platform. (Contact your Webex administrator if you have any questions or need permissions on your Webex account).
Setup
Step 1 - Create a Wordly session
Create a session on the Wordly portal for the same time as your meeting/webinar. If you’re unsure how to create a session, check out the Adding a Session article first.
Note
Make sure to set the language of the session to the same language the presenter of your meeting/webinar will be speaking.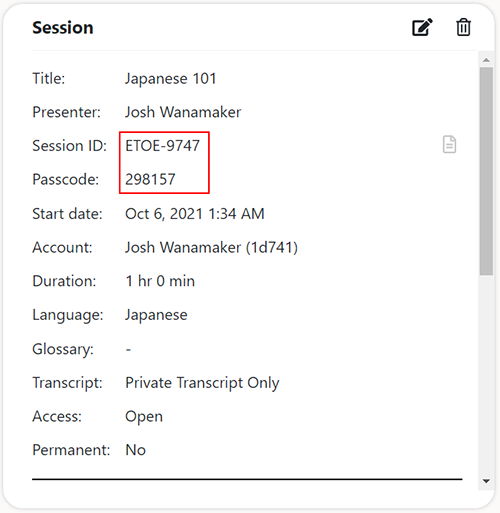
Step 2 - Enable “Other Streaming Services” in Webex
-
Sign in to your Webex account as an administrator.
-
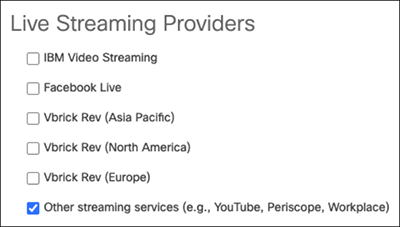
Navigate to Common Settings > Site Options > Live Streaming Providers and check the Other streaming services box:
Step 3 - Enable “Live Streaming” in Webex for individual users
Check out the section at the bottom of this Webex support article to learn how to enable live streaming for individual users.
Step 4 - Start your meeting or Webinar
Step 5 - Start “Live Streaming” for your meeting
-
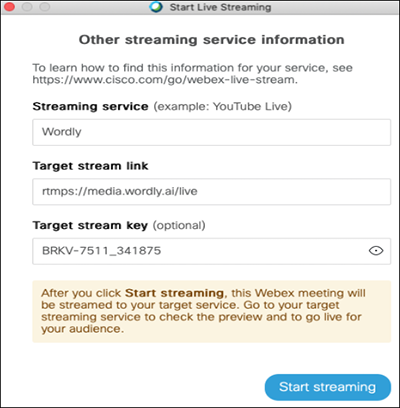
When you initiate Live Streaming in Webex, a window will appear asking for service information for “Other streaming services”. Enter the following info:
- Streaming Service: Wordly
- Target stream link: rtmps://media.wordly.ai/live
- Target stream key: Wordly Session ID_Wordly Session Pass Key. See the following Example: ETOE-9747_298157
-
Click on Start streaming.
-
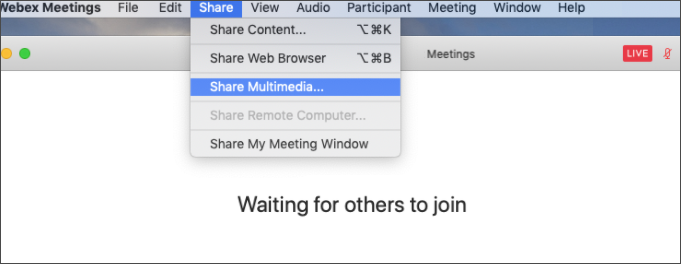
Select Share > Share Multimedia from the Webex menu:
-
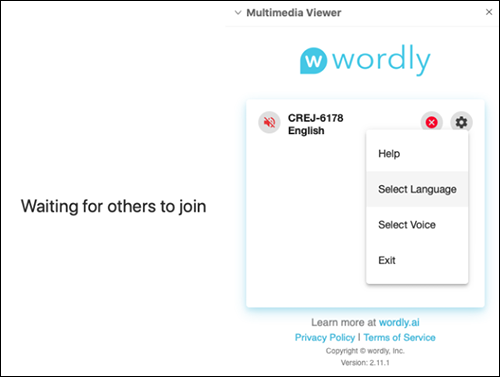
Enter the following URL to share : https://attend.wordly.ai/enter/SESSION-ID
-
The audience can now pick the language of the translation they see by clicking on gear button (
) and selecting a language:
Setting a language for the audience
Follow the steps below if the audience wants to hear the translation in a specific language.
-
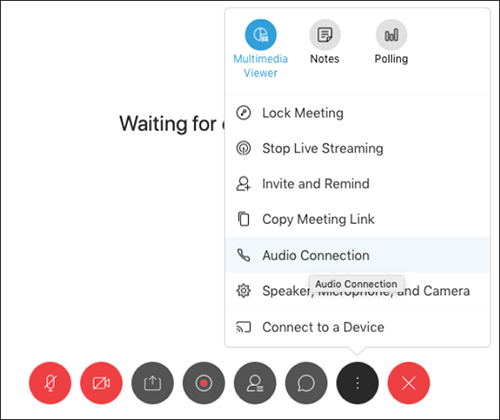
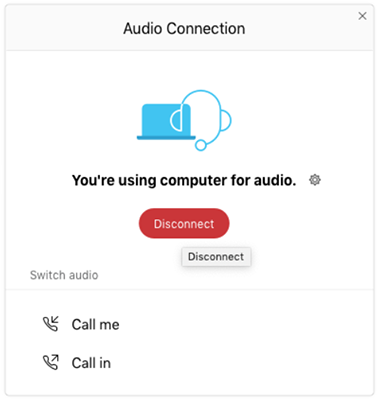
In Webex, click on Multimedia Viewer and select Audio Connection:
-
Click Disconnect:
-
Unmute the speaker icon on the Wordly multi-media window
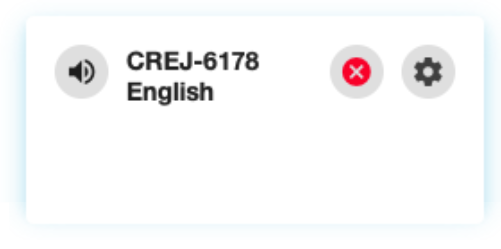
Users should now be able to hear the translated audio.
Known limitations:
-
All meeting conversations should happen only in one language.
-
Translation quality will be significantly affected if people speak in a language other than what is selected by the host as the default language for the meeting.
-
There is an inherent delay between when a speaker completes a sentence and the sentence being correctly translated into another language.
-
Transcripts are only accessible to the host and in the default language the meeting is hosted in.