This is the multi-page printable view of this section. Click here to print.
Creating and Using Wordly Sessions
- 1: Adding a Session
- 2: Attending a Session (Quick)
- 3: Capturing Audio for Wordly with Any Platform
- 4: Downloading QR Codes
- 5: In-Person Session Setup
- 6: Meeting Shortcuts
- 7: Uploading Sessions
- 8: Attending a Session (Advanced)
1 - Adding a Session
When you first login to Wordly, you’ll automatically start on the Dashboard:
To access the Sessions page:
- Move the mouse cursor to the left side of the screen
- Click on Sessions (
) from the expanding menu, as seen here:
Adding a Session
Note
Zoom users will experience a different setup process. Check out this these help articles If you’re using Zoom to add a new session.If you’re using a web browser to log in to Wordly, click + Add Session (  ).
).
This will open up the following menu:
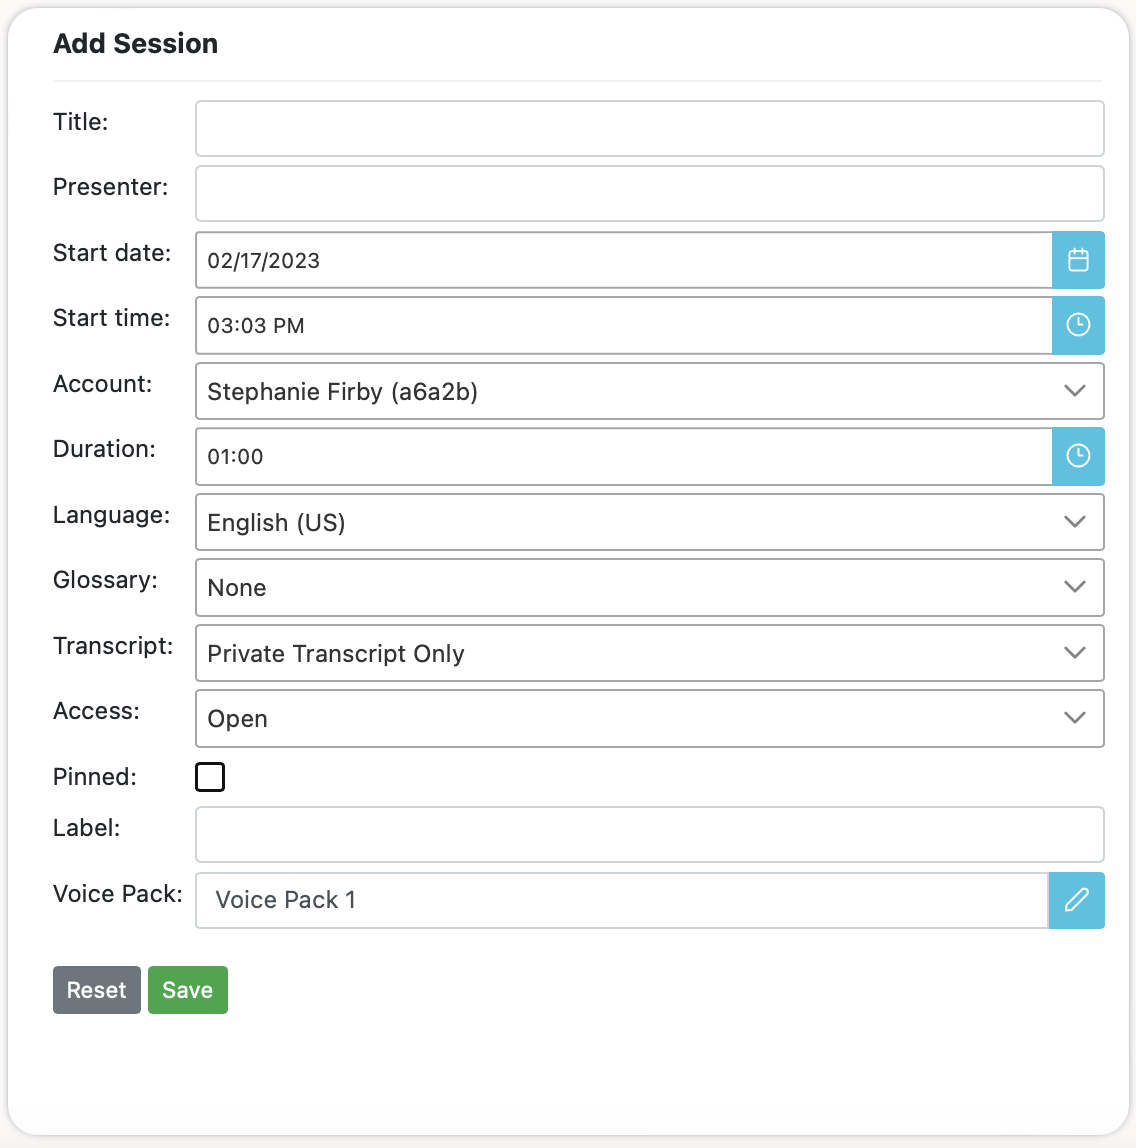
Fill in the following information as it appears:
Title
The name of your session. At the moment, session titles only display within the list of sessions on the left side of the Sessions page, and within exported session transcripts.
Presenter
The name of the person Speaking during the session.
- If the presenter will be using a streaming interface (Zoom, etc), this field will be auto-populated with “Wordly”.
- However, if the presenter uses the Join App or the Wordly mobile app as their audio source, then their actual name will come up.
Start Date
The date the session is planned to start.
Note
If a session doesn’t start within 48 hours after it’s scheduled to begin, it will automatically be removed.Start Time
The time the session is planned to start.
- While it’s required to include a start time, a session isn’t required to begin at the indicated time, as long as it starts within 48 hours after the set time.
Note
The time zone of the session is automatically determined by your browser. If you’re in PST and want to create a session for JST, you’ll need to update your system time/date/location to reflect the time zone you wish to schedule for.Account
The account field will be auto-populated with your account information. If you have multiple accounts or use a shared account, select the account you wish to bill from the dropdown.
Duration
The desired length of the session by hours and minutes. The duration you set will add to your scheduled minutes on the Wordly dashboard.
- 01:00 = 1 hour
- 00:30 = 30 minutes
Note
To learn how minutes are charged by Wordly, check out the Billing Minutes section below.Language
Choose carefully, as the selected language is what Wordly translates from. For example, if the presenter of your session will be speaking French, the chosen language should be set to French, even if the intent is to have Wordly translate it into another language.
- It’s possible to change the language of a session after the session has started, as well as during an active session. Check out this article for instructions.
Glossary
Select a pre-made glossary.
- Only 1 glossary can be used per session.
Transcripts
Transcripts are written/printed versions of all the dialogue spoken during a session. At the moment, transcripts are only available to private accounts, and can’t be shared through Wordly. Choose an option from the dropdown:
- Save No Transcripts - No transcripts will be saved.
- Private - Transcripts will be saved to your account automatically on completion of a session, in the chosen language of the speaker.
- Allow Public Transcripts - Not functional at this time.
Access
Access determines who can attend a session and the security required to enter. There are two options available:
- Open - Anyone with an Attendee Shortcut (see below) can attend the session.
- Require Attendee Passcode - Determines whether or not a passcode is required to join the session. The passcode must be at least 6 characters.
“Pinned” checkbox
Typically, 24 hours after a session begins, it is moved from the Upcoming list to the All list. Checking the Pinned box retains the session in the Upcoming list indefinitely.
When you’re ready to continue, click Save ().
-
To edit an existing session, select it from the list on the left side of the screen, and click the Edit icon (
) in the Session Details box on the right.
-
To delete an existing session, select it from the list on the left side of the screen, and click the trashcan icon (
) in the Session Details box on the right.
Label
Labels allow the user to add a word or phrase to their session so it is easier to search for later.
Voice Pack
Sessions can be assigned a voice pack. A voice pack is a curated list of voices for the Wordly attendee languages.
-
If you do not specify a voice pack when creating a session, then the created session will use the voice pack selected in your Wordly profile. By default, your profile will be set to use the default voice pack, which is currently Voice Pack 1.
-
You can sample the voice packs for different languages when editing a session or updating your profile in the Wordly Portal.
Session Lists
Once your session is saved, it will be visible on the left side of the session screen. The Upcoming list shows sessions scheduled for the future or pinned sessions. Clicking All to the right of Upcoming will show all sessions, past and present.
Sharing the Session
Once you’ve finished adding a session, you’ll be provided with a series of links to send to attendees and presenters.
Attendee shortcuts
Attendee Shortcuts are intended for viewers/listeners only. Please do not get these confused with Meeting Shortcuts (see below), which are intended for speakers/presenters.
-
Share the provided link with anyone you want to attend your sessions. Click the email icon (
) to open your computer’s email client with a pre-populated message containing the provided link.
-
Click the copy icon (
) to copy the provided link to your system’s clipboard.
-
Alternatively, provide the QR code so that anyone with a smartphone can scan it via their camera app. The QR code can be easily printed by clicking the print icon (
).
Meeting shortcuts
Meeting Shortcuts are intended only for those people who you plan on presenting during this session. It’s important not to get these confused with Attendee Shortcuts (see above), which are intended for viewers/listeners only. Please use Meeting Shortcuts cautiously.
For security purposes, a six-digit passcode is required to access a session as a presenter.
-
For convenience, the top link includes the passcode.
-
For additional security the bottom link will ask for the passcode, which can be provided separately.
Streaming Shortcuts
-
Click the “email” icon to open your computer’s email client with a pre-populated message containing the provided link.
-
Click the “copy” icon to copy the provided info to your system’s clipboard.
Certain services (such as Vimeo) might not work with the information provided in the top-half of the box. If you’re having trouble streaming, try using the alternative links provided at the bottom of the box.
Note
For additional help with streaming through Wordly, check out this guide.Billing Minutes
-
Minutes are not charged based on the duration of a session, but actual used minutes.
-
For example, if a session is set for 1 hour but lasts only 37 minutes, only those 37 minutes are charged.
-
Conversely, If a session is set for 1 hour but goes 1 hour 5 minutes, 65 minutes will be charged.
-
-
Minutes stop being charged either when the stream to the session is ended, or when the presenter mutes their microphone.
-
Sessions do not end automatically at the end of the scheduled duration.
-
If you’re streaming, you must end the stream manually to avoid having minutes charged.
-
To prevent the usage of unused minutes, you’ll need to manually** end the session** when finished. Otherwise, Wordly will continue to bill your minutes until either your minutes run out, or the session is ended automatically.
- To prevent minutes being charged accidentally, Wordly will automatically end a session after two hours if no stream is detected.
2 - Attending a Session (Quick)
Browser
To attend a session in a web browser, you must have first received an Attendee Link.
-
Click the Attendee Link. It should look like this: https://attend.wordly.ai/
-
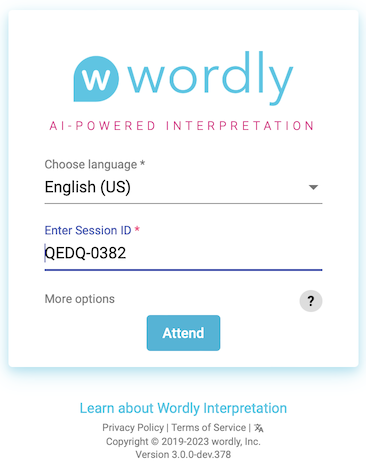
Once clicked, a Wordly Attend page will automatically open in your default browser:
-
Choose the language you want Wordly to translate spoken dialogue into.
- Example: If the speaker is speaking in English and you want to translate into French, select French.
-
If it’s not already filled in, enter the Session ID.
-
The Session ID is always four-letters and four numbers.
-
If not provided to you, you can sometimes find the Session ID at the end of the Attendee Link you were sent.
- Example : https://attend.wordly.ai/join/RNBR-7474
-
-
When ready, click the Attend button (
 ) to start.
 -
When finished, close the browser, the tab, or click the exit button (
 ) to leave the session.
Mobile browser
To attend a session on a mobile device’s web browser, you’ll need an Attendee Link or QR code to scan.
Attendee link
Attendee links are typically sent through email or text message.
-
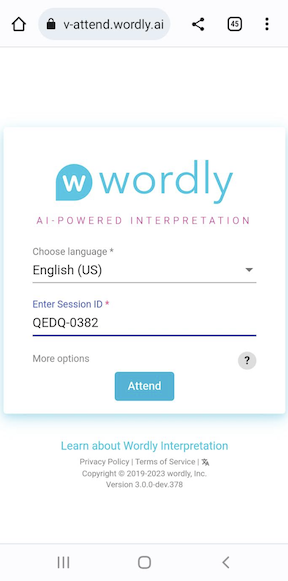
Tap the Attendee Link. This will automatically open Wordly in your device’s default browser:
-
Tap on the language dropdown to choose the language you want Wordly to translate spoken dialogue into.
- Example: If the speaker is speaking in English and you want to translate into French, select French.
-
If it’s not already filled in, enter the Session ID number.
-
The Session ID is always four-letters and four numbers.
-
If not provided to you, you can sometimes find the Session ID at the end of the Attendee Link you were sent.
-
Example : https://attend.wordly.ai/join/RNBR-7474
-
-
When ready, tap the Attend button (
 ) to start.
 -
When finished, close the browser, the tab, or click the exit button (
 ) to leave the session.
QR codes
Follow these steps to attend a Wordly session through a QR Code:
-
Use your mobile device’s camera or barcode scanning app to scan the QR code, which will appear similar to this:

The Wordly Attend window will automatically open in your device’s default browser:

-
Tap on the language dropdown to choose the language you want Wordly to translate spoken dialogue into.
- Example: If the speaker is speaking in English and you want to translate into French, select French.
-
If it’s not already filled in, enter the Session ID number.
-
The Session ID is always four-letters and four numbers.
-
If not explicitly provided to you, you can sometimes find the Session ID at the end of the Attendee Link you were sent.
-
Example : https://attend.wordly.ai/join/RNBR-7474
-
-
When ready, tap the Attend button (
 ) to start.
 -
When finished, close the browser, the tab, or click the exit button (
 ) to leave the session.
3 - Capturing Audio for Wordly with Any Platform
Wordly needs access to session (webinar, meeting, conference session, so on) audio, so Wordly can output real-time translation. With video conference platforms like Google Meet, Discord, or Microsoft Teams, Wordly needs a way to “hear” all the audio from the meeting.
The overall idea is to attend your platform meeting in one window of your computer and run Wordly to capture the audio in another. Then you will connect the two windows together using a virtual audio cable. There are a number of ways to do this; this document will address one method that uses a third-party application called VB-Cable.
Pre-requisites
To capture audio from all participants, rather than only audio from your mic, you will need:
-
A second computer not in use by a meeting participant. (You could use only one computer, but you wouldn’t be able to hear the meeting.)
-
VB Cable application or alternative software. VB-Audio Virtual is a third party not associated with Wordly.
-
A Web browser (to best capture audio, Wordly recommends Chrome).
Only one computer attending the meeting will need these downloaded. This computer will act as the audio routing device to Wordly for the entire meeting.
Setting Up VB Cable
You will only need to do this once. Please move to Preparing to Capture Your Meeting Audio if you have already downloaded and installed VB Cable.
- Download VB Cable.
VB Cable can run on either Windows or Mac. Follow directions on VB Audio’s site for your operating system.
- Install VB Cable.
Preparing to Capture Your Meeting Audio
-
With the second computer, join your virtual meeting as an attendee. Do not join as a host or panelist.
-
Mute the meeting on the second computer.
Connect Meeting Audio to Wordly through VB Cable
-
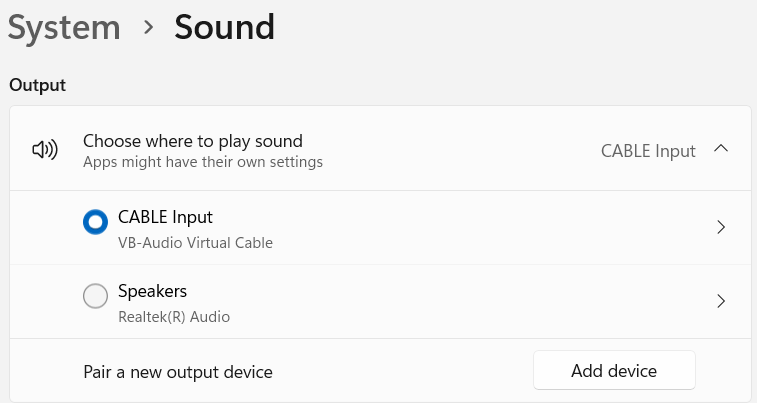
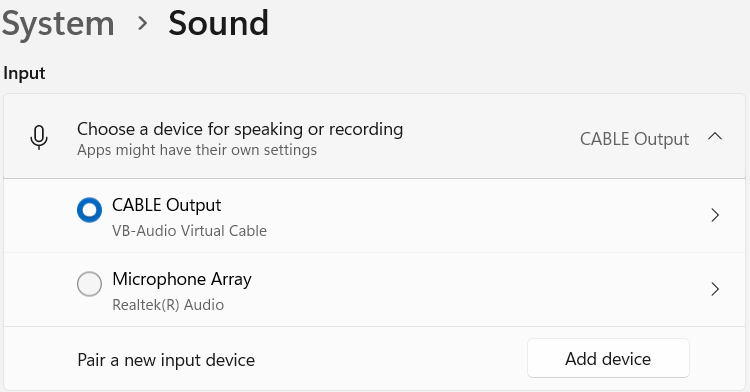
Go to system settings, sound.
-
Change audio input and output to VB Cable.
-
Launch Chrome.
-
Go to Wordly Portal, then go to Sessions
.
-
Select your Wordly session.
-
In Meeting Shortcut, click on the top link.
-
Clicking the link will bring you to Wordly Join. Join the session.
-
Make sure the microphone icon on the Meeting Shortcut is not muted. Make sure your browswer has permission to use the microphone.
-
Click the upper right hand three dots within the Meeting Shortcut.

- Click settings, then select VB Cable.

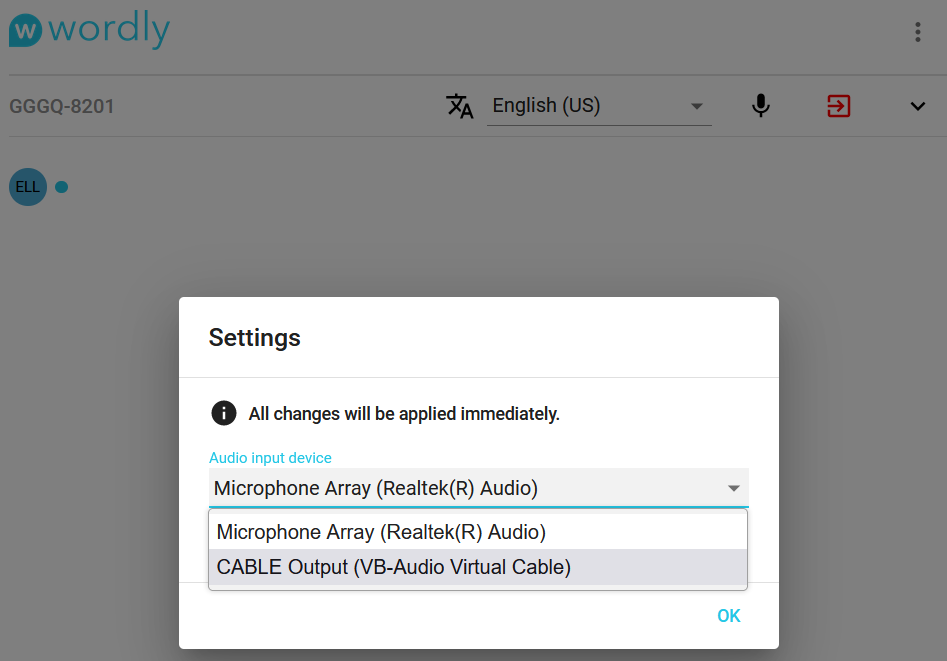
Audio will now be captured from your video conference platform for Wordly translation.
4 - Downloading QR Codes
Wordly offers QR codes as a quick and simple way to join a session. These QR codes can be downloaded in multiple formats for ease of use at meetings and conferences.
In Sessions ( ), select your target session.
Click Attendee Shortcuts to expand the box and reveal the URL and QR code. To the right of the QR code, click the download button ( ![]() ).
).
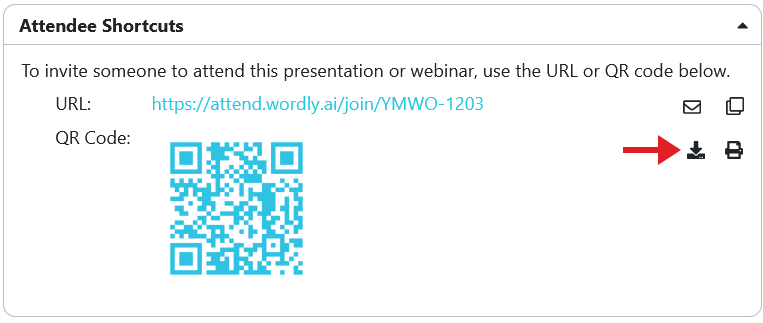
This will bring up a new window with three options for downloading format:
- QR code alone
- QR code with passcode
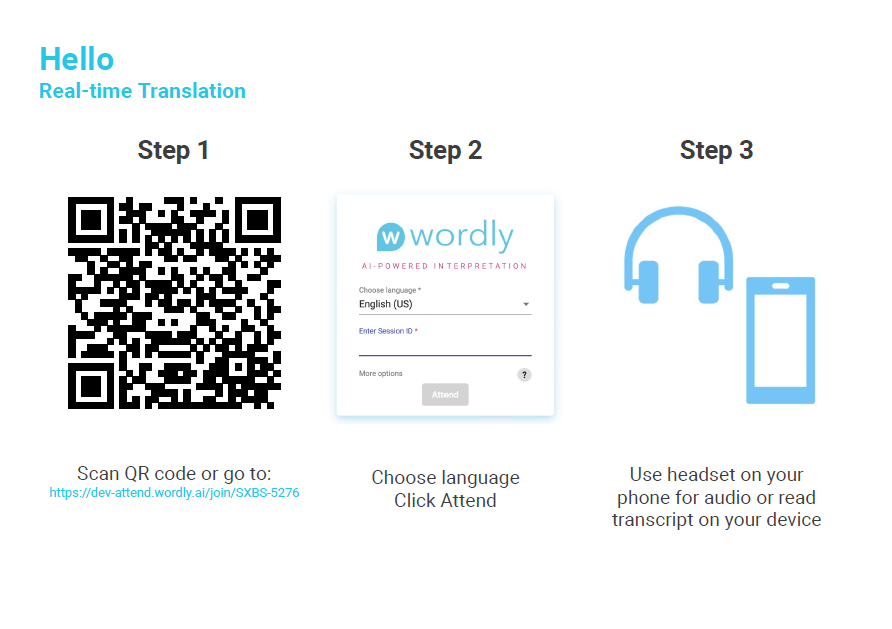
- QR code with instructions
Each will download as a .zip file. Inside will be a folder labeled session_qr_codes, which will contain a PDF with your QR code in your chosen format.
The QR code alone PDF will include the QR code as well as the URL to the session.
If your session requires an attendee passcode, you can use the “Download with passcode” option to create QR codes with the passcode built in or with the passcode provided below the QR code. See Adding a Session for how to create a session that requires a passcode.
The QR code with instructions PDF will present three illustrated steps to opening and attending the session. 1. Scan QR code or go to the URL. 2. Choose language and click attend. 3. Use headset on your phone for audio or read transcript on your device.
Downloading Multiple QR Codes
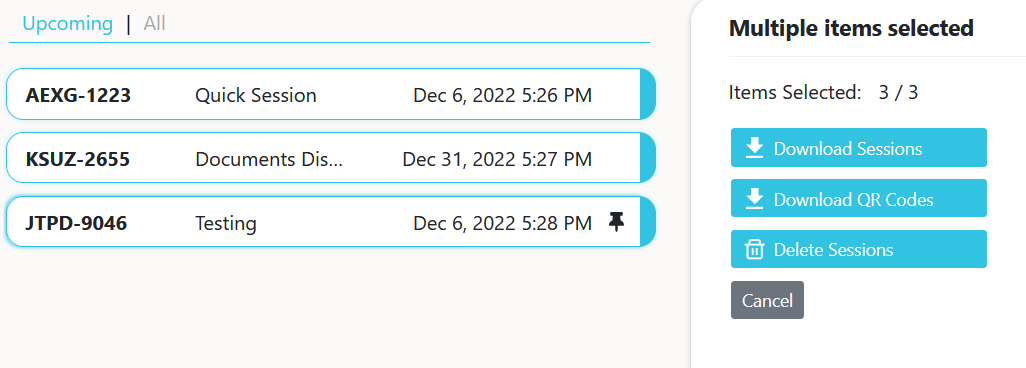
You can download multiple sessions’ QR codes at once. If you select multiple sessions, the option to download QR codes will appear on the right. Clicking the download button will bring up a window with the three format options. Note that when “QR code with instructions” is selected, sessions that require a passcode will not be included because they require the user to take additional steps to attend.
Printing QR Codes
To the right of the download button is the print button ( ). Clicking this will bring up a new browser window with the QR code.
5 - In-Person Session Setup
Wordly can be used for in-person meetings and events. To use Wordly in this manner, you will need to connect Wordly directly to the meeting or conference room audiovisual equipment.
The goal of this guide is to assist you in determining the equipment and configuration required to connect Wordly directly to your AV systems. Keeping in mind the variations in mobile devices and audio equipment, this guide will detail how to set up Wordly’s real-time translation for an in-person session.
Conference Room Setup
Required Equipment
To be provided by conference organizer
-
Presenter Device: Android (6.0 or later), iOS (11.0 or later) device, or laptop computer with WiFi connectivity.
Note: This device is referred to as Presenter Device. However, this is the device used by the audiovisual technician to run Wordly to translate the presenter’s speech.
-
Internet connectivity for attendees to connect to session(s) from their personal device.
-
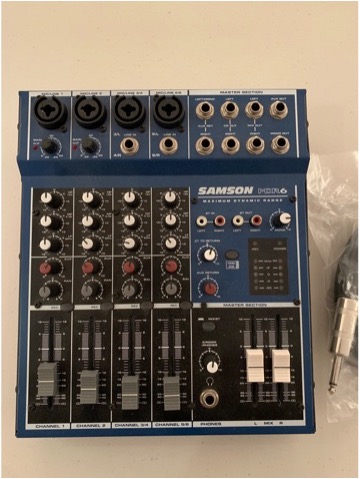
Audio mixer board or system with AUX output/headphone jack.
-
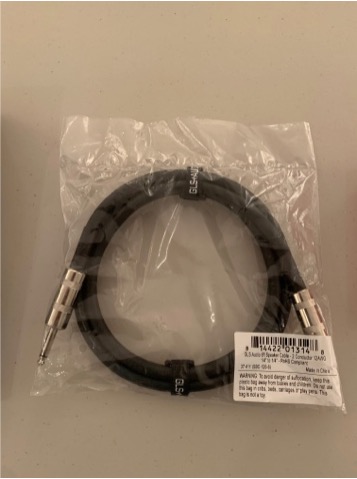
Speaker cable compatible with available output port on audio mixer and ending in a ¼-inch male connector (for example: a ¼” to ¼” cable: see on Amazon.
Note: we suggest sourcing this cable from your AV supplier as they will be able to provide the correct cable for their equipment.
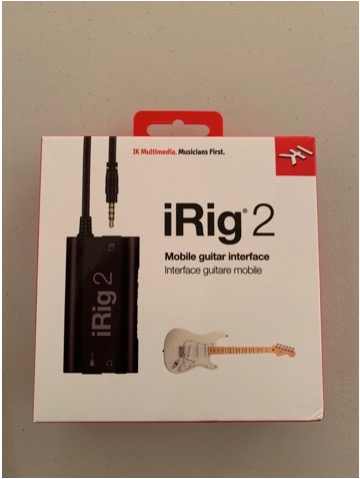
- Audio interface adapter for iOS/Android/Laptop (
Getting Started
- Create a Wordly by scheduling a session in the Wordly Portal. Go here to learn more about scheduling a session.
- While an account is required to create a session, the AV technician only needs the session-specific passcode to run the session.
- The AV technician is not required to have an account or create the session.
- If using a mobile device, use the Wordly application (can be found in the App Store or Play Store).
- If using a laptop, find the Wordly meeting link. The Wordly meeting link can be found in the Meeting Shortcuts in the Wordly Portal.
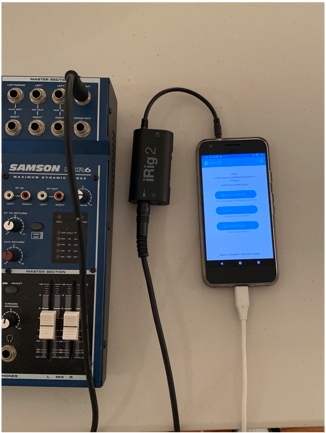
Example Equipment Setup
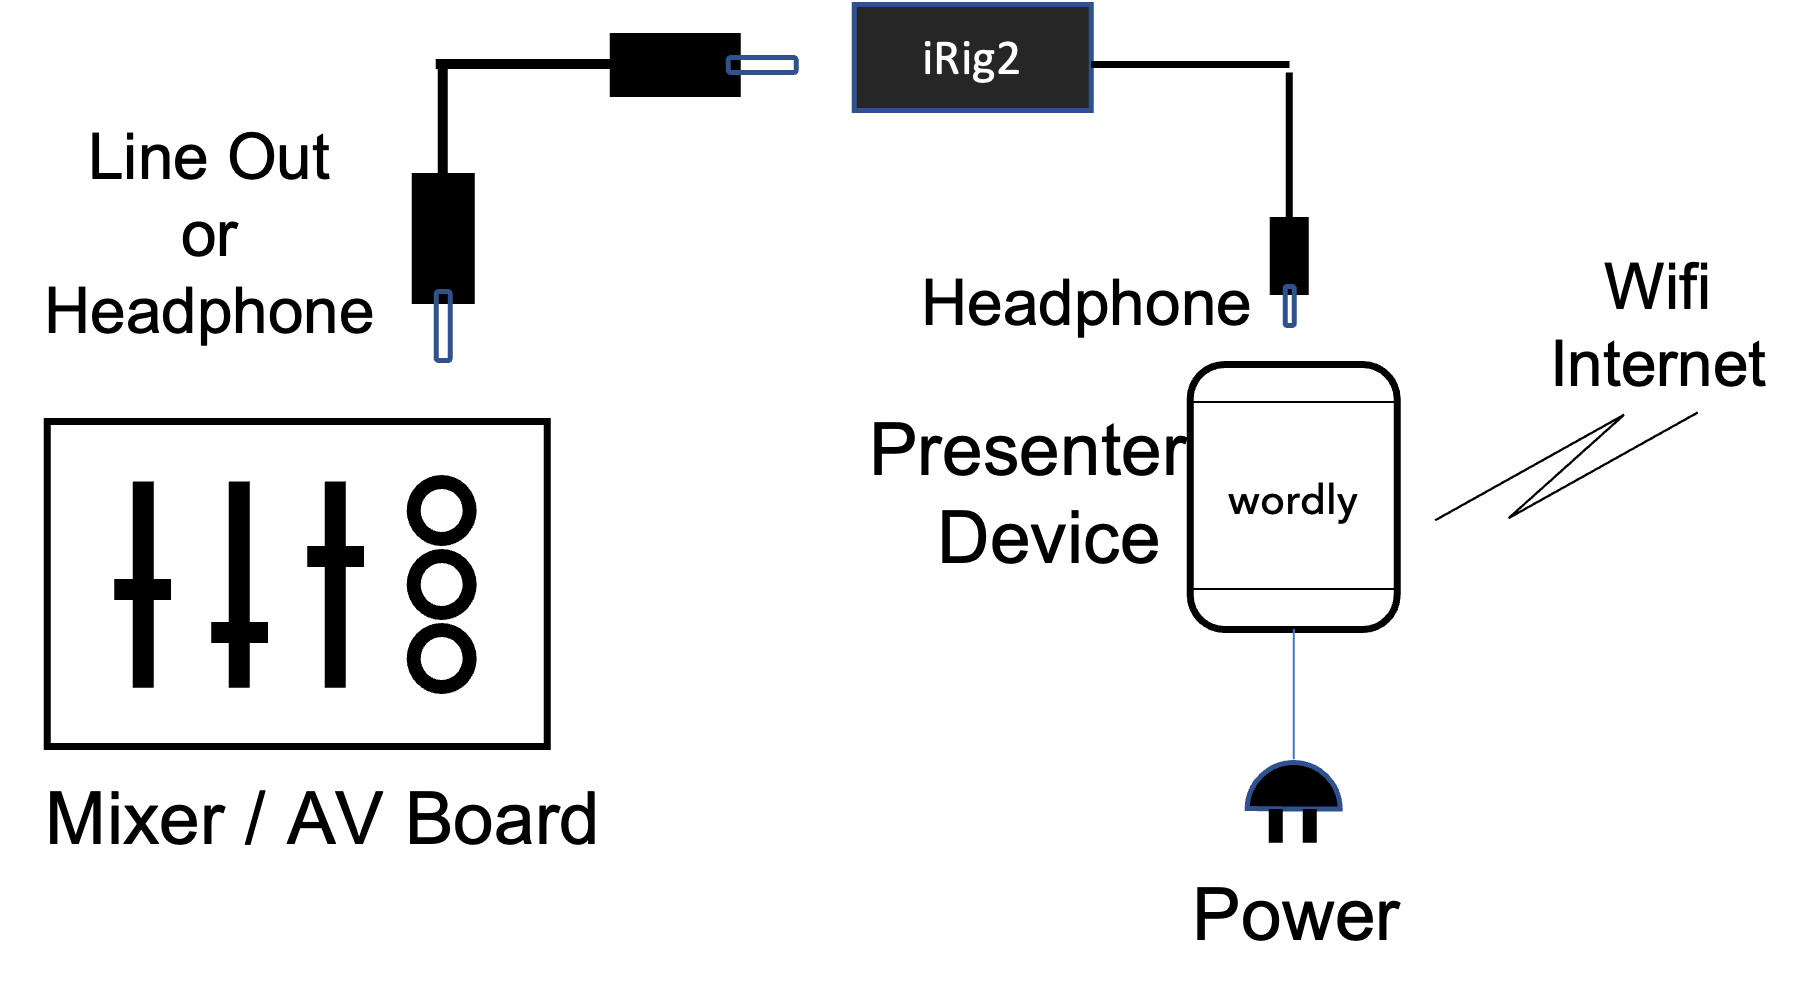
Wiring diagram
(see pictures below)
- Connect to the audio output port of the AV equipment sound board. (Pictured: a ¼" male to ¼" male speaker cable).
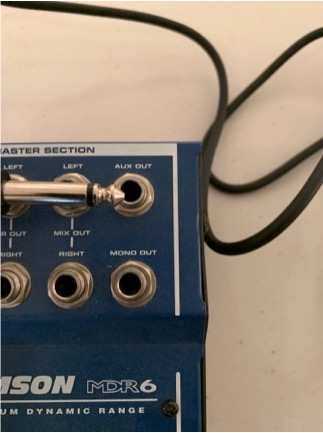
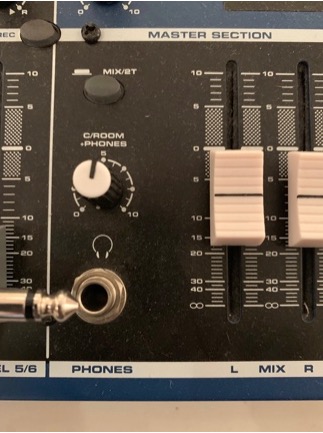
Alternately, if an audio output port is not available, connect to a headset port on the audio mixer board.
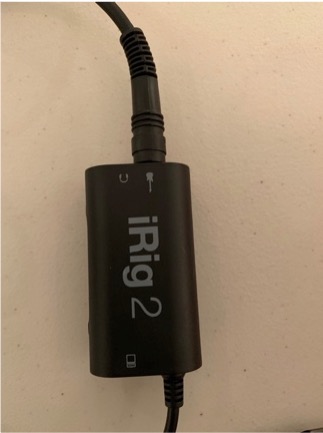
- Connect the other end of the speaker cable to the “guitar” input of the audio interface device (iRig 2 or iRig 2 HD).
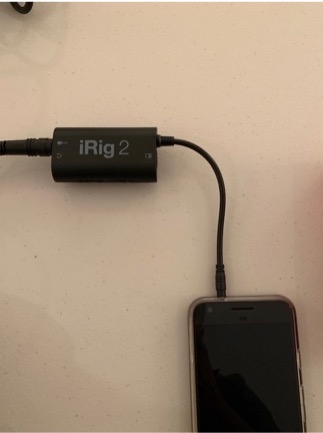
- Connect the audio interface device (iRig 2 or iRig 2 HD) to the Presenter Device (i.e., the Android/iOS mobile device or laptop running Wordly). (Pictured: 3.5mm pin from the audio interface device connected to the headphone jack of an iPhone.)
- Connect the Presenter Device to power.
Troubleshooting
Presenter Device stops showing translation
-
Make sure the Presenter Device is on.
-
Make sure the Presenter Device is not in screen saver or screenlock mode.
-
Ensure Presenter Device is connected to Internet.
-
On Presenter Device, ensure that the session has started.
-
Make sure cables are plugged in properly (see wiring diagram).
-
Turn Gain on iRig 2 to maximum.
-
Ensure iRig 2 is set to “Thru”.
-
Adjust volume on audio mixer line out until presenter transcription is consistent and correct.
-
If Wordly session has Internet and is started, but you are unable to see text on Wordly, unplug iRig 2 from Presenter Device and speak directly into device.
-
If text is seen, then the issue is likely with the audio not reaching the audio output from the AV system. Replug iRig 2 into Presenter Device and try audio mixer line again.
-
If no text is seen, check that the Wordly application is allowed to use the microphone in privacy and security settings of the Presenter Device.
-
Attendee’s device stops showing translation
-
On attendee device, select END to leave the session.
-
Enter code to rejoin session.
6 - Meeting Shortcuts
In Sessions (), select your desired session and click Meeting Shortcuts (below Attendee Shortcuts).
Using the first URL under Meeting Shortcuts, join the Wordly session. Be sure to allow your browser to access your microphone. Remember that if you want people to attend but not speak, send them the attendee shortcuts link instead.
Wordly will translate your speech and the text you see into the selected language (shown next to the microphone icon). Changing the language in “talk/listen” will change the language into which Wordly’s speech recognition translates and transcribes for you. Others’ translation settings will not be affected.

Wordly works best when enunciating clearly. You can use Glossaries to allow Wordly’s speech recognition to include unique terminology.
Bilingual Mode
Meeting Shortcuts also allows the user to switch quickly between two languages. Pressing the down arrow to the right of the End Session icon will bring up talk/listen.

The language selected in “talk/listen” should be the language you are speaking in. It will also be the language Wordly will translate into. The language selected in “paused” is, essentially, waiting in the wings. Wordly’s real-time translation will not appear in that language until you click the switch button (the icon of arrows pointing in opposite directions).
Once clicked, the language in “paused” will become the “talk/listen” language and the previous “talk/listen” language will be paused. You can switch back and forth ad infinitum.
7 - Uploading Sessions
Access the Sessions page using the expanding menu on the left:
- Move the mouse cursor to the left side of the screen
- Click on Sessions (
) from the expanding menu, as seen here:
Note
We recommend you check out how to add a session before reading this. There you’ll find a more comprehensive description of the information required to create a session.How to add multiple sessions?
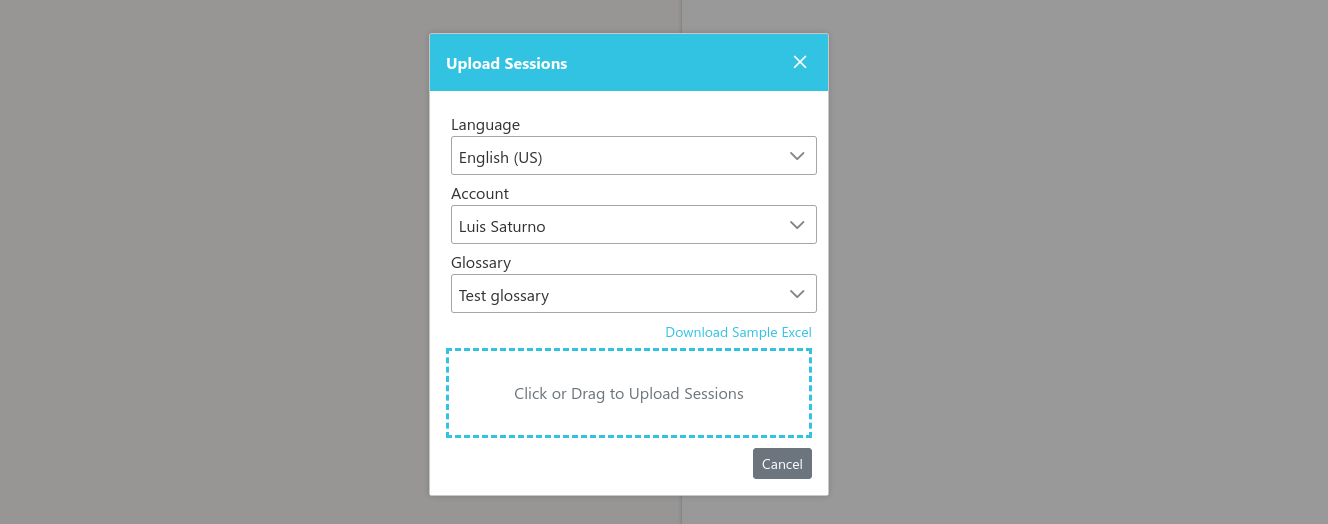
- From the Sessions screen, click on the ▼ Options menu at the top right of the screen and then select “Upload Sessions”.

- It should open the “Upload Sessions” dialog. This screen allows you to upload a spreadsheet containing data for multiple session.
Before creating the spreadsheet
After setting these defaults, the corresponding columns can be omitted from the spreadsheet if only the default values are required.
How to create the spreadsheet
- Click on “Download Example Excel” and open the downloaded file.

- Fill the spreadsheet
The downloaded file includes two rows:
- The first one is the header and should not be removed or edited.
- The second one is an example row to use as a reference. You can remove this row or replace the example values.
Fill out the spreadsheet with information for the sessions you wish to create. A new session will be created for each row in the spreadsheet. Below is a description of the values expected in each column.
| Column | Expected information |
|---|---|
| Title | The name of the session. It can be any text. |
| Presenter | The name of the person that will be speaking; also accepts any text. |
| Date | The day the session is planned to start. It should be in the future and preferably it should be formatted as a date using the spreadsheet software used to edit the file. |
| Time | The time the session is planned to start. It can be any text using 12hs format or 24h format (i.e. 1:00 PM or 13:00) |
| Timezone | The local timezone or region where the session will take place at the specified time. It can be a timezone name (PST), city (Los Angeles), any GMT/UTC offset (UTC-4:30), or just left blank for your default timezone. |
| Duration | The duration of the session. It can be specified in minutes or time (i.e. 95 or 1:35 ). |
| Glossary | The glossary to use during the session, or blank for the default. |
| Account | The account to bill for the session, or blank for the default. |
| Language | The language used by the person that will be speaking and from which the Wordly will be doing the translations, also you can leave blank for the default. |
Note
Glossary, Account, and Language can be left blank and the information selected in the upload dialog will be used as the default.Uploading the spreadsheet
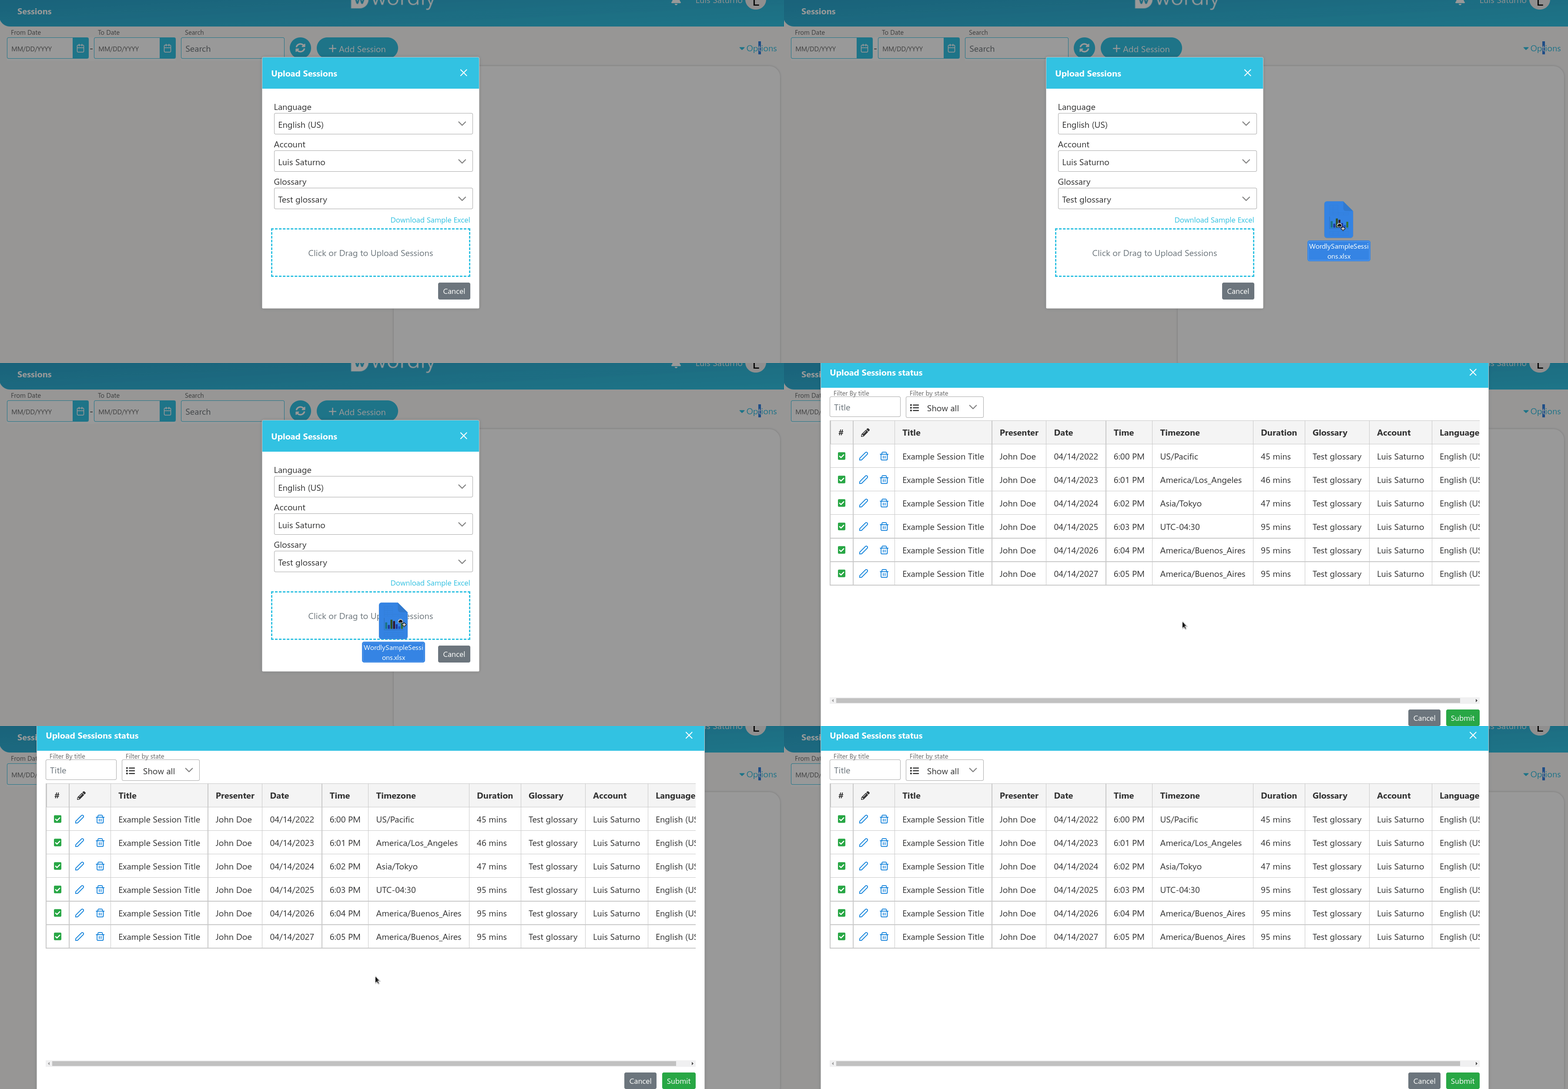
Once you have added your sessions to the spreadsheet, save the file (the name can be changed) and use the upload dialog to upload the file to Wordly.
Reviewing and submitting the sessions
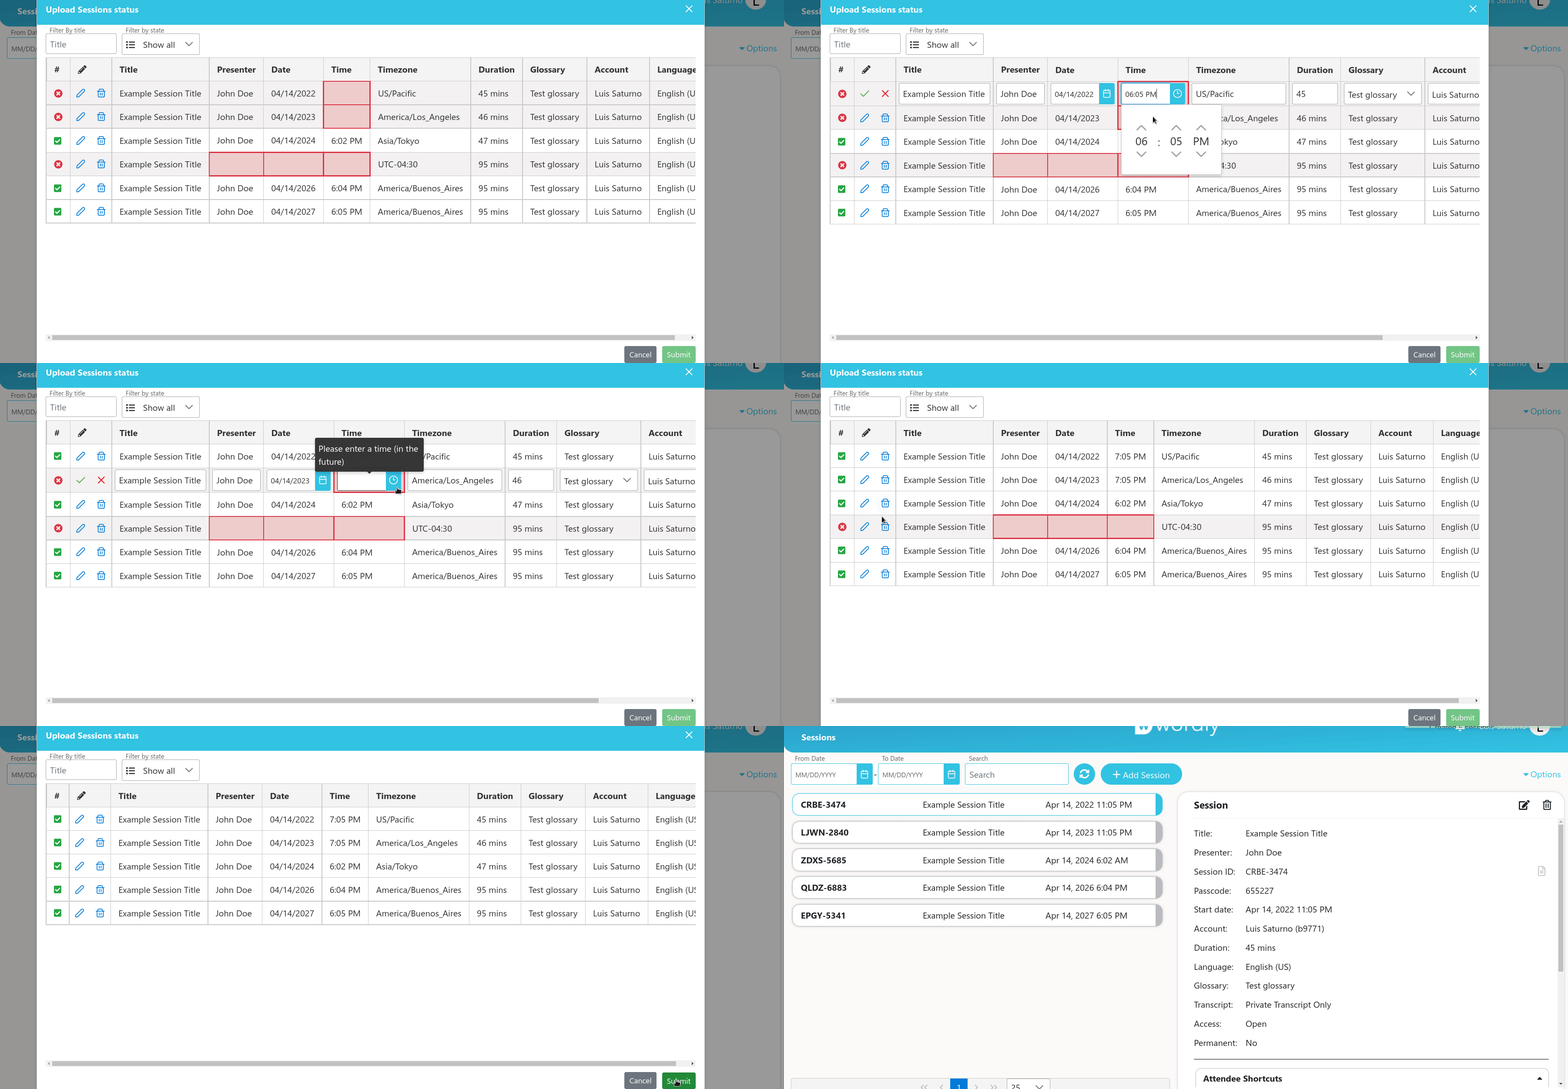
After the upload process is finished, the Portal will present the session information for your review. If there are any errors, the incorrect fields will be highlighted in red. All incorrect fields should be fixed or removed; otherwise the Submit button will remain disabled.
Click the pencil icon to edit the row you want to fix, or click on the trash icon to delete it. Once all rows are fixed and you’re happy with the changes, click “Submit” to create the sessions.
8 - Attending a Session (Advanced)
To attend a session in a web browser on your desktop, you must have first received an Attendee Link.
-
Click the Attendee Link. It should look like this: https://attend.wordly.ai/
-
Once clicked, a Wordly Attend page will automatically open in your default browser:

-
Choose the language you want Wordly to translate spoken dialogue into.
- Example: If the speaker is speaking in English and you want to translate into French, select French.
-
If it’s not already filled in, enter the Session ID.
-
The Session ID is always four-letters and four numbers.
-
If not provided to you, you can sometimes find the Session ID at the end of the Attendee Link you were sent.
- Example : https://attend.wordly.ai/join/RNBR-7474
-
-
To switch Wordly’s interface to another language, click the Symbol (
 ) and choose your desired language from the dropdown.
 -
When ready, click the Attend button (
 ) to start. Alternatively, continue reading to learn about additional options for Wordly Attend.
Additional Options
Click “More options” at the bottom of the login box to access additional features.
-
Enter passcode - Enter a passcode to join the session, if you’ve been provided with one. If not, it’s likely you won’t need one.
-
Enter Name - Enter your name if desired. This is completely optional.
-
Choose a display mode - Display modes change how the Wordly session appears in your web browser:
- Normal - This is the default look of Wordly:
- Display - If you have light accessibility concerns, choose Display mode:
- CART - If you have strict accessibility concerns, choose CART mode:
Note
Display mode and CART mode currently do not have advanced options. See below for more info.Advanced options for desktop browsers
Within a “Normal” Wordly session are some advanced options you can access:

-
Click the language dropdown (
 ) to change the displayed language.
 -
Click the speaker button (
 ) to hear a text-to-speech version of the translated dialogue.
- If the icon isn’t visible, it means the audio output for that language isn’t supported, or you’re using the “Display” or “CART” display modes.
-
Click the options button (
 ) for more options:
-
Click the help button (
 ) to show some common questions and answers.
 -
Click the gear button (
) to bring up the “Show only complete phrases” box.
- Check this box If you’d prefer to only read complete phrases that have been translated by Wordly and not see the words and sentences update.
-
Click the exit button (
 ) to leave the session.
-
When finished, close the browser, the tab, or click the exit button (  ) to leave the session.
Mobile browsers
Attendee link
Attendee links are typically sent through email or text message.
-
Tap the Attendee Link. This will automatically open Wordly in your device’s default browser:

-
Tap on the language dropdown to choose the language you want Wordly to translate spoken dialogue into.
- Example: If the speaker is speaking in English and you want to translate into French, select French.
-
If it’s not already filled in, enter the Session ID number.
-
The Session ID is always four-letters and four numbers.
-
If not provided to you, you can sometimes find the Session ID at the end of the Attendee Link you were sent.
-
Example : https://attend.wordly.ai/join/RNBR-7474
-
-
When ready, tap the Attend button (
 ) to start.
 -
When finished, close the browser, the tab, or click the exit button (
 ) to leave the session.
QR codes
Follow these steps to attend a Wordly session through a QR Code:
-
Use your mobile device’s camera or barcode scanning app to scan the QR code, which will appear similar to this:

The Wordly Attend window will automatically open in your device’s default browser:

-
Tap on the language dropdown to choose the language you want Wordly to translate spoken dialogue into.
- Example: If the speaker is speaking in English and you want to translate into French, select French.
-
If it’s not already filled in, enter the Session ID number.
-
The Session ID is always four-letters and four numbers.
-
If not provided to you, you can sometimes find the Session ID at the end of the Attendee Link you were sent.
-
Example : https://attend.wordly.ai/join/RNBR-7474
-
-
When ready, tap the Attend button (
 ) to start.
 -
When finished, close the browser, the tab, or tap the exit button (
 ) to leave the session.
Additional Options
Tap “More options” at the bottom of the login box to access additional features.
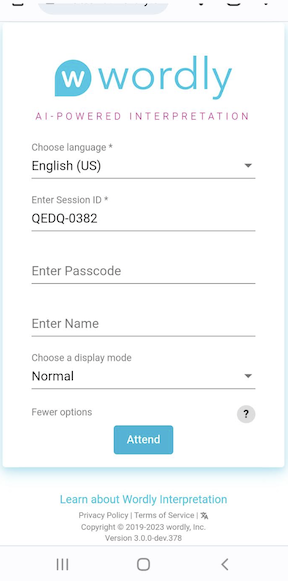
-
Enter passcode - Enter a passcode to join the session, if you’ve been provided with one. If not, it’s likely you won’t need one.
-
Enter Name - Enter your name if desired. This is completely optional.
-
Choose a display mode - Display modes change how the Wordly session appears in your web browser:
-
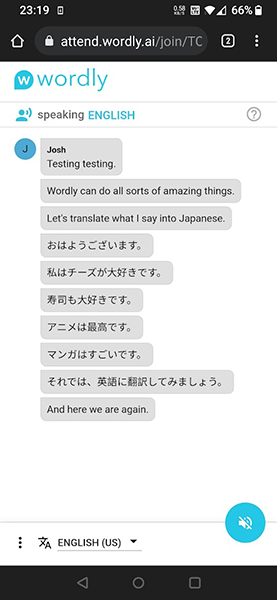
Normal - This is the default look of Wordly:
-
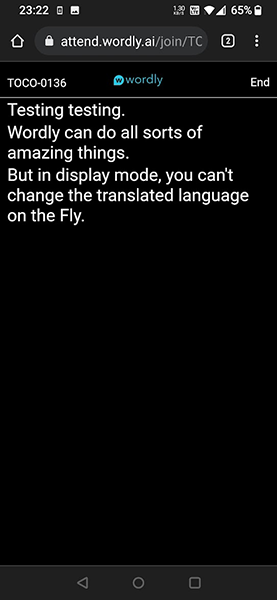
Display - If you have light accessibility concerns, choose Display mode:
-
CART - If you have strict accessibility concerns, choose CART mode:
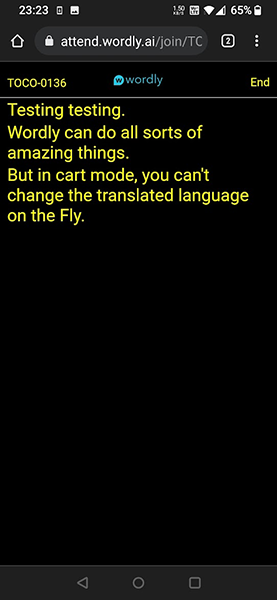
-
Note
Display mode and CART mode currently do not have advanced options. See below for more info.Advanced options for mobile devices
Wordly sessions using the Normal display mode have some advanced options you can access:
-
Tap the language dropdown (
 ) to change the displayed language.
 -
Tap the speaker button (
 ) to hear a text-to-speech version of the translated dialogue.
- If the icon isn’t visible, it means the audio output for that language isn’t supported, or you’re using the “Display” or “CART” display modes.
-
Tap the options button (
 ) for more options:
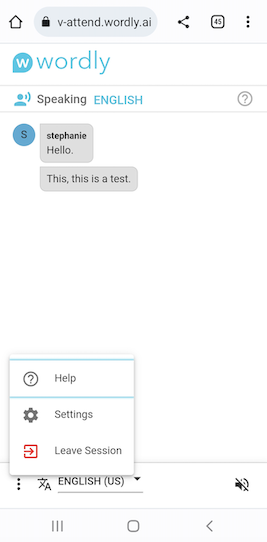
-
Tap the help button (
 ) to show some common questions and answers.
 -
Tap the gear button (
) to bring up the “Show only complete phrases” box.
- Check this box If you’d prefer to only read complete phrases that have been translated by Wordly and not see the words and sentences update.
-
Tap the tap the exit button (
 ) to leave the session.
-
When finished, close the browser, close the tab, or tap the exit button (  ) to leave the session.