Welcome to the Wordly Knowledge Center!
Here is a collection of guides for day to day Wordly use.
If you still have questions, please contact us at contact@wordly.ai.
This is the multi-page printable view of this section. Click here to print.
Welcome to the Wordly Knowledge Center!
Here is a collection of guides for day to day Wordly use.
If you still have questions, please contact us at contact@wordly.ai.
When you first login to Wordly, you’ll automatically start on the Dashboard:

To access the Sessions page:
 ):
):
If you’re using a web browser to log in to Wordly, click + Add Session (  ).
).
This will open up the following menu:

Fill in the following information as it appears:
The name of your session. At the moment, session titles only display within the list of sessions on the left side of the Sessions page, and within exported session transcripts.
The name of the person Speaking during the session.
The date the session is planned to start.
The time the session is planned to start.
The account field will be auto-populated with your account information. If you have multiple accounts or use a shared account, select the account you wish to bill from the dropdown.
The desired length of the session by hours and minutes. The duration you set will add to your scheduled minutes on the Wordly dashboard.
Choose carefully, as the selected language is what Wordly translates from. For example, if the presenter of your session will be speaking French, the chosen language should be set to French, even if the intent is to have Wordly translate it into another language.
Select a pre-made glossary.
Transcripts are written/printed versions of all the dialogue spoken during a session. At the moment, transcripts are only available to private accounts, and can’t be shared through Wordly. Choose an option from the dropdown:
Access determines who can attend a session and the security required to enter. There are two options available:
Typically, 24 hours after a session begins, it is moved from the Upcoming list to the All list. Checking the Pinned box retains the session in the Upcoming list indefinitely.
When you’re ready to continue, click Save ( ).
).
To edit an existing session, select it from the list on the left side of the screen, and click the Edit icon (![]() ) in the Session Details box on the right.
) in the Session Details box on the right.
To delete an existing session, select it from the list on the left side of the screen, and click the trashcan icon (![]() ) in the Session Details box on the right.
) in the Session Details box on the right.
Labels allow the user to add a word or phrase to their session so it is easier to search for later.
Sessions can be assigned a voice pack. A voice pack is a curated list of voices for the Wordly attendee languages.
If you do not specify a voice pack when creating a session, then the created session will use the voice pack selected in your Wordly profile. By default, your profile will be set to use the default voice pack, which is currently Voice Pack 1.
You can sample the voice packs for different languages when editing a session or updating your profile in the Wordly Portal.
Once your session is saved, it will be visible on the left side of the session screen. The Upcoming list shows sessions scheduled for the future or pinned sessions. Clicking All to the right of Upcoming will show all sessions, past and present.
Once you’ve finished adding a session, you’ll be provided with a series of links to send to attendees and presenters.

Attendee Shortcuts are intended for viewers/listeners only. Please do not get these confused with Meeting Shortcuts (see below), which are intended for speakers/presenters.
Share the provided link with anyone you want to attend your sessions. Click the email icon (![]() ) to open your computer’s email client with a pre-populated message containing the provided link.
) to open your computer’s email client with a pre-populated message containing the provided link.
Click the copy icon (![]() ) to copy the provided link to your system’s clipboard.
) to copy the provided link to your system’s clipboard.
Alternatively, provide the QR code so that anyone with a smartphone can scan it via their camera app. The QR code can be easily printed by clicking the print icon (![]() ).
).

Meeting Shortcuts are intended only for those people who you plan on presenting during this session. It’s important not to get these confused with Attendee Shortcuts (see above), which are intended for viewers/listeners only. Please use Meeting Shortcuts cautiously.
For security purposes, a six-digit passcode is required to access a session as a presenter.
For convenience, the top link includes the passcode.
For additional security the bottom link will ask for the passcode, which can be provided separately.

Click the “email” icon to open your computer’s email client with a pre-populated message containing the provided link.
Click the “copy” icon to copy the provided info to your system’s clipboard.
Certain services (such as Vimeo) might not work with the information provided in the top-half of the box. If you’re having trouble streaming, try using the alternative links provided at the bottom of the box.
Minutes are not charged based on the duration of a session, but actual used minutes.
For example, if a session is set for 1 hour but lasts only 37 minutes, only those 37 minutes are charged.
Conversely, If a session is set for 1 hour but goes 1 hour 5 minutes, 65 minutes will be charged.
Minutes stop being charged either when the stream to the session is ended, or when the presenter mutes their microphone.
Sessions do not end automatically at the end of the scheduled duration.
If you’re streaming, you must end the stream manually to avoid having minutes charged.
To prevent the usage of unused minutes, you’ll need to manually** end the session** when finished. Otherwise, Wordly will continue to bill your minutes until either your minutes run out, or the session is ended automatically.
To attend a session in a web browser, you must have first received an Attendee Link.
Click the Attendee Link. It should look like this: https://attend.wordly.ai/
Once clicked, a Wordly Attend page will automatically open in your default browser:

Choose the language you want Wordly to translate spoken dialogue into.
If it’s not already filled in, enter the Session ID.
The Session ID is always four-letters and four numbers.
If not provided to you, you can sometimes find the Session ID at the end of the Attendee Link you were sent.
When ready, click the Attend button (  ) to start.
When finished, close the browser, the tab, or click the exit button (  ) to leave the session.
For additional settings options, read the Attending Additional Options article
To attend a session on a mobile device’s web browser, you’ll need an Attendee Link or QR code to scan.
Attendee links are typically sent through email or text message.
Tap the Attendee Link. This will automatically open Wordly in your device’s default browser:

Tap on the language dropdown to choose the language you want Wordly to translate spoken dialogue into.
If it’s not already filled in, enter the Session ID number.
The Session ID is always four-letters and four numbers.
If not provided to you, you can sometimes find the Session ID at the end of the Attendee Link you were sent.
Example : https://attend.wordly.ai/join/RNBR-7474
When ready, tap the Attend button ( ) to start.
When finished, close the browser, the tab, or click the exit button ( ) to leave the session.
Follow these steps to attend a Wordly session through a QR Code:
Use your mobile device’s camera or barcode scanning app to scan the QR code, which will appear similar to this:

The Wordly Attend window will automatically open in your device’s default browser:
Tap on the language dropdown to choose the language you want Wordly to translate spoken dialogue into.
If it’s not already filled in, enter the Session ID number.
The Session ID is always four-letters and four numbers.
If not explicitly provided to you, you can sometimes find the Session ID at the end of the Attendee Link you were sent.
Example : https://attend.wordly.ai/join/RNBR-7474
When ready, tap the Attend button ( ) to start.
When finished, close the browser, the tab, or click the exit button ( ) to leave the session.
There are two ways to attend a session in the IOS Wordly App:
Read more about the Wordly App.
We suggest using high-fidelity audio equipment such as headsets, headphones, earbuds, or boom microphones, preferably with noise-canceling technology.
Advise your presenters to avoid using integrated laptop microphones, which capture too much background noise. If a laptop microphone is the only option available, we suggest turning the microphone gain levels up as high as possible in their laptop system’s audio settings.
If you have multiple presenters, make sure they know to speak one-at-a-time and avoid interrupting or speaking over each other.
Presenters should know to enunciate clearly.
Avoid using music with lyrics.
Presenters should speak at a moderate pace, pausing between sentences briefly.
Advise your presenters to pick a single language to speak in.
Make sure your presenters have sufficient bandwidth to support high-quality audio capture.
Glossaries are custom libraries which significantly increase the accuracy of Wordly’s transcription results. Without a glossary for reference, Worldly may be unable to properly transcribe unique phrases, words, and terminology that may be specific to your organization, employees, or departments. Check out this article to learn how to create glossaries.
Make sure to create glossaries for all the languages which presenters will be speaking.
Many variables can affect the accuracy of Wordly’s translation, including available internet bandwidth and possible issues with hardware, software, and operating systems. Make sure to let your presenters know that while they should expect a great experience with Wordly, errors are possible.
Follow these steps to change the email and/or password associated with your Wordly account.


Wordly will automatically open to “Personal info”; however, two other options will be available on the side bar: “Account security” and “Applications”. This article covers Personal info and “Signing in” under Account security.

In Personal info, click inside the boxes to update account name and email.
Use the dropdown menu to select locale.
Click the blue Save button at the bottom to save your changes.


Click “Signing in”
To update your password, click the Update button. If you have always used a separate Single Sign On service like Google, Apple, or a corporate login, this option will not be available. You will have to change your password via that service.

Click Update. You will be asked to verify your identify by entering your old password. After verification you will be taken to the Update Password screen where you can enter your new password.
Enter your new password and then confirm the new password. You can check the “Sign out from other devices” option to force other devices using your account to sign in using the new password.
Press “Submit” to save your new password.

Wordly supports multilingual speaking. This looks different whether you are using the Wordly Join App or using Wordly Meeting Bot.
In the Wordly Join App (accessed through Meeting Shortcuts), you can choose any language at any time, but to quickly switch between two languages, click the down arrow to reveal more language options.

One language will be labeled “speak/talk” while the other is in a gray font and labeled “paused”.
Choose your desired languages to switch between using the drop down menus. Changing the “speak/talk” language will immediately change the speaker language while changing the “paused” language selects a new language for fast switching via the arrows icon.
Click the arrows icon to switch the speak/talk language to paused and vice versa.

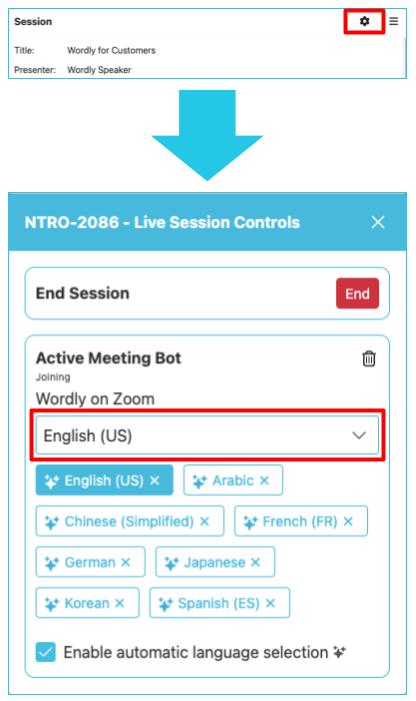
On your Wordly account, go to the Sessions page and select the gear icon that appears when a session is live.
A pop-up window (the same one used to invite the Meeting Bot) titled with the Session ID and “Live Session Controls” will appear with two options: End Session and Active Meeeting Bot.

Under Active Meeting Bot, there will be the option to select the language of the speaker. Selecting a new language immediately changes the speaker language.
For each new language selected, a blue button of the previous selected language will appear underneath the language dropdown menu. Click the buttons to switch back and forth between speaker languages. The current speaker language is always the one selected in the dropdown menu.

Select as many languages as needed. If the X at the upper right of the popup is pressed, the window will close, but your selections will be saved.
Wordly offers QR codes as a quick and simple way to join a session. These QR codes can be downloaded in multiple formats for ease of use at meetings and conferences.

The QR code downloads as a .zip file. Inside is a folder labeled session_qr_codes, which contains a PDF with your QR code in your chosen format.
You can download multiple sessions’ QR codes at once.
In Sessions (), select your desired session and click Meeting Shortcuts (below Attendee Shortcuts).

Using the first URL under Meeting Shortcuts, join the Wordly session. Be sure to allow your browser to access your microphone. Remember that if you want people to attend but not speak, send them the attendee shortcuts link instead.
Wordly will translate your speech and the text you see into the selected language (shown next to the microphone icon). Changing the language in “talk/listen” will change the language into which Wordly’s speech recognition translates and transcribes for you. Others’ translation settings will not be affected.

Wordly works best when enunciating clearly. You can use Glossaries to allow Wordly’s speech recognition to include unique terminology.
Meeting Shortcuts also allows the user to switch quickly between two languages. Pressing the down arrow to the right of the End Session icon will bring up talk/listen.

The language selected in “talk/listen” should be the language you are speaking in. It will also be the language Wordly will translate into. The language selected in “paused” is, essentially, waiting in the wings. Wordly’s real-time translation will not appear in that language until you click the switch button (the icon of arrows pointing in opposite directions).
Once clicked, the language in “paused” will become the “talk/listen” language and the previous “talk/listen” language will be paused. You can switch back and forth ad infinitum.
To change your microphone in a session, you will need to go to settings.
First, click the vertical elipses in the upper righthand corner.

Click on Settings to open the dialog box.

From there, you can click the dropdown menu to select your audio input device (microphone/headset).

Click “OK” to close the dialog box.
If there will be multiple speakers in a session, Meeting Shortcuts can be used to identify each person.
After clicking the Meeting Shortcuts link, type your/the speaker’s name into the box under Enter Name.

Wordly will then identify your/the speaker’s words for others in the session.

The Push to Talk feature allows speakers to unmute themselves by holding down the microphone button. Push to Talk is not on by default. To turn on Push to Talk, follow the instructions below:
After opening your session, click on the settings button ( ) in the upper right corner.
Scroll down to “Input Mode”.
Click “Push to Talk”.

Now the microphone button ( ) will appear red
  .
.
When you press down the button (or hold your hotkey), the mic will unmute and you will see the button’s white circle will fill with pink  .
.
After you push the mic button, it will take a second before your words pick up on the transcription. Please note that the Join app (your session webpage) must be in focus for this to work. If the window is minimized or if you are in another tab or window, Push to Talk will not work.
By default, Push to Talk is activated by holding down the space bar. To use a different key on your keyboard:
) and scroll down to below “Push to Talk”.

There are a wide variety of ways to start a Wordly session.
For speakers, in your Wordly account, click “Meeting Shortcuts”. Click the first URL under Meeting Shortcuts then click join. For attendees, follow the Attendee link to join the Wordly Session.
Anyone using a Meeting Shortcut link will start the Wordly session. It doesn’t have to start in the Wordly Portal.
Download Wordly’s app on Google Play or Apple Store:
Once you have the app, join a session with or without logging in.
There are different versions of Cvent. Contact Wordly to make sure you’re using the appropriate steps for your version of Cvent.
To integrate the Wordly App into your Cvent session, follow the Cvent Widget article.
As the Zoom host, use the apps button at the bottom of your Zoom screen, select the Wordly App, confirm your language, and, if desired, specify a Session ID.
On the Session page of your Wordly Portal, click “Join with Meeting Bot” to invite the bot to your Teams meeting. Wordly will start translating once the Teams host admits Wordly into the call.
On the Session page of your Wordly Portal, click “Join with Meeting Bot” to invite the bot to your Google Meet call. Wordly will start translating once the Google Meet host admits Wordly into the meeting.
Create a Wordly session then enable other streaming services in Webex. When you start your meeting or Webinar, start live streaming with Wordly using the information found in the Webex Support and Wordly article.
Starting an RTMPS stream to Wordly will start your Wordly session.
Download the Wordly Translator app in the Apple Store

When you first open the app, you will be asked to approve the terms of service. From there, you will be taken to the dashboard where you can join a session or sign into your Wordly account.
Click Sign In, which will bring you to the Welcome page.

Press Sign In with Wordly. If you use your company SSO with Wordly, you should pick your SSO provider. This is the same process as the first time you logged into the portal using your company SSO.
Whether you have an account of not, you can use the front page of the app to join a Wordly session as either attendee or presenter!
On the front page you can add a Session ID and then the “Join” button will be enabled. Clicking it will connect you to the session as an Attendee. Enter a passcode before clicking “Join” will connect you to the session as a presenter, allowing your speech to be added to the session’s transcript.
Click “Manage” after entering the passcode to change the Presenter’s language and name for the session before starting it.

If you join a session, skip to Attending a Session for more guidance.
Also on the front page is the Sign In option. Click this to sign in to your Wordly account.

After signing in, you will have access to your Wordly Account and see your upcoming/current sessions.

To attend a session, either enter the Session ID (and passcode if required), or select your session and click the green “start” button at the bottom of the screen.

In the session screen, you will see the live translation. At the top and bottom of the screen will be different settings:

When you click the language listed in the top left of the session, a dropdown menu will appear, allowing you to pick any of Wordly’s supported languages.

For each language you select, quick access buttons will appear at the top of the translation.

To leave or end a session, click the “END” button at the bottom left. This will bring up a window asking if you would like to leave the session.

If you would like to use the app to create a session, click the blue “Add Session” button at the bottom of the screen. This will bring up the Session Setup window.

Here, you can name your session; name the presenter; schedule the date and start time; select duration, language, glossary (if any); choose your transcript preferences; and decide the access level for your new session.
When you are done, hit “Save” at the bottom of the screen, and the session will appear on your list of sessions. You can edit the session after creating it. This session will also be available in the web portal.
Hitting “Back” will return you to the app’s homescreen.
You can share billable minutes between multiple Wordly portals. When minutes have been shared to your portal, you need to accept them in your portal.
You can accept the shared minutes in one of two ways:
 ) in the top menu bar to open the Alerts page.
You can view a record of these minute transfers under the Transactions tab. If you need more minutes, you can have the primary account send you more minutes.
title: “Accepting Shared Minutes” linkTitle: “Accepting Shared Minutes” weight: 1 description: > Learn how to accept billable minutes from another portal aliases:
You can share billable minutes between multiple Wordly portals. When minutes have been shared to your portal, you need to accept them in your portal.
You can accept the shared minutes in one of two ways:
) in the top menu bar to open the Alerts page.You can view a record of these minute transfers under the Transactions tab. If you need more minutes, you can have the primary account send you more minutes.
Transcripts are written records of all the dialogue spoken during a Wordly session. Transcripts are available to users that select the “Private Transcripts” option when adding a session.
Some points about transcripts:
Transcripts are only accessible for the account holder that set up a session, and are created whenever their connection to a session is ended (rather than the session itself). If you create a session and join it multiple times, each time will have its own transcript.
Transcripts don’t contain translated dialogue. They are word-for-word records of the spoken dialogue only. If the presenter spoke in English, the transcript will also be in English.
For sessions with multiple languages, the transcript will reflect the source languages as they were transcribed.
At the moment transcripts can’t be shared within Wordly. If you want to share a transcript, you must download it first.
When you first log in to Wordly, you’ll automatically start on the Dashboard:
To access the Transcripts page, move the mouse to the left side of the screen and click on Transcripts (  ):
):

Once you’re on the Transcripts page, select a session from the list on the left side of the screen. An accompanying Transcript will appear on the right, as seen here:

You can search for a specific session or a range of sessions using the filters on the left side of this page.
Transcripts have two functions: Deleting, and Downloading.
To delete a transcript, click the trashcan button ( ![]() ) in the top right corner of the transcript.
) in the top right corner of the transcript.
Transcripts can be downloaded in four different formats.
Plaintext file with timestamps
Simple plaintext files
VTT files
SRT files
To download individual transcripts, select the desired session and click the download button (  ). This will bring up a window where you can choose the download file’s format.
Sometimes, recorded audio and transcript timestamps do not sync up. Offsetting timestamps of a downloaded transcript allows you to alter the timecode when the transcript begins. This is helpful for assuring subtitles will align with your recordings.
To do this, in the Download Transcripts window, click in the box under “Add timestamp offset” then type however many seconds you’d like the words to be offset by.
You can offset the transcript by either negative or positive numbers. Be aware that, in VTT and SRT formats, negative offsets may cause the words at the beginning of the transcript to be dropped.

For example, if you offset the transcript by -1, any subtitles derrived from the transcript would start one second earlier than before. Meanwhile, offsetting the transcript by 2 would lead to the transcript beginning 2 seconds after the original.
If you tick the box “Include speaker names,” the names of the speakers will appear in the transcript when the speaker changes. If there is only one speaker, then no names will appear. If you do not click “Include speaker names”, no matter how many speakers are in the audio, their names will not appear in the transcript.
To download more than one transcript at a time you first need to search through your sessions using the filters on the left-half of the screen.
After you’ve located your desired sessions, click the Options dropdown (  ) in the top-right corner of the page, and click Download selected (
  ). A dialogue box will open, allowing you to choose the format of the transcripts to be downloaded:

Subscribers to Wordly Pro and up are additionally able to translate Session Transcripts.
), select your Session.
 ) to bring up the language selection window.
A cancellation button will appear at the bottom when translation begins. To cancel, you can also hover your mouse over a specific language and click the X that will appear to the right.
A percentage will show next to the selected language(s), and “Translation in Progress” along with a progress bar will show at the bottom of the window.

Translation will continue if you click Close.
After a few minutes, the translation will be complete.
Click Original (  “Original dropdown button”) to select your translated Transcripts.
Selecting a language, your Transcript text will change to that language.
You can click the same button to return to the original Transcript.
Wordly Pro users are also able to download translated transcripts. The transcripts must be translated before you attempt to download them.
The Activity screen allows you to track the date, duration, minute use, and all other session activity. You can also:
To access the Activity screen from anywhere within Wordly:
Move the mouse cursor to the left side of the screen.
Click on Activity (  ):
):


Sessions are listed on the left side of the screen by Session ID and Date only.
Click on a session to open up the Usage Summary for that session on the right side of the screen.
Click the Transcript icon (  ) within the Session details page to be taken to the transcript of that session. See the Transcripts Page Overview Article for more information about transcripts.
Click the Options dropdown in the top right corner of the screen to download an activity report:

Activity reports are Microsoft Excel spreadsheets (.CSV files) that detail everything that happened during a session.
Activity is reported from the time a session starts to the time Wordly receives a command to “end” the session.
Occasionally, the length of a session reported on the Activity Screen won’t match the time reported on the Transaction screen (indicated as Used Minutes).
To attend a session in a web browser on your desktop, you must have first received an Attendee Link.
Click the Attendee Link. It should look like this: https://attend.wordly.ai/
Once clicked, a Wordly Attend page will automatically open in your default browser:
Choose the language you want Wordly to translate spoken dialogue into.
If it’s not already filled in, enter the Session ID.
The Session ID is always four-letters and four numbers.
If not provided to you, you can sometimes find the Session ID at the end of the Attendee Link you were sent.
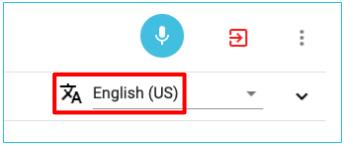
To switch Wordly’s interface to another language, click the Symbol (  ) and choose your desired language from the dropdown.
When ready, click the Attend button ( ) to start. Alternatively, continue reading to learn about additional options for Wordly Attend.
Click “More options” at the bottom of the login box to access additional features.
Enter passcode - Enter a passcode to join the session, if you’ve been provided with one. If not, it’s likely you won’t need one.
Enter Name - Enter your name if desired. This is completely optional.
Choose a display mode - Display modes change how the Wordly session appears in your web browser:


 Hi
Hi
Within a “Normal” Wordly session are some advanced options you can access:

Click the language dropdown (  ) to change the displayed language.
Click the speaker button (  ) to hear a text-to-speech version of the translated dialogue.
Click the options button ( ) for more options:
Click the help button (  ) to show some common questions and answers.
Click the gear button (  ) to bring up the “Show only complete phrases” box.
Click the exit button ( ) to leave the session.
When finished, close the browser, the tab, or click the exit button ( ) to leave the session.
Attendee links are typically sent through email or text message.
Tap the Attendee Link. This will automatically open Wordly in your device’s default browser:
Tap on the language dropdown to choose the language you want Wordly to translate spoken dialogue into.
If it’s not already filled in, enter the Session ID number.
The Session ID is always four-letters and four numbers.
If not provided to you, you can sometimes find the Session ID at the end of the Attendee Link you were sent.
Example : https://attend.wordly.ai/join/RNBR-7474
When ready, tap the Attend button ( ) to start.
When finished, close the browser, the tab, or click the exit button ( ) to leave the session.
Follow these steps to attend a Wordly session through a QR Code:
Use your mobile device’s camera or barcode scanning app to scan the QR code, which will appear similar to this:
The Wordly Attend window will automatically open in your device’s default browser:
Tap on the language dropdown to choose the language you want Wordly to translate spoken dialogue into.
If it’s not already filled in, enter the Session ID number.
The Session ID is always four-letters and four numbers.
If not provided to you, you can sometimes find the Session ID at the end of the Attendee Link you were sent.
Example : https://attend.wordly.ai/join/RNBR-7474
When ready, tap the Attend button ( ) to start.
When finished, close the browser, the tab, or tap the exit button ( ) to leave the session.
Tap “More options” at the bottom of the login box to access additional features.

Enter passcode - Enter a passcode to join the session, if you’ve been provided with one. If not, it’s likely you won’t need one.
Enter Name - Enter your name if desired. This is completely optional.
Choose a display mode - Display modes change how the Wordly session appears in your web browser:
Normal - This is the default look of Wordly:

Display - If you have light accessibility concerns, choose Display mode:

High Contrast - If you have strict accessibility concerns, choose High Contrast mode:

Wordly sessions using the Normal display mode have some advanced options you can access:
Tap the language dropdown ( ) to change the displayed language.
Tap the speaker button ( ) to hear a text-to-speech version of the translated dialogue.
Tap the options button ( ) for more options:

Tap the help button ( ) to show some common questions and answers.
Tap the gear button ( ) to bring up the “Show only complete phrases” box.
Tap the tap the exit button ( ) to leave the session.
When finished, close the browser, close the tab, or tap the exit button ( ) to leave the session.
Wordly’s Automatic Language Selection allows presenters to set multiple presenter languages. Wordly will automatically select the correct presenter language based on the speech detected.
When you set your default Automatic Language Selection you are setting the default settings that will appear when you create a new Wordly Session.
In your Portal, navigate to your profile by clicking on your initial in the top right corner and choose PROFILE.
![]()
There are three values related to Automatic Language Selection:
 . If you select a language for which Automatic Language Selection is not available, Automatic Language Selection will automatically be disabled. You can remove languages by clicking on the “x” beside a language.

Follow these steps for creating your Wordly session. Three new options will appear:
. If you select a language for which Automatic Language Selection is not available, Automatic Language Selection will automatically be disabled. You can remove languages by clicking on the “x” beside a language.

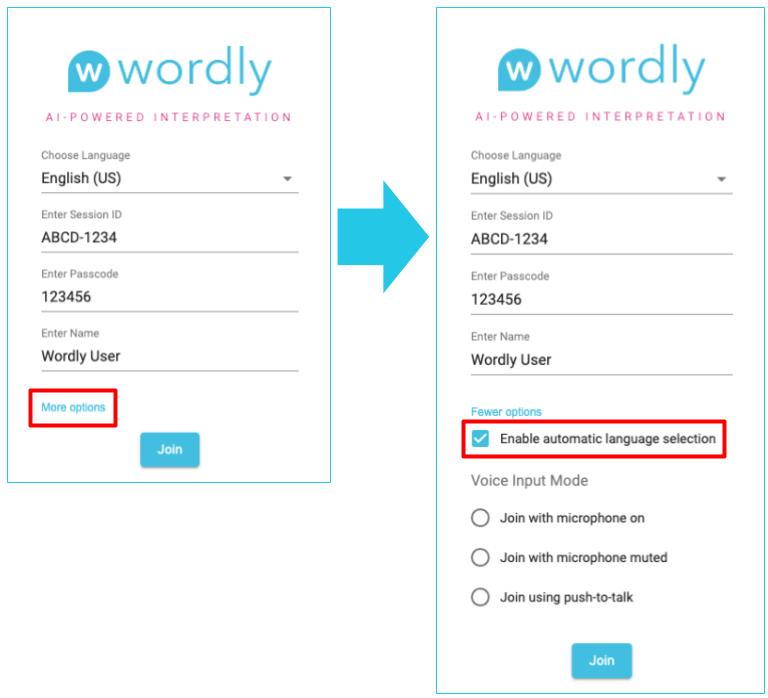
When you arrive at the login page for your session, your default settings will appear. If you would like to change (enable/disable) your Automatic Language Selection choose “more options” followed by “enable Automatic Language Selection.”
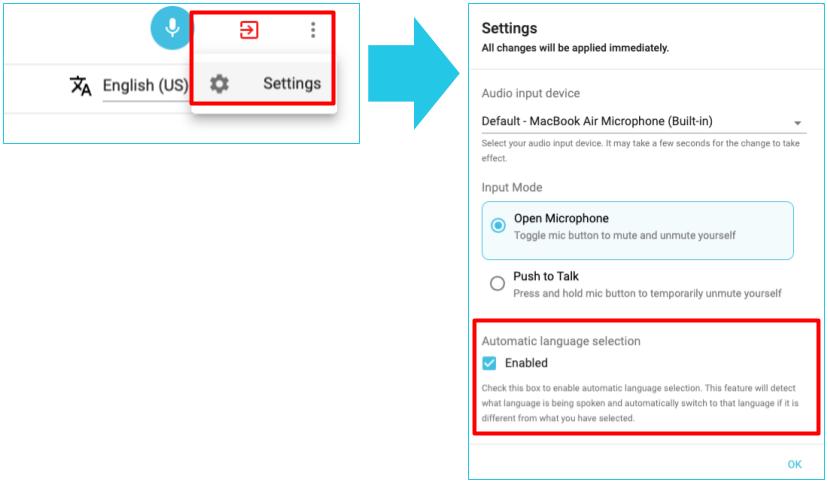
During your session, you can change (enable/disable) your Automatic Language Selection by clicking on the gear icon and choosing “enable Automatic Language Selection.”
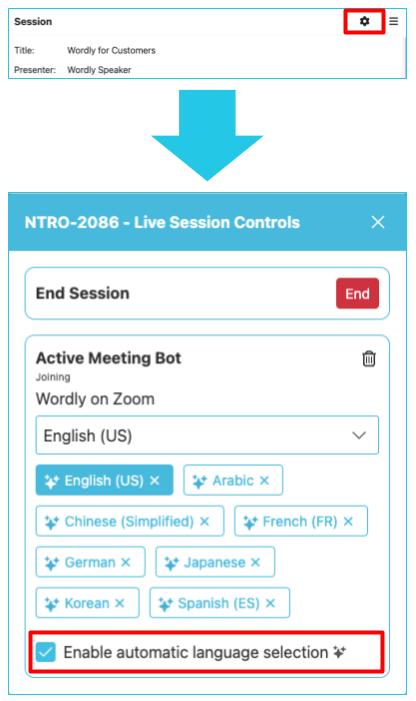
When you connect to the Meeting, your default settings will appear. If you would like to change (enable/disable) your Automatic Language Selection, click the gear icon to open the live session controls followed by “enable Automatic Language Selection.”
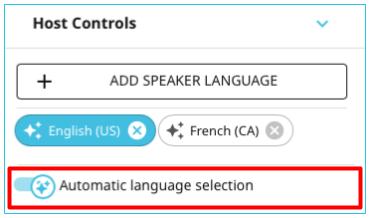
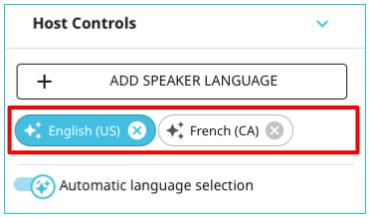
Start you Zoom integration as usual. If you would like to change (enable/disable) your Automatic Language Selection, navigate to your host controls and toggle “enable Automatic Language Selection.”
Speak as you normally would during your meeting. When you change languages, you will see the presenter’s language update to the new spoken language.
. If you select a language for which Automatic Language Selection is not available, Automatic Language Selection will automatically be disabled.
If you know you will present in additional languages during your presentation, you can edit your Wordly session to add additional languages in the SELECTIONS area.
Using the language selector in the top right corner, select the new language you would like to add to the selections list.
In the Live Session Controls, click on “add language” followed by the language(s) you would like to add.
In the host controls section, click on “add language” followed by the language(s) you would like to add.

At any time during your presentation, you can manually change the presenter language by clicking on the tile of the new language you would like to use.
If Automatic Language Selection is enabled, the presenter’s language will update the next time a change is detected.

Click on your profile icon at the top right of the page and select Profile.

You will see your profile information, go to the last item (Locale). Click on the Locale icon.
![]()
Select your desired language from the dropdown menu. We currently support Japanese, French, Spanish, and English.

Click Change Locale when finished.

At the bottom of the Attend page, you will see “Learn About Wordly Interpretation”. Under that section in grey print, to the right of “Terms of Service”, click on the Locale icon
![]()
Select your desired language from the dropdown menu. We currently support Japanese, French, Spanish, and English.

Click Apply when finished.

You can share your glossary with other Wordly users.
The person receiving the glossary will need to accept the glossary. They can accept it in two ways: from the bell icon in the top menu and from the Glossaries page.
) in the top menu bar to open the Alerts page.You can share billable minutes between multiple Wordly portals. You may want to do this is if you have multiple people within your organization, each accessing Wordly and creating sessions, but drawing minutes from a primary portal that purchased the minutes.
You can:
The Wordly accounts you want to share minutes with must already exist.
Note: No actual email is sent during this step. This is a verification process to ensure the minutes are going to the correct account.
After you share minutes, the account has been sent an invitation to share minutes displays.
The portal you invite to share your minutes with needs to accept this invitation. See Accepting Shared Minutes.
Make sure that the portal accepting the invitation to share minutes selects the Set as Default checkbox, to ensure that they use minutes from this account for any sessions they create. If they are primarily using Zoom, these minutes will not appear on their dashboard in Zoom unless they check this box.
Return to the dashboard to access your updated minutes.
Within the account window in the Accounts menu, you can click:
The edit button (  ) to edit the account information.
The white trashcan button (  ) to delete the account.
The book button (  ) to go to the Transactions page.
The shopping cart button (  ) to go to the Purchase page and buy more minutes.
The send icon button (  ) to send another invitation to the account.
The black trashcan button (  ) to cancel the invitation.
The Transactions screen lists every addition and subtraction of billable minutes from any of your accounts, as they occur.
To access the Transactions screen from anywhere within Wordly:
Move the mouse cursor to the left side of the screen.
Click on Transactions (  ):
):

This will take you to the Transactions screen.
Below is a screenshot of the Transactions screen. See the following information for details on the layout:

Transactions are listed on the left side of the screen by date and the number of minutes added or subtracted.
Click on a transaction to open up the Transaction details for it on the right side of the screen.
If you have access to more than one account, you can select it from the Account dropdown near the top of the left side of the screen, as seen here:

To the immediate right of the Account dropdown is the total number of minutes available for the selected account.
Click the Options dropdown in the top right corner of the screen to download a Transaction report:

Transaction reports are Microsoft Excel spreadsheets (.CSV files) that detail every transaction attributed to an account.
You can generate a summary of your transcript information. These summaries can be translated in any of the languages that are available in Wordly.
Find your summary under the Summary tab.
Transcript summaries are generated using AI. Please verify important details. With your transcript summary, you can:
Access the Sessions page using the expanding menu on the left:
):


After setting these defaults, the corresponding columns can be omitted from the spreadsheet if only the default values are required.

The downloaded file includes two rows:
Fill out the spreadsheet with information for the sessions you wish to create. A new session will be created for each row in the spreadsheet. Below is a description of the values expected in each column.
| Column | Expected information |
|---|---|
| Title | The name of the session. It can be any text. |
| Presenter | The name of the person that will be speaking; also accepts any text. |
| Date | The day the session is planned to start. It should be in the future and preferably it should be formatted as a date using the spreadsheet software used to edit the file. |
| Time | The time the session is planned to start. It can be any text using 12hs format or 24h format (i.e. 1:00 PM or 13:00) |
| Timezone | The local timezone or region where the session will take place at the specified time. It can be a timezone name (PST), city (Los Angeles), any GMT/UTC offset (UTC-4:30), or just left blank for your default timezone. |
| Duration | The duration of the session. It can be specified in minutes or time (i.e. 95 or 1:35 ). |
| Glossary | The glossary to use during the session, or blank for the default. |
| Account | The account to bill for the session, or blank for the default. |
| Language | The language used by the person that will be speaking and from which the Wordly will be doing the translations, also you can leave blank for the default. |
Once you have added your sessions to the spreadsheet, save the file (the name can be changed) and use the upload dialog to upload the file to Wordly.

After the upload process is finished, the Portal will present the session information for your review. If there are any errors, the incorrect fields will be highlighted in red. All incorrect fields should be fixed or removed; otherwise the Submit button will remain disabled.
Click the pencil icon to edit the row you want to fix, or click on the trash icon to delete it. Once all rows are fixed and you’re happy with the changes, click “Submit” to create the sessions.

Glossaries allow you to customize Wordly’s speech recognition to include your organization’s unique terminology, such as special phrases or names of products, people, and departments. Glossaries are custom libraries which significantly increase the accuracy of transcription results. Without a glossary for reference, Worldly may be unable to transcribe unique phrases, words, and terminology.
It’s possible to create multiple glossaries for specific uses (such as IT, research, regional sales teams, etc).
Glossaries increase the accuracy of transcribing spoken words into text.
Make sure your presenter has a quality microphone. The more clear the audio, the better the transcription.
Glossary terms should be as concise and unique as possible for best performance.
It’s important to add words, phrases, terminology, names, acronyms, and abbreviations as you expect them to be spoken aloud naturally.
To access the Glossaries page from anywhere within Wordly:
Move the mouse cursor to the left side of the screen
Click on Glossaries (  ):
):

Once you’re on the Glossaries page, click +Add Glossary (  ) to get started. This will open up the following menu:

Enter the following info to create a glossary:
Enter the name of your Glossary. A title is required to save the glossary.
Choose the language that the presenter will be speaking in.
In the Boost tab (  ), add the phrases and terminology that you think Wordly will need help with transcribing. This can include names, acronyms, terminology, and abbreviations, but must be added as they’re spoken aloud naturally.
One term per line. You must add a line-break (press “Enter” on your keyboard) before adding another term.
Glossaries can contain up to 3000 individual terms.
One term can be up to 100 characters.
It’s possible to copy and paste a list of terms into the “Phrases” box, as long as they’re separated with line-breaks.
Include names that you’re unlikely to find in a dictionary. This includes:
Include terminology that is “specialized”, such as:
Acronyms should be included on their own, without their meaning. Examples:
Abbreviations include two-letter acronyms that are spoken aloud, such as:
Only include abbreviations you expect will be spoken aloud as abbreviations. For example, we can expect people to say “Nevada” and not “en vee” (NV), so “NV” should NOT be included.
However, we can expect people to say “vee are” (VR) instead of “Virtual Reality”, so “VR” should be included.
While the examples above include parenthesized phrases like “(Artificial Intelligence)” do not include these in the glossary. Only include phrases people are likely to say exactly like the phrase.


Emphasis can improve the accuracy of Wordly’s transcription quality by expanding how the sounds that make up a word are processed.
To add emphasis to a word, enter the word into the phrases box, add a space after the word, and either 1 or 2 exclamation marks. See the following examples:
If a word isn’t being transcribed correctly, try emphasizing it with 1 exclamation mark initially. If it still isn’t being transcribed, use 2 exclamation marks.
Wordly will prioritize the correct transcription of emphasized words over non-emphasized, similar-sounding words. For example, “Porsche” might be mistranscribed as “porch” if the word isn’t emphasized.
To include terms in more than one language, click Add Language ( ). This will automatically collapse the current “Phrases” box and create another. See the example of what that looks like here:

Click on any of these Phrase boxes to edit the list of terms for that language.
To remove one of your languages from a glossary, click the X ( ) next to it.
Click the alphabetize button (  ) to automatically alphabetize all the terms in the phrase box.
Clicking the reset button ( ) will delete everything you haven’t saved from the glossary.
If you’re adding items to an existing glossary and click reset (), only the new items will be deleted.
This action can’t be undone at this time.
When finished, click the Save button ().
At this point, your glossary will be saved, and you will be able to include it when adding a session.
While most of the time Boost will get the word you need, sometimes a uniquely spelled name, unexpectedly pronounced acronym, or a product that sounds like another word still won’t transcribe as desired. In this case, try Wordly Glossaries’ “Sounds Like” feature to improve transcription accuracy.
Without the Glossary’s Sounds Like function, this can happen:

To fix this:

Now your session’s transcript will have the correct word from the Boost list:

This function is important when words are spelled in an unconvenional way, Ke$ha, for example.


If you have any questions or issues regarding Sounds Like, please reach out to contact@wordly.ai.
Blocklists are the inverse of Boosted phrases in that these are lists of words that you want Wordly to avoid. For example, suppose you want to block spicy words like “paprika” or “turmeric”. You can add them to your glossary’s Blocklist as shown below. Should a “spicy” word be spoken during a session, it will not appear in the transcript.
In Glossaries ( ), select your glossary.
Click the target language section to reveal your word lists. There will be three tabs: Boost ( ) Block (  ) and Replace (
  ).
).

Select the Block tab.
Click inside the box to start typing words you do not want Wordly to transcribe. Each word or phrase should be on its own line.

 )
)Remember to select the desired glossary when creating a session. As long as your glossary is selected, the Blocklist will work just as the Boost list.
AI can often misconstrue words. To help create the smoothest translations, Wordly’s Glossary now offers word replacement along with the Boost and Block
For example, if talking about a 4D experience you might type “forty -> 4D” to make sure 4D is not recognized and translated as forty. Names can also sometimes cause issue. For example, with the last name Firby, you’d want to avoid it getting recognized as the toy Furby, and thus, should add “furby -> Firby” to your replacement list.
Open Glossaries ( ) and select the desired glossary.
Click the Replace tab ( ) and click in the text box.
Write the word you do not want, type “->”, then write the word you do want to appear instead. Note: Without the “->”, an error message will appear in red below the text box.

) to save your work.You can use the Replace function to customize translations. Whereas the Boost function nudges Wordly’s translation software, replacing will force the text into one translation as opposed to another.
In your Glossary, select your target language, go to the Replace tab, and write a rule to replace unwanted synonyms with your desired translation.
Take “cat” in English and Spanish for example.
If you want to make sure “cat” translates to “gato” and no other Spanish synonym, your instinct might be to do something like this:


However, this will not work. The first, will lead to the English transcription showing “gato” instead of “cat”, which is not proper English. The second will do nothing. Why? Because a Spanish speaker will not say “cat”. They will already say “gato”.
Instead, what you want to do is find the Spanish synonyms of “gato” such as “felino” or “gata”.
Then you should replace these synonyms with “gato” in your Spanish glossary.

Or, if you are talking about coffee, you might want to for the word “bean” translates to the correct sort of bean.

Another example would be if a geologist needed to talk about boring holes and wanted to assure that “boring” was not translated as the more common meaning of tedious or dull.

If you do not want a term translated, you can write a rule to replace the unwanted translation with the non-translated text. For example, if your company is named Big Trees, you wouldn’t want that translated literally.

You can
Portal Version 3.25.0
Portal Version 3.24.0
General Update
Portal Version 3.23.0
Display App Version 1.9.0
Attend App Version 3.5.0
Wordly API Version 1.10.0
Portal Version 3.22.0
Portal Version 3.20.0
Display App Version 1.8.0
Wordly App for Zoom Version 1.13.0
Portal Version 3.19.0
Portal Version 3.18.0
Wordly API Version 1.9.0
Display App Version 1.7.0
Portal Version 3.17.0
Wordly API Version 1.8.0
Portal Version 3.16.0
Present App Version 3.0.0
Portal Version 3.15.0
Portal Version 3.14.0
Wordly API Version 1.7.0
Portal Version 3.13.0
Wordly App for Zoom Version 1.12.0
Portal Version 3.12.0
Portal Version 3.11.0
Present App Version 2.4.0
Android Phone App Version 3.0.0
Attend App Version 3.4.0
Present App Version 2.3.0
Display App Version 1.6.0
Wordly App for Zoom Version 1.11.0
General Update
Present App Version 2.2.0
Wordly API Version 1.6.0
Android Phone App Version 2.21.0
Portal Version 3.10.0
Wordly App for Zoom Version 1.10.0
Display App Version 1.5.0
Portal Version 3.9.0
Display App Version 1.4.0
Display App Version 1.3.0
IOS Phone App Version 2.21.0
Attend App Version 3.3.0
Portal Version 3.8.0
Portal Version 3.7.0
Present App Version 2.1.0
Attend App Version 3.2.0
Display App Version 1.2.0
Portal Version 3.6.0
Wordly App for Zoom Version 1.9.0
Display App Version 1.1.0
Present App Version 3.1.0
Present App Version 2.0.0
Display App Version 1.0.0
Portal Version 3.5.0
Present App Version 1.8.0
Wordly App for Zoom Version 1.8.0
Portal Version 3.4.0
Portal Version 3.3.0
Portal Version 3.2.0
Wordly App for Zoom Version 1.7.0
Wordly App for Zoom Version 1.6.0
Wordly API Version 1.5.0
Present App Version 1.7.0
IOS Phone App Version 2.20.0
Android Phone App Version 2.20.0
Portal Version 3.1.0
Wordly API Version 1.4.0
Wordly App for Zoom Version 1.5.0
Portal Version 3.0.0
Attend App Version 3.0.0
Wordly API Version 1.3.0
Portal Version 2.22.0
Wordly API Version 1.2.0