Welcome to the Wordly Knowledge Center!
Here is a collection of guides about how to use Wordly effectively in a variety of different situations. If you still have questions, please contact us at contact@wordly.ai.
This is the multi-page printable view of this section. Click here to print.
Welcome to the Wordly Knowledge Center!
Here is a collection of guides about how to use Wordly effectively in a variety of different situations. If you still have questions, please contact us at contact@wordly.ai.
Wordly needs access to session (webinar, meeting, conference session, so on) audio, so Wordly can output real-time translation. With video conference platforms like Google Meet, Discord, or Microsoft Teams, Wordly needs a way to “hear” all the audio from the meeting.
The overall idea is to attend your platform meeting in one window of your computer and run Wordly to capture the audio in another. Then you will connect the two windows together using a virtual audio cable. There are a number of ways to do this; this document will address one method that uses a third-party application called VB-Cable.
To capture audio from all participants, rather than only audio from your mic, you will need:
A second computer not in use by a meeting participant. (You could use only one computer, but you wouldn’t be able to hear the meeting.)
VB Cable application or alternative software. VB-Audio Virtual is a third party not associated with Wordly.
A Web browser (to best capture audio, Wordly recommends Chrome).
Only one computer attending the meeting will need these downloaded. This computer will act as the audio routing device to Wordly for the entire meeting.
You will only need to do this once. Please move to Preparing to Capture Your Meeting Audio if you have already downloaded and installed VB Cable.
VB Cable can run on either Windows or Mac. Follow directions on VB Audio’s site for your operating system.
With the second computer, join your virtual meeting as an attendee. Do not join as a host or panelist.
Mute the meeting on the second computer.
Go to system settings, sound.
Change audio input and output to VB Cable.
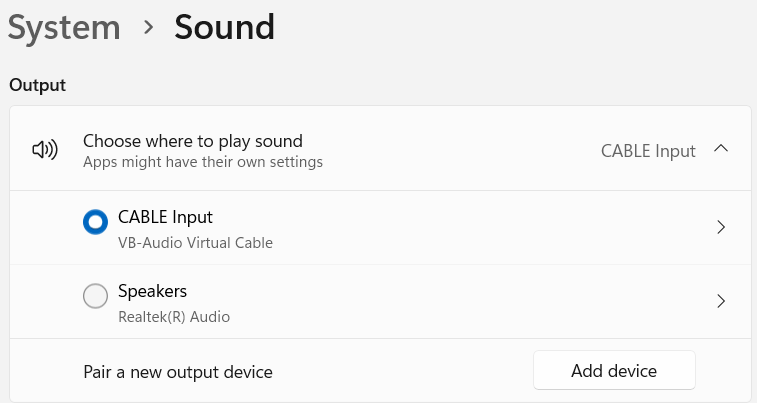
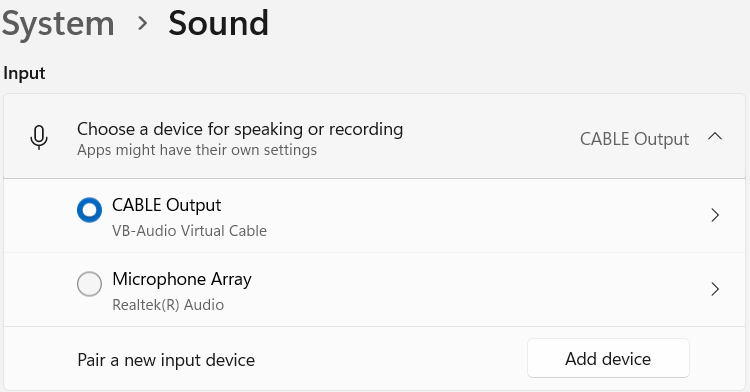
Launch Chrome.
Go to Wordly Portal, then go to Sessions .
Select your Wordly session.
In Meeting Shortcut, click on the top link.
Clicking the link will bring you to Wordly Join. Join the session.
Make sure the microphone icon on the Meeting Shortcut is not muted. Make sure your browser has permission to use the microphone.
Click the upper right hand three dots within the Meeting Shortcut.


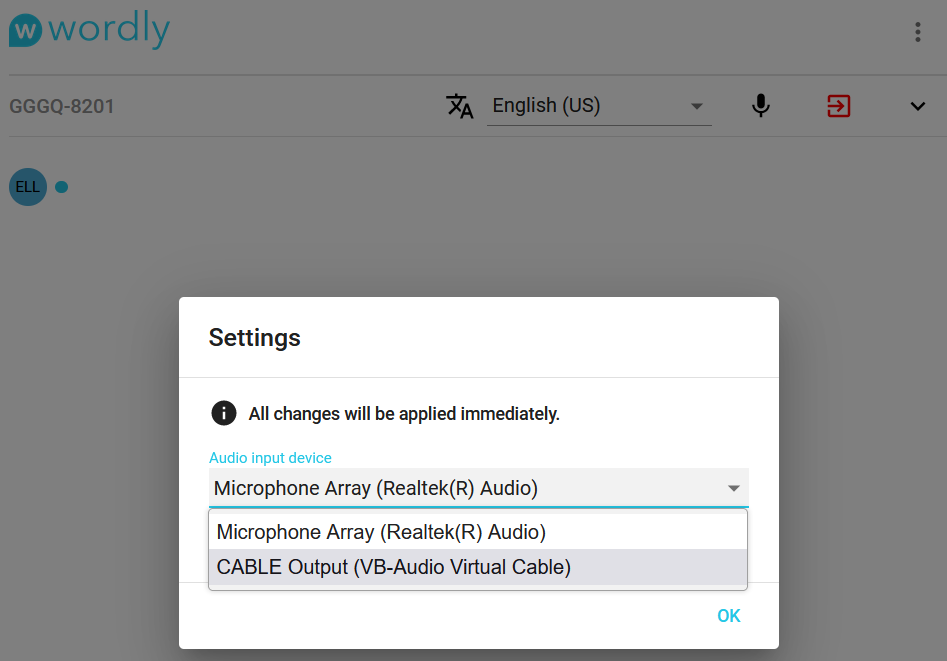
Audio will now be captured from your video conference platform for Wordly translation.
The Cvent Widget allows you to integrate the Wordly App into the Cvent Attendee Hub for your webinars and conferences, providing a cohesive translation experience.
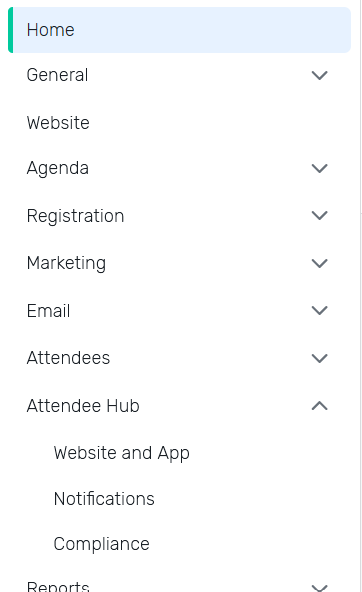
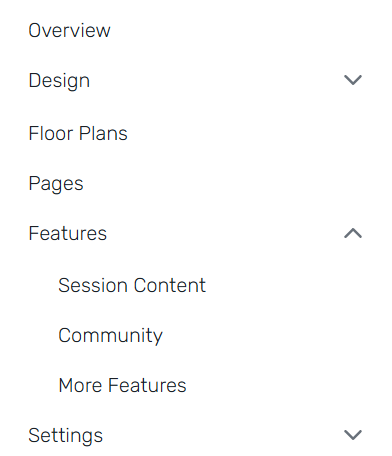
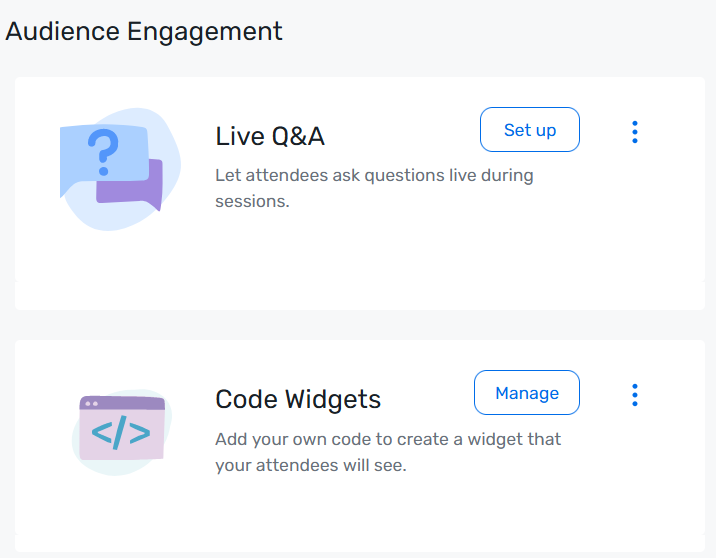

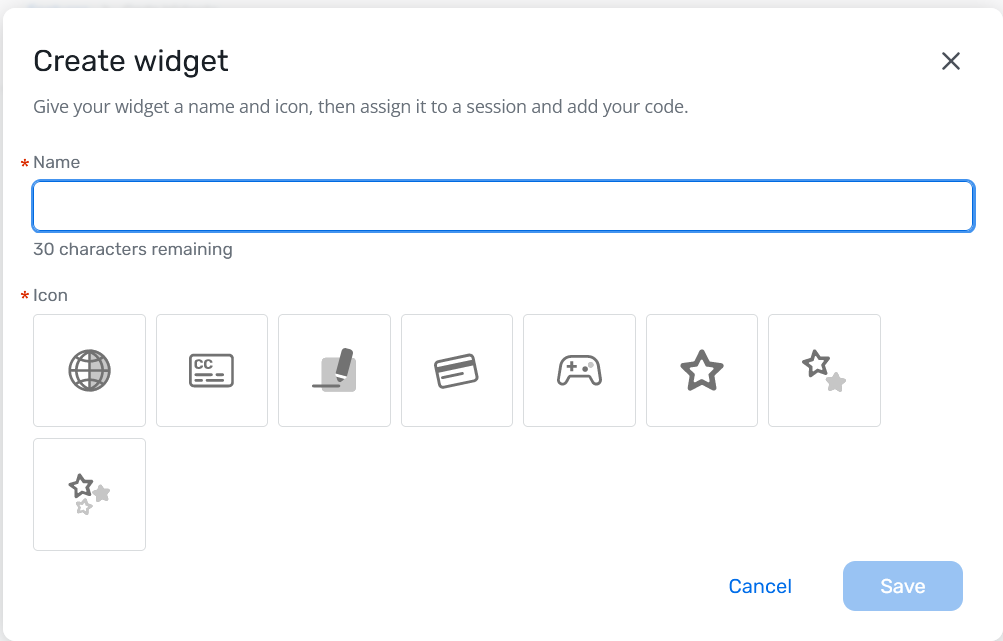
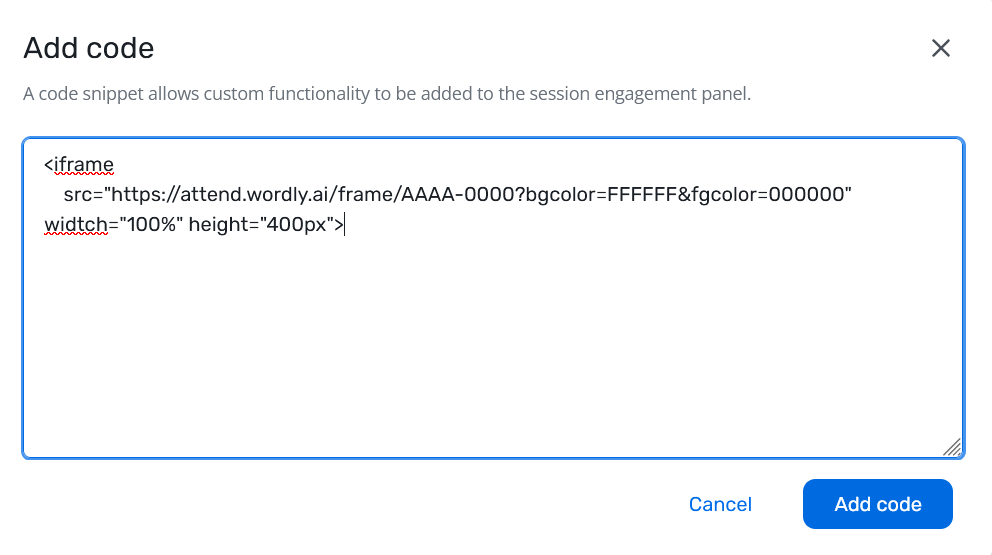
Click Select Session then select the session to which you’d like your widget assigned. Then click on Add code to the right of the session name.
a. In the text box, enter the iframe code for your Wordly session in the following format:
<iframe src="https://attend.wordly.ai/frame/AAAA-0000?bgcolor=FFFFFF&fgcolor=000000" width="100%" height="400px">
b. Do not include a terminating tag.

Click on Overview, then click on Visit Website at the right of the page.
Navigate to your session, and click on the Session Title. This will take you into the session where you will be able to see the Wordly Widget at the right side of the screen.
Click on the widget to see if the iframe you have installed.
a. <iframe src="https://attend.wordly.ai/frame/AAAA-0000?bgcolor=FFFFFF&fgcolor=000000" width="100%" height="400px">
Wordly can be used for in-person meetings and events. To use Wordly in this manner, you will need to connect Wordly directly to the meeting or conference room audiovisual equipment.
The goal of this guide is to assist you in determining the equipment and configuration required to connect Wordly directly to your AV systems. Keeping in mind the variations in mobile devices and audio equipment, this guide will detail how to set up Wordly’s real-time translation for an in-person session.
To be provided by conference organizer
Presenter Device: Android (6.0 or later), iOS (11.0 or later) device, or laptop computer with WiFi connectivity.
Note: This device is referred to as Presenter Device. However, this is the device used by the audiovisual technician to run Wordly to translate the presenter’s speech.
Internet connectivity for attendees to connect to session(s) from their personal device.
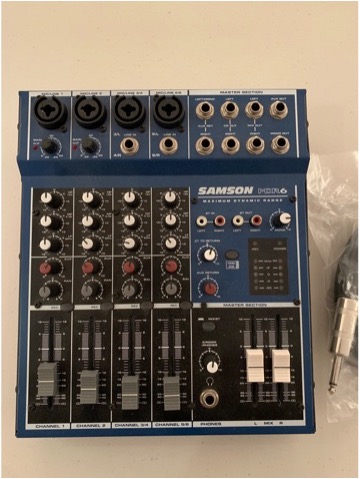
Audio mixer board or system with AUX output/headphone jack.
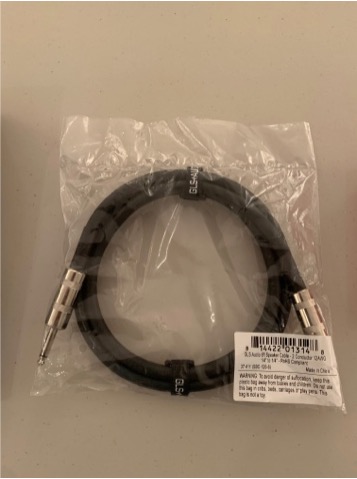
Speaker cable compatible with available output port on audio mixer and ending in a ¼-inch male connector (for example: a ¼” to ¼” cable: see on Amazon.
Note: we suggest sourcing this cable from your AV supplier as they will be able to provide the correct cable for their equipment.
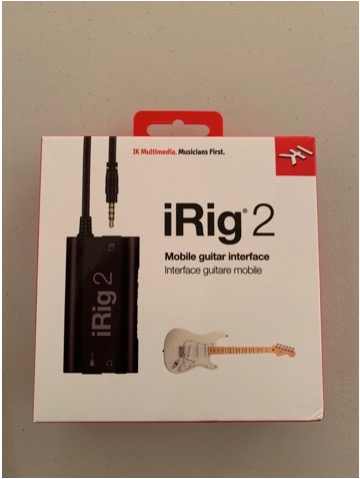
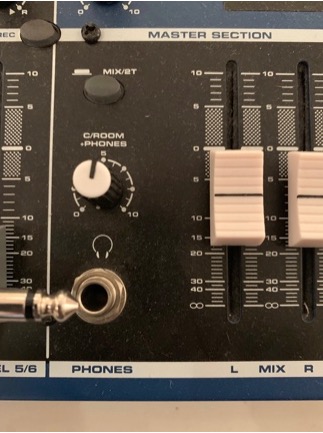
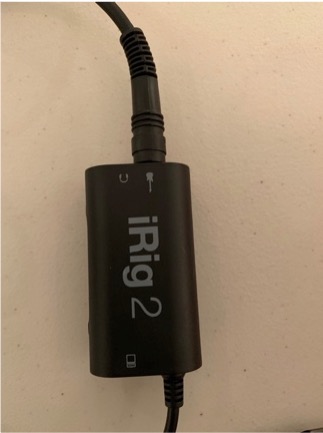
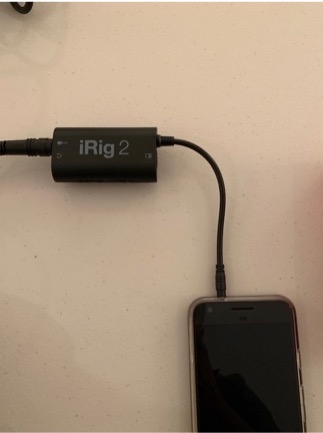
(see pictures below)
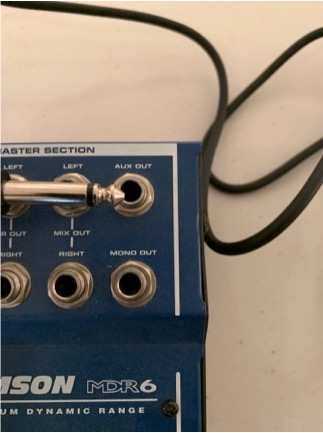
Alternately, if an audio output port is not available, connect to a headset port on the audio mixer board.
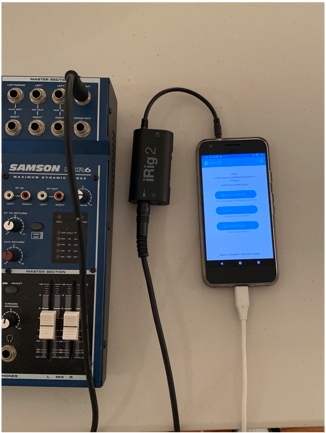
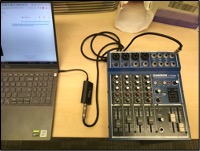
Make sure the Presenter Device is on.
Make sure the Presenter Device is not in screen saver or screenlock mode.
Ensure Presenter Device is connected to Internet.
On Presenter Device, ensure that the session has started.
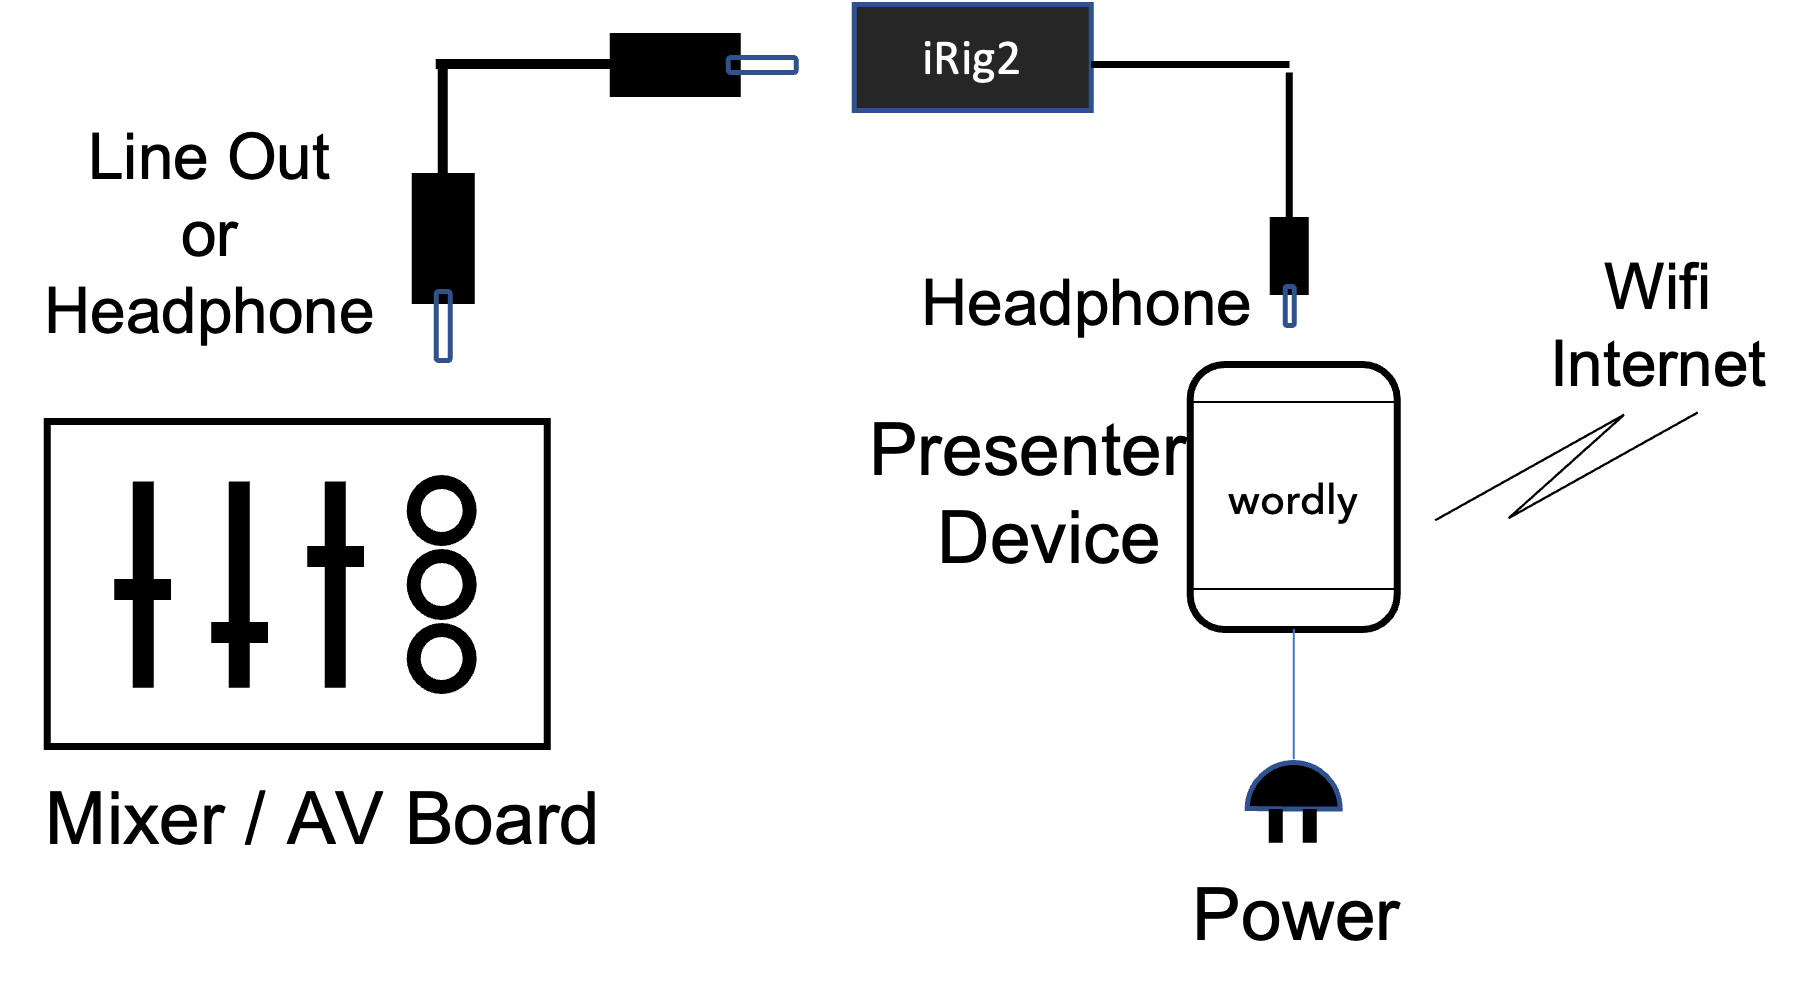
Make sure cables are plugged in properly (see wiring diagram).
Turn Gain on iRig 2 to maximum.
Ensure iRig 2 is set to “Thru”.
Adjust volume on audio mixer line out until presenter transcription is consistent and correct.
If Wordly session has Internet and is started, but you are unable to see text on Wordly, unplug iRig 2 from Presenter Device and speak directly into device.
If text is seen, then the issue is likely with the audio not reaching the audio output from the AV system. Replug iRig 2 into Presenter Device and try audio mixer line again.
If no text is seen, check that the Wordly application is allowed to use the microphone in privacy and security settings of the Presenter Device.
On attendee device, select END to leave the session.
Enter code to rejoin session.
Standard Zoom audio changes the way speakers sound in an attempt to improve audio quality. Unfortunately, this introduces distortions in the speech pattern of spoken audio, which can degrade the quality of Wordly’s translation.
It’s possible to restore the original quality of Zoom’s audio by following the steps below. Wordly translations will be significantly better in all languages when “Original Sound” is used:
Run Zoom.
Start a Zoom meeting or join an existing one.
Once you’re in the meeting, click the up arrow next to the Mute button in the bottom-left corner:

Click Audio Settings…

This will open the Zoom Audio Settings window:
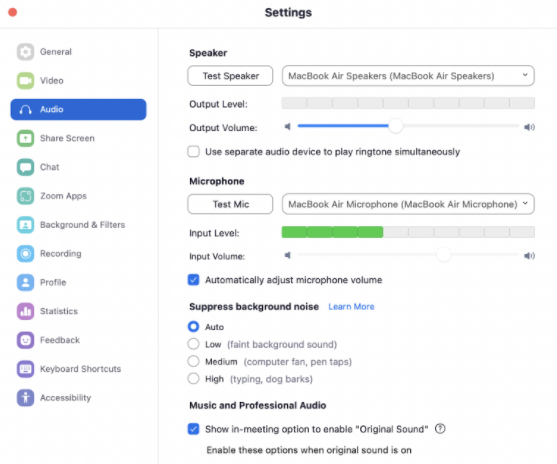
Under Music and Professional Audio, check the following boxes:
Uncheck all other options within Music and Professional Audio, as seen below:
Close the Settings window, and Leave the current Zoom meeting.
Rejoin the meeting you were in, or start a new one. In the top-left corner of the meeting window you’ll see the following:

Click on Original Sound: Off (and not the arrow). It will change to the following:

You are now using Zoom’s Original Sound setting. To deactivate original sound or change your audio options, return to Zoom’s Audio Settings screen.
Wordly can be used to create real-time translation of your services in your place of worship. This article will explain how to create a session; run a session in person; use Meeting Shortcuts, QR codes, Wordly Display; and use Glossaries.
This guide assumes you have a Wordly account. If you do not have a Wordly account, please contact contact@wordly.ai to speak with a sales representative.
To use Wordly, first you must log into https://portal.wordly.ai and create a Session.
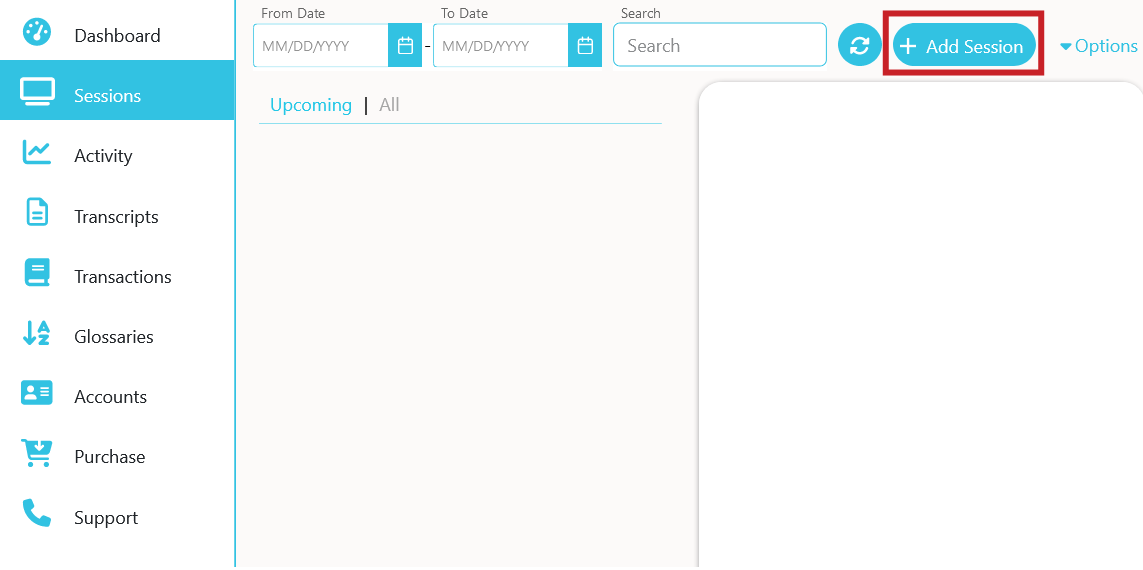
On the left hand side of your Wordly Dashboard, click on Sessions .
There, click on + Add Session.
In the Add Session dialog box, complete any fields relevant to you. (Zoom and Label are optional, Glossary can be updated later, and Start date/time will not limit you in any way.)
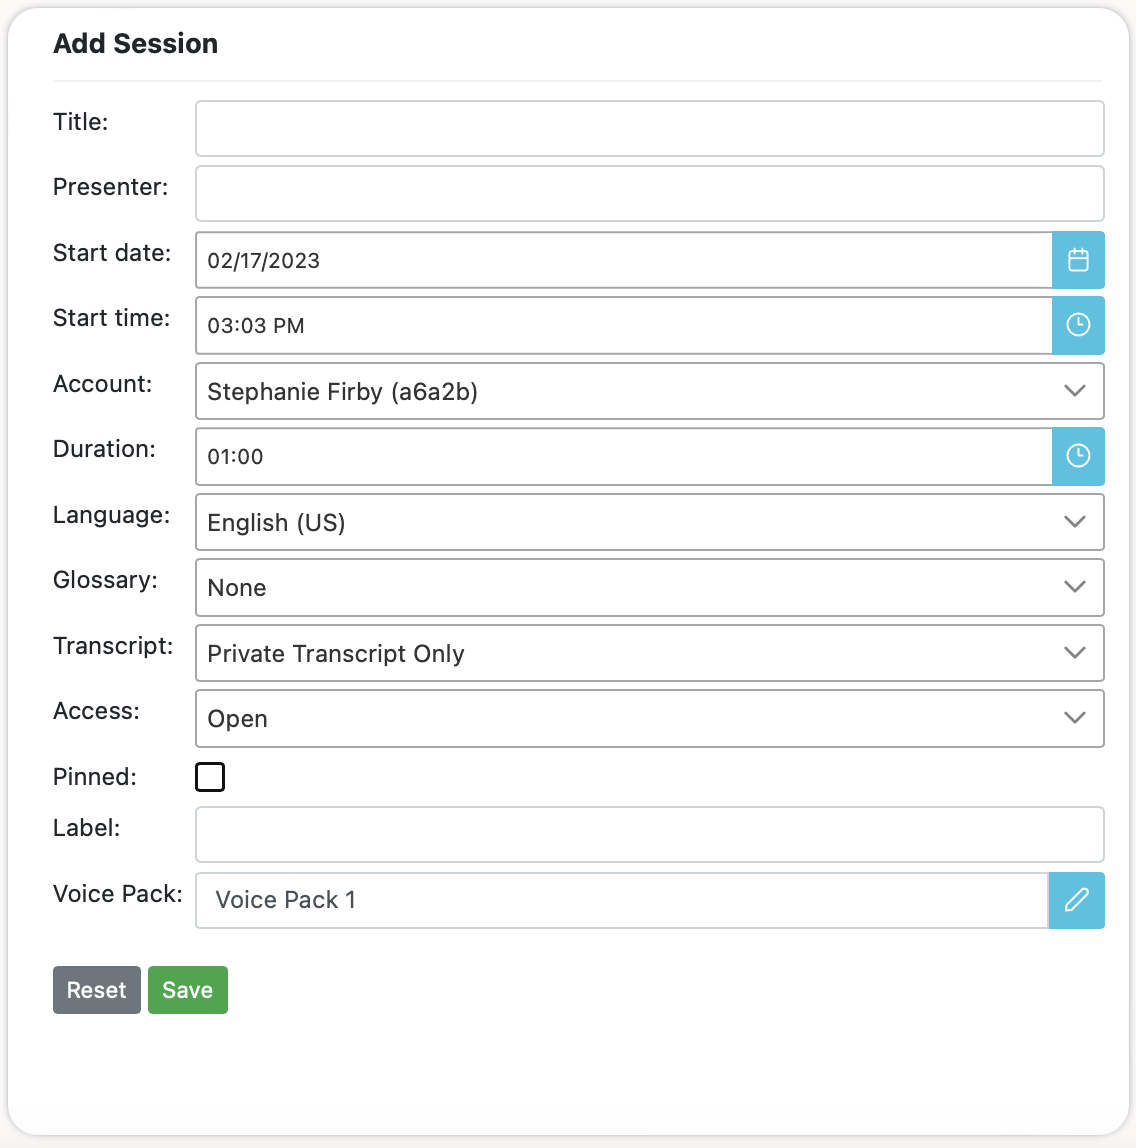
Note: The language that you set here is the language you are speaking/that will be spoken. Later, attendees will be able to select the language in which they view the session.
Click “Save” and the session will now appear on your Sessions dashboard. For further information, see Adding a Session.
To run your Wordly Session, the first thing to do is set up your place of worship for audio capture and translations.
There are two options for setting up your room.
Both will require at least one presenter device and internet connectivity. The difference between the two setups is in the audio input. Option 1 uses a mixer board, which is more common; this offers better sound quality, which in turn leads to better translations. Use Option 2 if you do not have a mixer board in your place of worship.
Option 1: using an audio mixer board to connect a microphone, speakers, and Wordly.
Presenter Device: laptop computer, Android (6.0 or later), or iOS (11.0 or later) device with WiFi connectivity.
Note: This device is referred to as Presenter Device. This is the device used to run Wordly to translate the presenter(s)’ speech.
Internet connectivity for attendees to connect to session(s) from their personal devices.
Audio mixer board or system with AUX output/headphone jack.

Speaker cable compatible with available output port on audio mixer and ending in a ¼-inch male connector (for example: a ¼” to ¼” cable: see on Amazon.
Note: we suggest sourcing this cable from your AV supplier as they will be able to provide the correct cable for their equipment.


Option 2: connecting your microphone to Wordly without an audio mixer board.
Presenter Device: Laptop computer, Android (6.0 or later), or iOS (11.0 or later) device with WiFi connectivity.
Note: This device is referred to as Presenter Device. This is the device used to run Wordly to translate the presenter(s)’ speech.
Internet connectivity for attendees to connect to session(s) from their personal devices.
Microphone Wordly needs audio input to reduce the likelihood of background noise interfering with Wordly’s translations. We recommend a simple, wireless lapel microphone. While you can use a phone or laptop’s built-in microphone, this can be awkward to handle and pick up too much background noise.
If there will be talking back and forth in different languages, you may want to set up two or more Presenter Devices and microphones, one for each speaker, each set to the speaker’s language. This way the mic will not have to be passed back and forth.
Note: This could also work if you have people responding or asking questions in a different language.
For more about in-room set up, please see In-Person Session Setup.
The Meeting Shortcut is your source for audio input into Wordly. It should not be used for people who will only be attending. Provide attendees the attendee shortcut link (for example, through the QR code).
Above, in Room Setup, we described the equipment configuration.
To find the Meeting Shortcut, navigate to Sessions () in your Wordly dashboard. Select your desired session, and click Meeting Shortcuts below Attendee Shortcuts.
Use the first URL under Meeting Shortcuts to join the Wordly session. This URL will end in “key=” and a six digit number unique to your session. Be sure to click “allow” when your browser asks for access to your microphone.
In the language dropbox (shown next to the microphone icon), select the language you will be speaking. This is both your input language Wordly is listening for and the language Wordly will show you if someone else is speaking into your session.
Attendees will be able to follow along in whatever language they have specified regardless of your settings.

Note: Wordly works best when enunciating clearly and using full sentences. You can use Glossaries to allow Wordly’s speech recognition to include unique terminology.
Meeting Shortcuts also allows the user to switch quickly between two languages being spoken. Pressing the down arrow to the right of the End Session icon ( ) will bring up talk/listen.

The language selected in “talk/listen” should be the language you are speaking in. It will also be the language Wordly will translate into. The language selected in “paused” is, essentially, waiting in the wings. Wordly’s real-time translation will not appear in that language until you click the switch button (the icon of arrows pointing in opposite directions).
Once clicked, the language in “paused” will become the “talk/listen” language and the previous “talk/listen” language will be paused. You can switch back and forth as needed.
To select your microphone in a session, you will need to go to settings.
First, click the vertical ellipses in the upper righthand corner.

Click on Settings to open the dialog box.
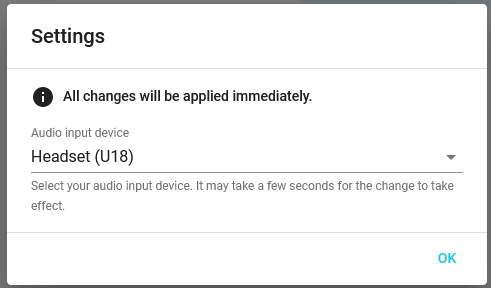
From there, you can click the dropdown menu to select your audio input device (microphone/headset).
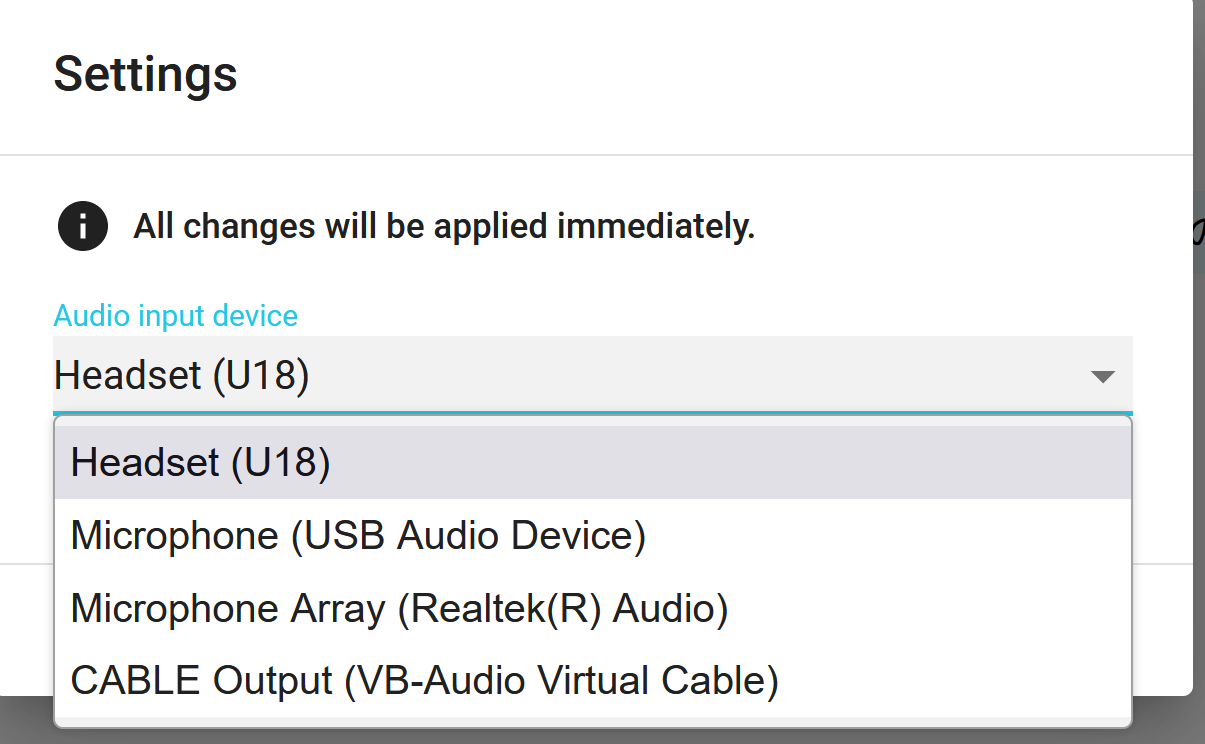
Click “OK” to close the dialog box.
Glossaries allow you to refine and customize Wordly’s speech recognition to include your organization’s unique terminology, such as the special phrases or names of products, people, and departments. Glossaries are custom libraries that significantly increase the accuracy of transcription results. Without a glossary for reference, Wordly may be unable to accurately transcribe unique phrases, words, and terminology.
Note: Because places of worship often use names, places, or other terms uncommon in the wider language, Wordly recommends using Glossaries to ensure accurate transcription.
Glossaries support boosting certain phrases (making it more likely for Wordly to use this word over another when translating), blocking words/phrases (for example, inappropriate words), and replacing words (this can ensure proper spelling or prevent a term from being translated).
For detailed instructions on creating and using Glossaries, please see Adding Glossaries.
Wordly has prepared a supplemental list of Boost terms for churches.
There are two options to allow worshippers to attend your Wordly session.
QR Codes are a quick and easy way to share your Wordly session. Attendees simply scan the code with their mobile devices and select the language they wish to translate your words into.
Find your sessions’ QR code by clicking on the session in your Sessions dashboard. The QR code will be under Attendee Shortcuts. From there you can download the code to email to your assemblage or print out.
Note: You may use the same session and corresponding QR code as often as you want regardless of start date/time.
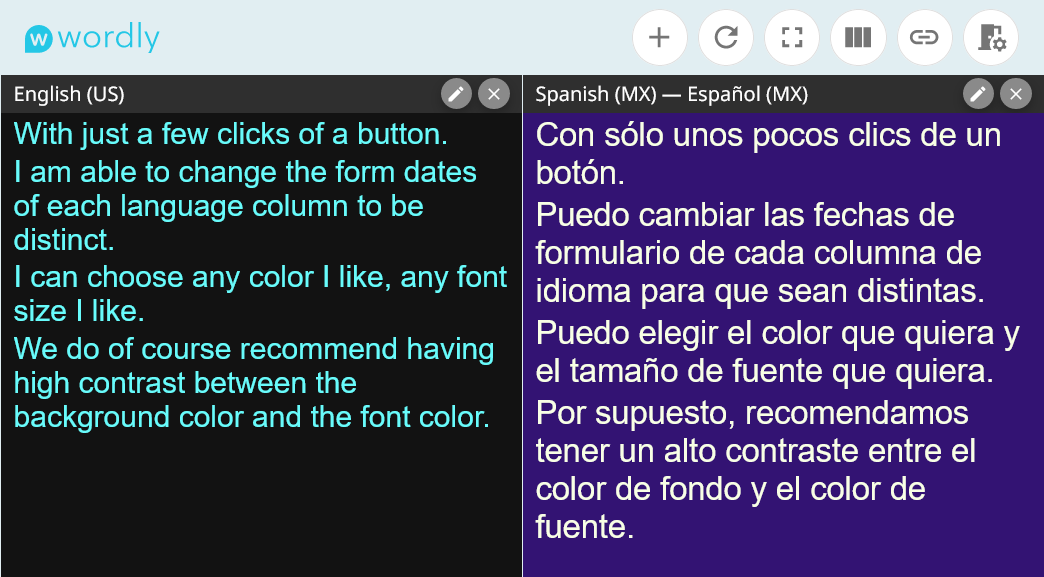
With Wordly Display you can project your transcription/translation onto a monitor or screen in the room. Wordly Display can accommodate multiple translations at once, and the text/background colors and font size are customizeable to your needs.
Go to https://display.wordly.ai.
Insert your eight-character Session ID (and type passcode/adjust frame margins under More Options).
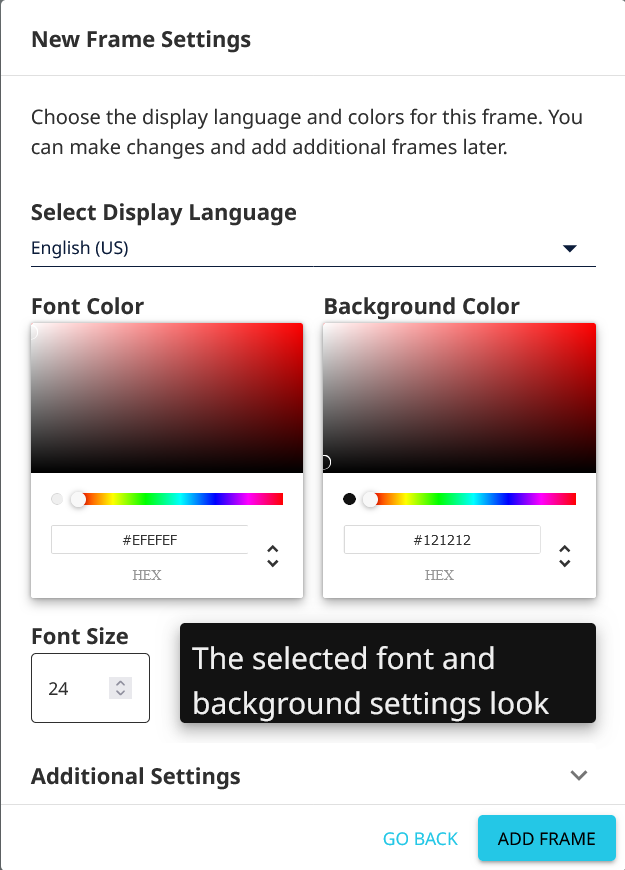
Click “Next” to enter your display settings (these can be changed later).
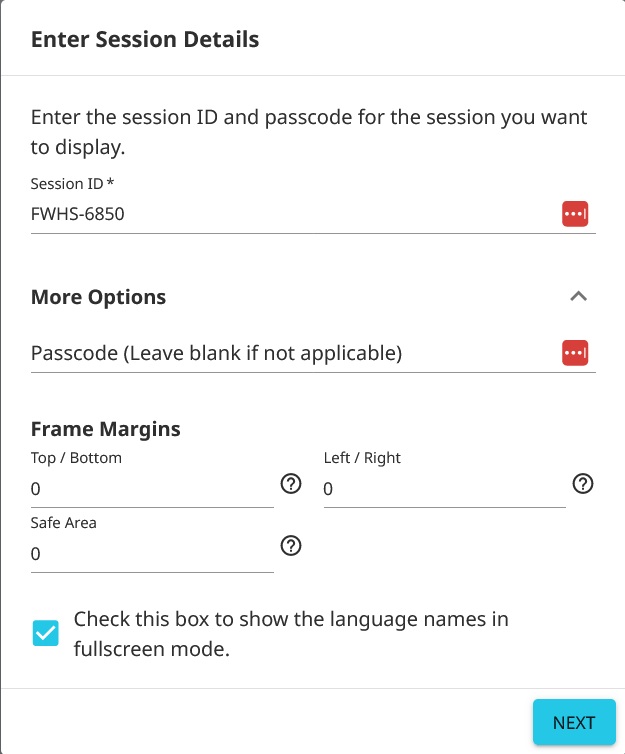
Once you have customized your settings, click “Add Frame” to enter Wordly Display.
In Wordly Display, you can add additional frames as well as change each frame’s appearance. For further guidance, please see Displaying Wordly On a Monitor.
Wordly does not start on its own, and it does not end on its own.
When you are done presenting, press the exit button ( ). From there, click “End Session” instead of “Leave Session”.
“Leave Session” will leave the session open, making it appear to attendees as if the session is still ongoing. “End Session” will notify attendees that the session has ended and ensure minutes will no longer be charged. Remember you may reopen the same session, QR codes, and links repeatedly after ending.
Ending your Session also generates a transcript that may be viewed and downloaded in the Transcripts section of your Wordly dashboard. For more information on transcripts, please see Accessing Transcripts.
To get the most our of your Wordly experience, mind the following:
Wordly can seemlessly integrate with a Google Meet meeting using Wordly’s Meeting Bot feature. Wordly Meeting Bot is compatible with Google Meet, Teams, and Zoom.
To use Wordly with Google Meet, you’ll need the following:
Create a session on the Wordly Portal or use an existing session. If you’re unsure on how to create a session, check out the Adding a Session article first.
Once your Google Meet call has begun, follow these steps to invite the Meeting Bot to your meeting. Keep in mind, the Meeting Bot will try to join for 10 minutes before giving up, so it’s best to invite the bot when the meeting has begun or just before it starts.
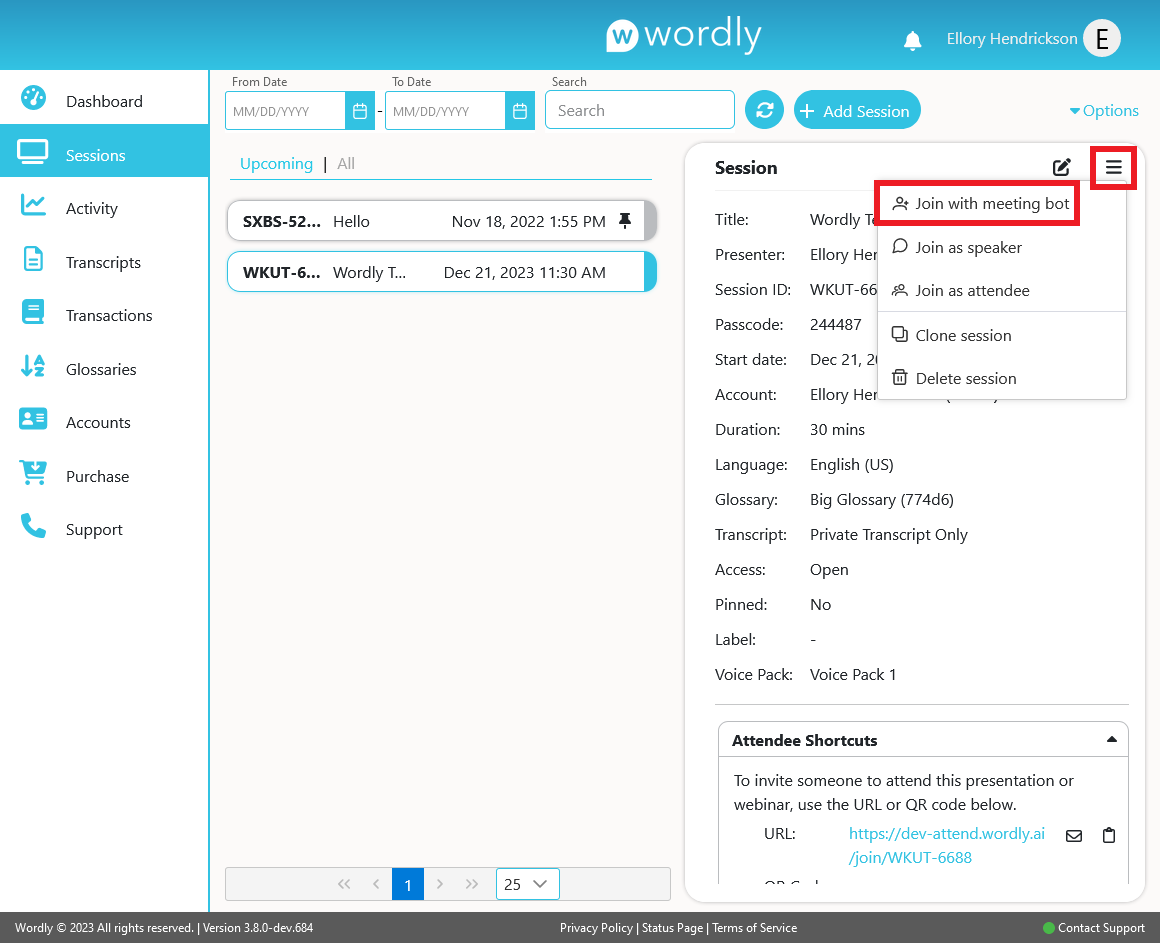
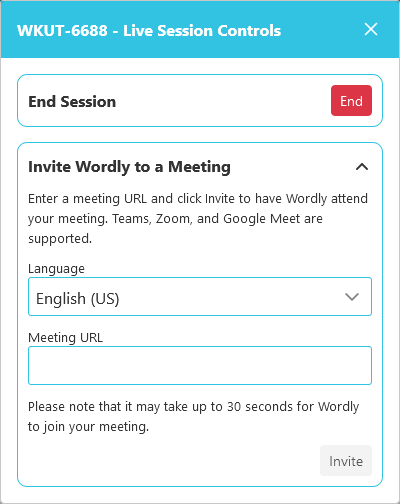
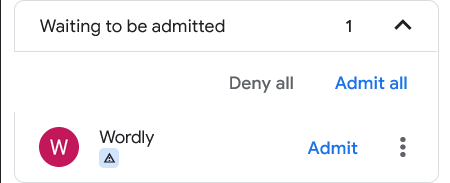
When the virtual meeting starts, the meeting organizer may need to allow Wordly to join.

-Find Wordly waiting to join in the lobby, and select Admit to allow Wordly into the meeting.
To access the Attendee Shortcut link and view the live transcript, follow the Attending a Session article.
To support multilingual speaking, you will need to manually change the speaker language. Please follow the steps below:
Return to your Wordly account page. Go to Sessions and select the gear icon next to your desired session.
A pop-up window (the same one used to invite the Meeting Bot) titled with the Session ID and “Live Session Controls” will appear with two options: End Session and Active Meeeting Bot.
Under Active Meeting Bot, there will be the option to select the language of the speaker. Selecting a new language immediately changes the speaker language. For each new language selected, a blue button of the previous selected language will appear underneath the language dropdown menu. Click the buttons to switch back and forth between speaker languages. The current speaker language is always the one selected in the dropdown menu.
Select as many languages as needed. If the X at the upper right of the popup is pressed, the window will close, but your selection will be saved.
When your Google Meet call ends, the Meeting Bot will leave the call.
You can remove the Wordly Meeting Bot from the meeting at any time by clicking the trash can beside it in the pop-up. The bot can be invited again, if needed.
Wordly can be seamlessly integrated into Webex to enable meeting and Webinar attendees to participate in the language of their choice. Follow the instructions below to integrate Wordly into your Webex platform.
This guide covers:
To use Wordly with Webex, you’ll need the following:
A Wordly account with available minutes.
A valid Webex account with administrator credentials. These are necessary to enable features on the Webex platform. (Contact your Webex administrator if you have any questions or need permissions on your Webex account).
Create a session on the Wordly Portal for the same time as your meeting/webinar. If you’re unsure how to create a session, check out the Adding a Session article first.
Sign in to your Webex account as an administrator.
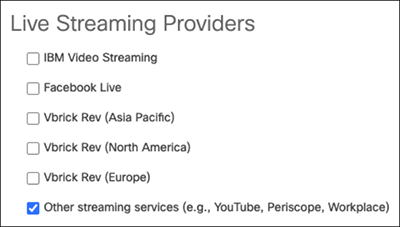
Navigate to Common Settings > Site Options > Live Streaming Providers and check the Other streaming services box:
Check out the section at the bottom of this Webex support article to learn how to enable live streaming for individual users.
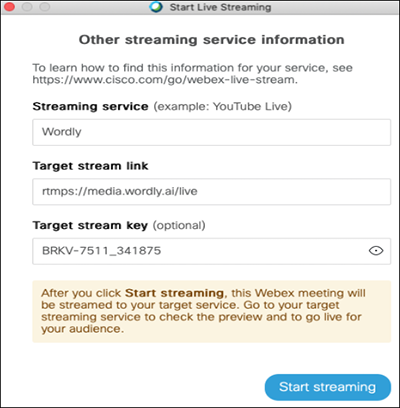
When you initiate Live Streaming in Webex, a window will appear asking for service information for “Other streaming services”. Enter the following info:
Click on Start streaming.
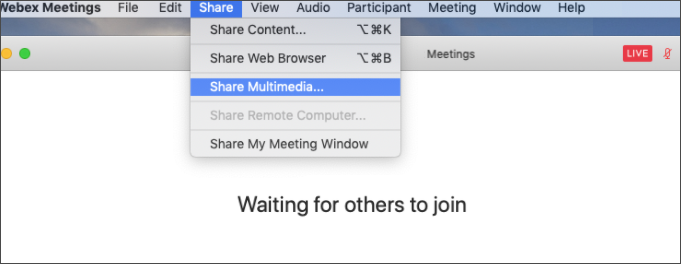
Select Share > Share Multimedia from the Webex menu:
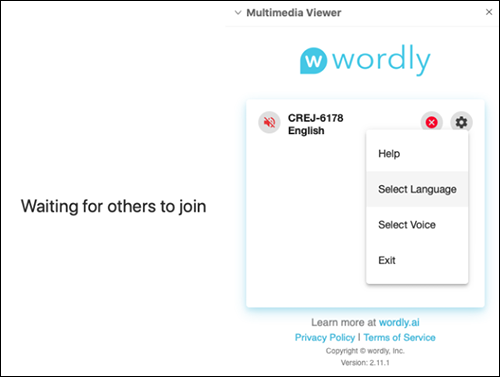
Enter the following URL to share : https://attend.wordly.ai/enter/SESSION-ID
The audience can now pick the language of the translation they see by clicking on gear button ( ) and selecting a language:
Follow the steps below if the audience wants to hear the translation in a specific language.
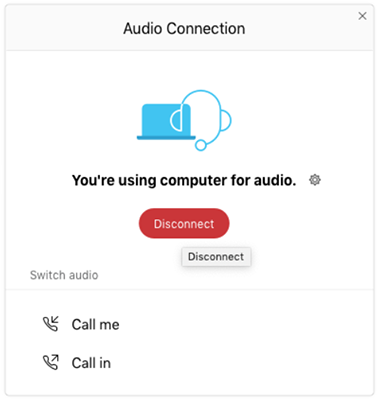
In Webex, click on Multimedia Viewer and select Audio Connection:
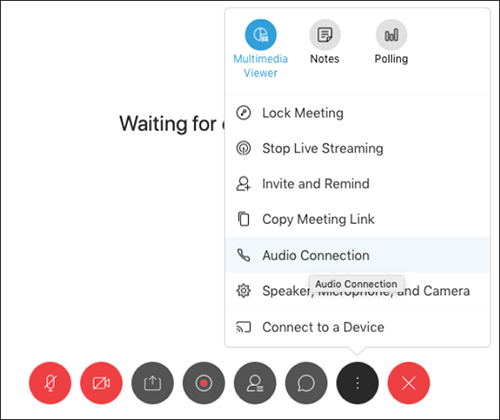
Click Disconnect:
Unmute the speaker icon on the Wordly multi-media window
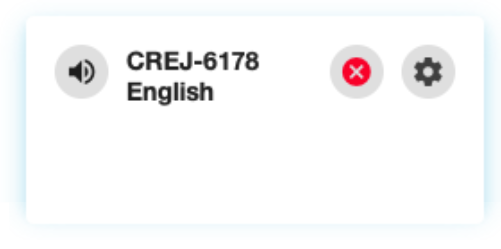
Users should now be able to hear the translated audio.
All meeting conversations should happen only in one language.
Translation quality will be significantly affected if people speak in a language other than what is selected by the host as the default language for the meeting.
There is an inherent delay between when a speaker completes a sentence and the sentence being correctly translated into another language.
Transcripts are only accessible to the host and in the default language the meeting is hosted in.
You may want to display your Wordly session on a separate monitor. For example, attendees can view captions on a monitor if they don’t have a device to use.
Go to Wordly Display.
Enter Session Details.
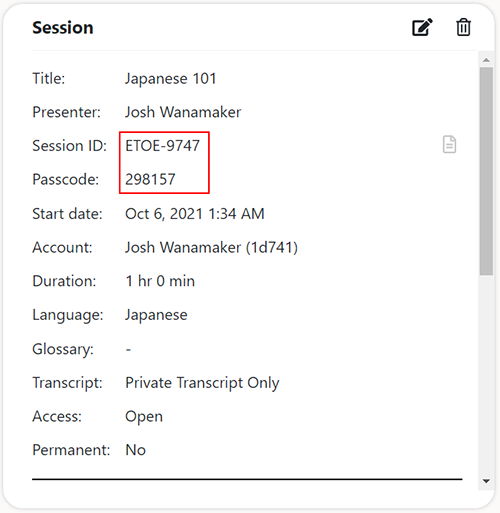
Locate your Session ID by navigating to the desired Session in your Wordly account. The Session ID will be the four letters and four numbers left of the Session Title. The Session ID is also identified in the session details, revealed when clicking on the session. The Session ID is below the Presenter and above the Passcode.


In New Frame Settings, you can:
After you add the frame, you can view Wordly Display. On the upper right of Wordly Display, the following options display:

You can do the following:
Select the monitor button  to change the margins of the frame and the border color around and between frames.
Select the plus button  to add another language frame.
When you press the button, the Frame Settings window will open to select which language you want and format the new frame.
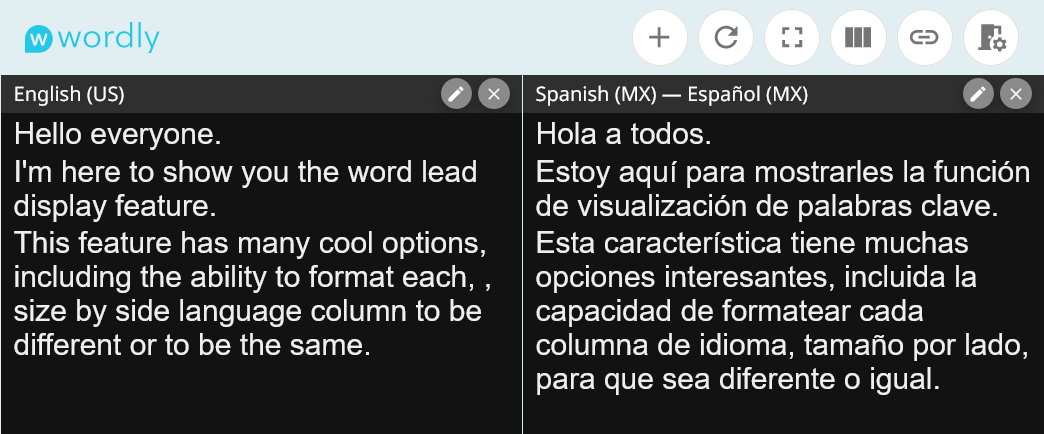
When displaying multiple languages, you may want to format the frames of each translation separately. In this case, go to your Wordly Display page and select the Edit Frame button on the top right of a displayed translation.
This will pull up the Edit Frame Settings screen. Much like the New Frame screen, you can change font color, background color, and font size.
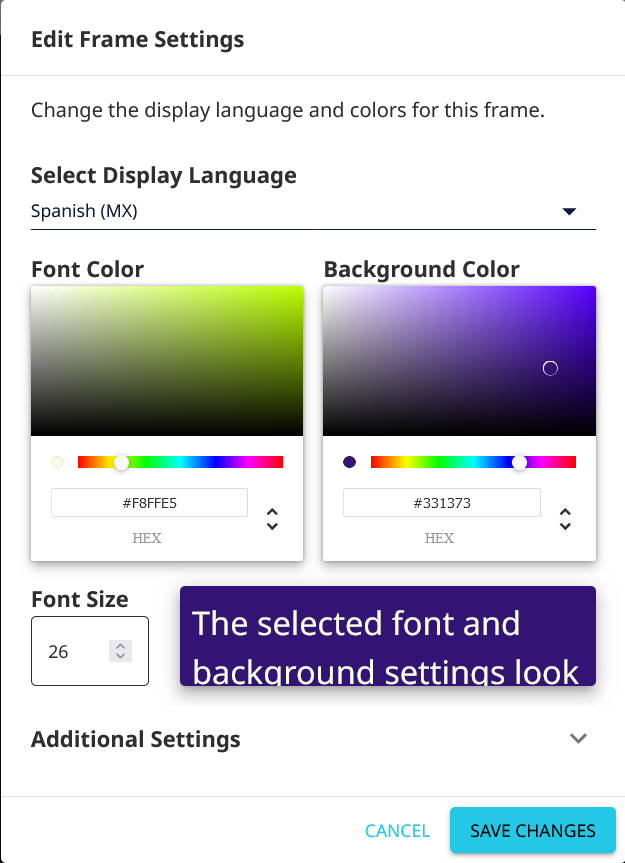
Even as you adjust your settings to distinguish each frame. We recommend maintaining high contrast between the font and background colors.

Next to the Edit Frame button is an X button that allows you to close a frame.
The circle arrow button  after the Add Frame Button will clear all text from the current frames.
To enter full screen mode, select the box button  . This will hide the Wordly Display controls.
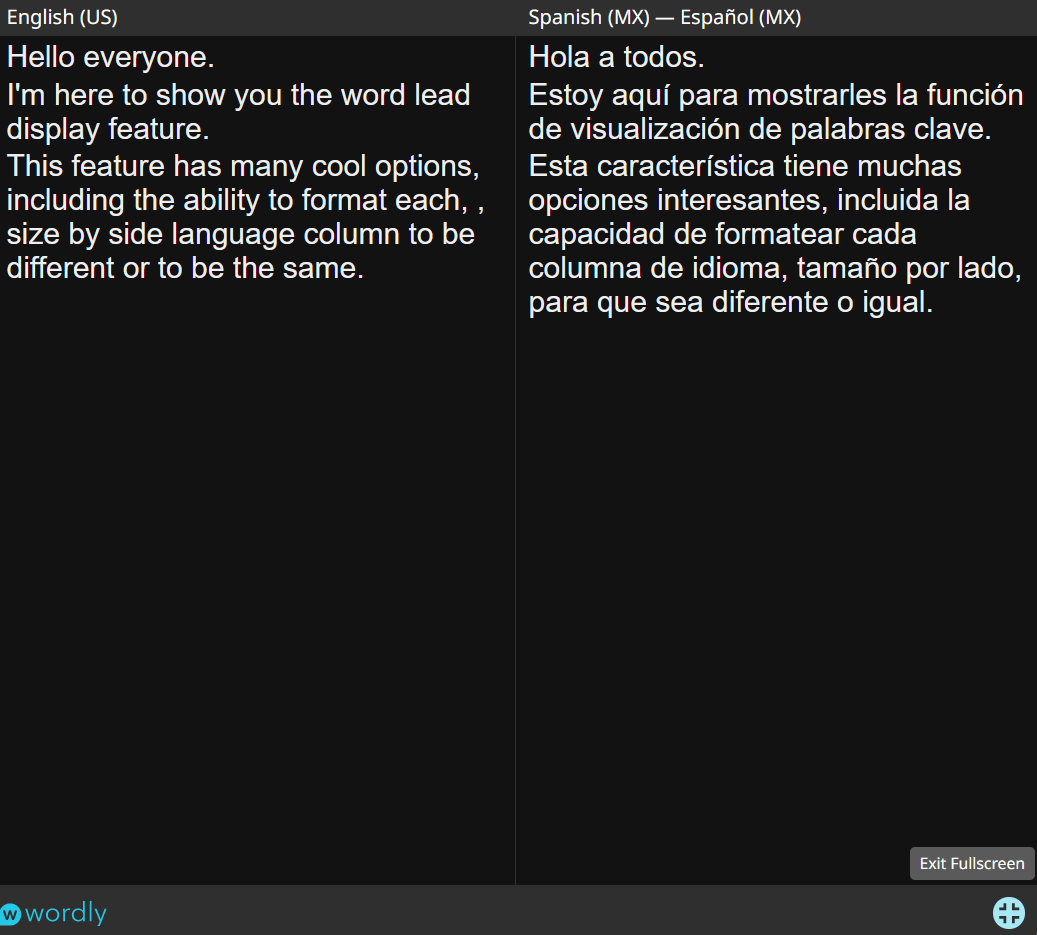
However, this button will not hide your browser’s controls. In your browser, go to View -> Enter Full Screen Mode to display just the session translation(s).
To change the translation frames from stacked vertically to stacked horizontally and vice versa, press the three-bars button  .
.
Above we have shown examples of vertical oriented frames. Horizontal orientation looks like this:
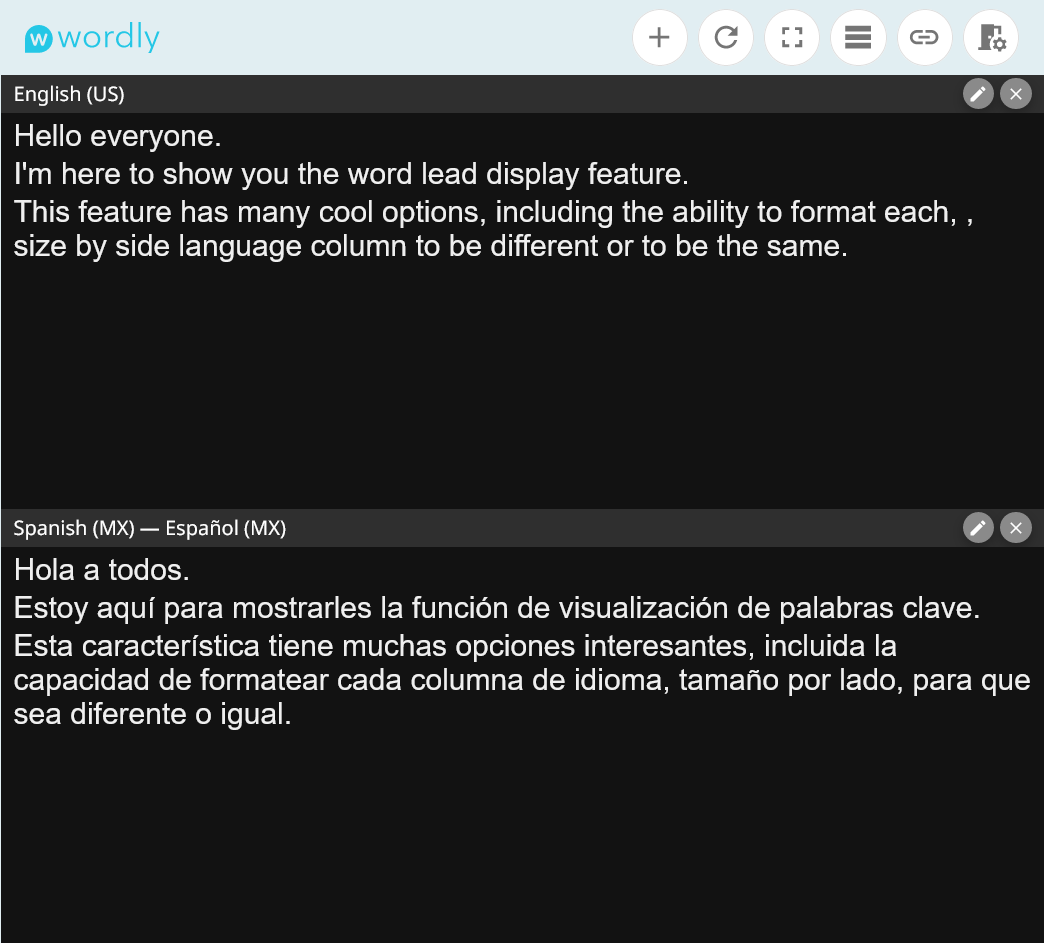
The copy link button  creates a link that saves your frame format choices.
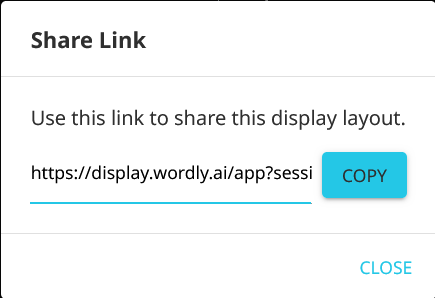
After using the link, you can enter any session ID, and automatically get all the frame formatting you had when creating the link.
The last button on the upper right, an open door icon  , will allow you to switch displayed sessions by entering a new session ID.

To close Wordly Display, just close the browser window.